
- Converting images into a PDF allows easy sharing, enhanced compatibility, and seamless collaboration.
- The Print option, Files App, Apple Books App, and creating a shortcut are the best ways to turn a photo into a PDF on an iPhone without an app.
- You can also go for image-to-PDF converter apps and websites to save your pictures as portable document files.
There can be instances when you want to turn a photo into a PDF on an iPhone or iPad. Maybe you want to save some important images as a single file for paperwork. Or you may want to annotate and collaborate on your documents saved as images. Whatever the reason, it’s pretty easy to turn pictures into a PDF on an iPhone. In this article, we’ll show you 6 ways to convert photos to PDF on iPhone and iPad. No matter if you wish to turn a single image into a portable document or convert multiple pictures into a single PDF on an iPhone, the below methods will meet your requirements.
Method 1. Using Print Option
The built-in Print option in the Photos app is one of the easiest ways to convert photos to PDF on an iPhone without an app. It converts photos into PDFs on your iPhone and iPad, before sending them to the printer. Therefore, you can utilize this option to instantly turn multiple pictures into a PDF on an iPhone. Here are the steps to do it:
- Open the Photos app on your device and select the image you want to convert to a PDF document.
- Tap on the Share button at the bottom left corner and choose Print in the share sheet.


- Now, pinch out (using your fingers) the photo preview to turn the image into a PDF file. Yes, it’s that easy!
- Once the image has been converted, you can tap on the Share button and share it via iMessage, save it to your iCloud or iPhone, or even transfer it to another app depending on your needs.

Method 2: Using Files App
Apple Files app offers a handy way to turn an image into a PDF document with ease. That said, there’s a catch. You can go for this method as long as the required photos are saved in the Files app. That’s because you can’t access your Photos library via the Files app.
You can easily access all your downloaded images, iPhone screenshots, downloaded images, iCloud photos, and other images you’ve directly saved to the Files app. In case you wish to create a PDF using a photo from the Photo library, you first need to copy images from Photos to the Files app. We’ve mentioned the complete steps below:
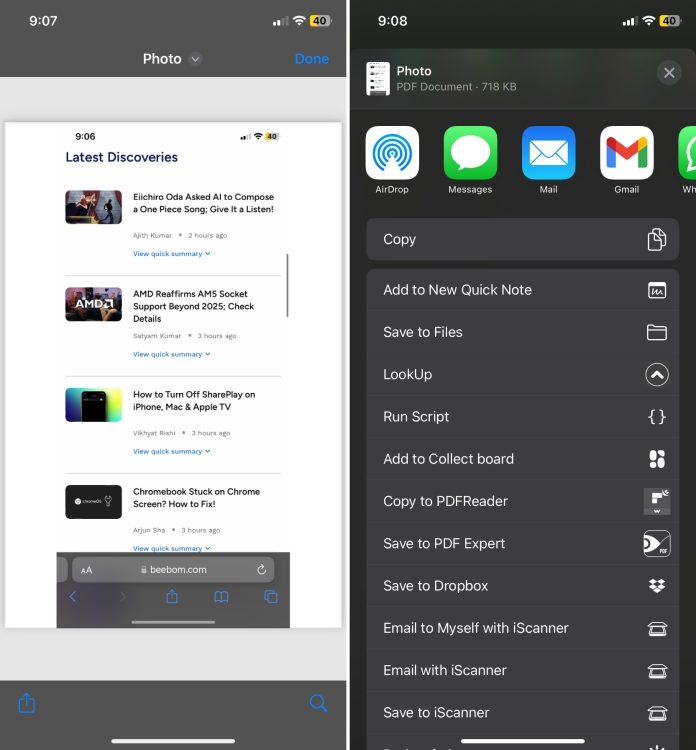
- Open the Photos app on your iPhone or iPad and head over to the image you want to convert into a PDF file. Now, select an image and hit the Share button at the bottom left corner. If you want to turn multiple images into a portable document format, tap on Select from the top-right and choose the images.
- In the share sheet, choose the ‘Save to Files’ option, select your preferred location, and hit the Save button.

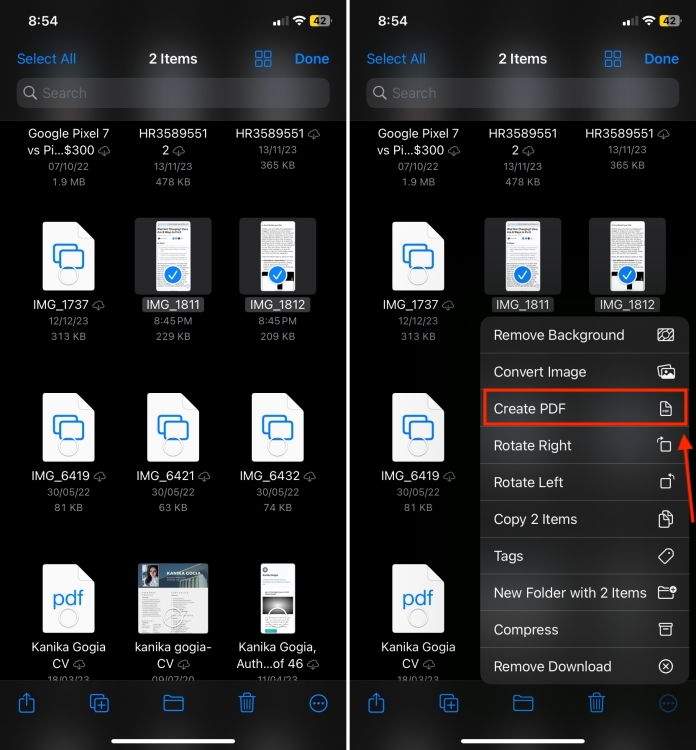
- Now that you have the desired images in the Files app, choose the image you want to turn into a PDF. If you wish to convert multiple images into PDFs at once, tap on the three-dot menu button at the top right. Then, choose Select and pick all the images you want to convert into a PDF file.
- Once you have selected the images, tap on the three-dot ‘More’ button at the bottom right corner of the screen.

- From the list, choose the Create PDF option in the context menu. The PDF will be saved at the same location in the Files app.
- If you wish to further edit or annotate your pictures, make sure to check out these best PDF editor apps.
Method 3: Using Apple Books App
Another way to turn any picture into a PDF file is to use the Apple Books app. The process is super quick and simple as you’ve to do nothing but save the images. When you copy your photos to the Books app, they are automatically saved as PDFs on your iPhone or iPad. Whether you want to turn a single picture into a PDF or save multiple photos as a single PDF file, the app works pretty great. Here’s how to go about it:
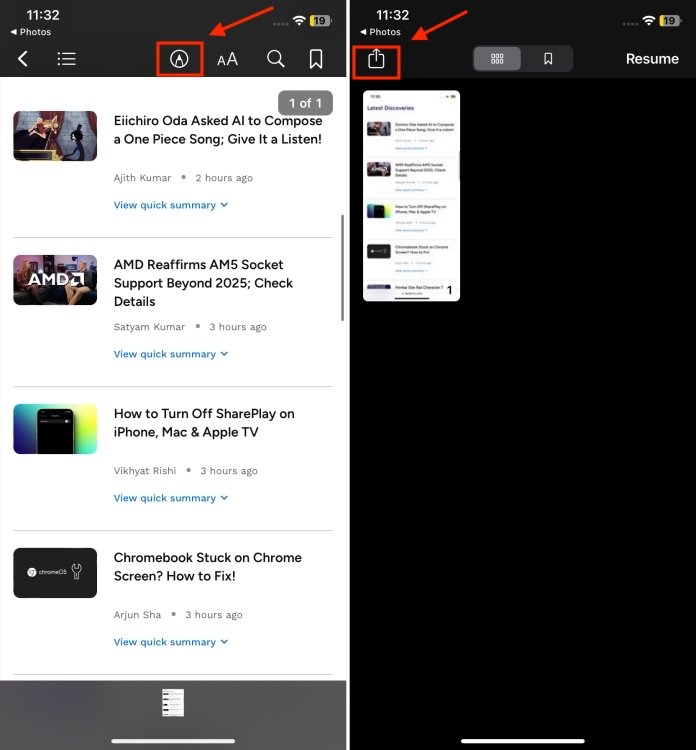
- Open the Photos app on your iPhone and select the image(s) you want to convert into a PDF.
- Now, tap on the Share button from the bottom-left of the screen and select the Books app.
- In case you don’t see the Books option, tap on the More button (three dots), swipe through the list, and choose Books.

- That’s it! The images will be converted into PDF files and automatically open in the Apple Books app. Dead simple, isn’t it?
- You can edit the PDF or share it via Messages, AirDrop, or the Mail app on your iPhone.
Method 4: Using Shortcuts App
If you often have to convert a picture into a PDF on your iPhone, I would recommend creating a shortcut. This will help you save a lot of time, just a few taps and you’re sorted. Creating iOS shortcuts may seem tedious at first, but trust me it’s pretty straightforward. Setting up the shortcut may take up a few minutes, but it saves you time in the future. Here’s how to save photos as a PDF on an iPhone using a shortcut:
- Open the Shortcuts app on your iOS device and tap on the “+” icon from the top-right.
- By default, the shortcut will be named as “New Shortcut 1”. I recommend renaming it so you can easily find it later on.
- To rename, tap on the small downward-facing arrow (next to the name), and hit the Rename option. Now, choose a preferred name. I have named it “Convert Photos to PDF”.

- Now, tap on the Add Action button.
- Type “photos” in the search bar and choose the Photos app. Then, tap on Select Photos.
- Tap on the small arrow next to Select Photos and turn on the Select Multiple toggle.

- Now, tap on the search bar at the bottom and tap on Categories.
- Next up, tap on Media, scroll through the list, and choose the Convert Image option.
- Now, tap on JPEG and select PDF from the list.

- Again tap on the search bar, then tap on Apps, and select Files. After this, choose the Save File option from the list and tap on Done from the top-right corner.

To run this shortcut, open the Shortcuts app and tap on the shortcut you’ve just created. This will immediately open the Photos app for you. Select the images you wish to save as PDF and tap on Add. Lastly, choose the location where you wish to save your PDF file and tap on Open.
Method 5: Using Third-Party Apps
Another way to make a photo a PDF on an iPhone is to use an app. In addition to the above options, a third-party image-to-PDF converter also offers an efficient way to turn photos into PDF files on iOS. After trying a few options, I’ve picked some free image-to-PDF converters on the App Store that can instantly turn images into PDF documents on iPhone and iPad. Let’s have a look:
- Photo to PDF Converter Scanner (Free)
- PDF Converter- Reader for PDF (Free)
- Photos PDF (Free, in-app purchases)
Method 6: Using Online Converters
If you don’t want to create any shortcuts or download any apps, you can use online converters on any browser. Several websites let you convert JPG images to PDF for free on iPhone. I recommend using Adobe Acrobat’s free image-to-PDF converter. It lets you turn JPG, PNG, GIF, and other files into PDF format without any cost.
That’s all from our side on how to convert photos into PDF files on iPhone and iPad. So you see, there are multiple other ways to get the task done with ease. You can go for the built-in options or even go for some handy third-party image-to-PDF converters that more than just fill up the void. Which is your favorite method to save photos as PDFs on an iOS device? We’d love to hear from you in the comments below.


