
While it could be too immature to pass the full verdict on Apple TV+ right now, Apple’s streaming service has the potential to take on the bigwigs like Netflix and Amazon Prime. With a massive install base, billions of cash-rich treasure, and high-quality movies and TV shows to boot, the service couldn’t have asked for a more solid base. Ever since the streaming service went live around a fortnight back, I have been playing around with it. And after exploring everything that the app has to offer, I thought it would be cool to jot down all the bag of tips and tricks for the Apple TV app. So, whether you haven’t yet gone hands-on with the app or are looking for ways to light up your binge-watching, these hacks could prove to be a gamechanger for you.
Best Tips & Tricks to Use Apple TV+ Like a Pro
Probably the best part about Apple TV+ is that you have a range of options to customize the preferences in line with your liking. For instance, you can choose the streaming quality, automatically download the shows added to your library and even wipe out all the redundant items without breaking any sweat. Thus, you can have a more personalized media watching experience. With that said, let’s find out what’s more the streaming service has in store for you!
1. Stream High-Quality Movies and Shows on Mobile Data
I get it. When you are dealing with limited bandwidth, it’s wise to save every ounce of data by turning off all the features that can gobble up a ton of data. But when you have the luxury of plenty of data, there is no harm in streaming high-quality shows and movies. To prevent your data from being drained out fast, Apple TV app streams lower quality content when your device is on mobile data. However, you have the freedom to watch high-quality content. To get it done, all you need to do is head over to Settings app > TV > iTunes Videos. Now, make sure the switch for Use Mobile Data for Playback is turned on. Then, tap on Mobile Data and choose Best Available.


2. Stream Low-Quality Content on WiFi on iOS and iPadOS
Well, I have saved this hack for the folks who are dealing with a limited internet plan even on WiFi. By default, Apple TV streams high-quality content when your device is connected to WiFi, which is apt as most people like to relish watching movies and shows in the best quality. But in situations where your WiFi plan is running a little tight, you wouldn’t mind watching low-quality movies, would you? To do so, navigate to Settings app > TV > iTunes Videos > WiFi and choose Good. Now, Apple TV+ will be forced to stream lower-quality content.

3. Choose Desired Streaming Quality on Mac
Unlike iOS 13, macOS Catalina offers you to choose from three streaming qualities: Best Available, Good, and Better. Considering Apple TV+ boasts the highest 4K streaming quality, it’s nice to watch them in their best form. But times when you can’t afford to let video streaming gobble up your limited internet plan, you may want to rein in the streaming quality. If you ever want to do so, head into the TV app on your Mac > click on TV menu > Preferences > Playback tab. Now, click on the drop-down menu before Streaming Quality and then choose the desired option.


4. Prevent Apple TV App from Influencing Recommendations Across Devices
Apple TV keeps a track of what sort of movies and shows you love to watch and offers recommendations accordingly. Thus, you can easily find out the type of content you enjoy watching most. To further enhance your experience, the app uses your play history to influence personal recommendations and up next suggestions across the synced devices. While this feature sounds great from a seamless experience point of you, some of you might want to disable it to safeguard the privacy of what you watch on a specific device. If you are one of them, disable this feature.
On your iOS or iPadOS Device: Go to Settings app > TV. Now, turn off the switch for Use Play History.


On Your Mac, open TV app. Now, click on the TV menu at the top left corner and choose Preferences. Now, make sure Playback is selected and then uncheck the box to the left of Use Viewing History. In the end, make sure to click on OK to finish.

5. Enable Restrictions for Movies and Shows
This trick could save the day for the folks who stream Apple TV content in the family environment and want to keep explicit content out of the sight of kids. Apple offers robust parental controls so that users can prevent obscene content from showing up in the app. Moreover, they can choose to allow movies and shows of a certain rating.
On your iPhone or iPad, open Settings app > Screen Time (make sure it’s on) > Content & Privacy Restrictions. Now, turn on the switch for Content & Privacy Restrictions and then tap on Content Restrictions. Under Allow Store Content, tap on Films/TV Programmes and choose the preferred rating.
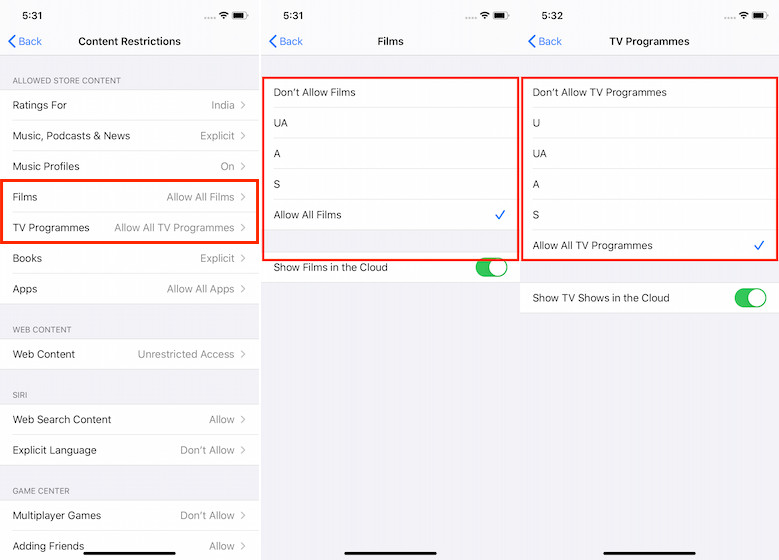
To restrict Apple TV content on your Mac, open the TV app. Then, click on the TV menu and choose Preferences > Restrictions tab. Then, fine-tune everything in line with your needs. While you are at it also check out our article on setting full parental controls in macOS Catalina.


6. Automatically Download the Content Added to Your Library
Whenever I come across exciting movies or intriguing shows, I like to add it immediately to my personal library to catch up with them at my own pace. So, I’m glad to have this feature as it enables me to automatically download my favorites. If you also want all of your top picks to be available for offline viewing, this little nifty hack would amp up your video-streaming. To enable this option, launch the TV app > Preferences > Automatic Downloads and check the boxes for Movies and Shows respectively. In the end, click on OK to finish.


7. Always Check for Available Downloads
Just like other streaming services like Netflix, Apple TV+ also offers you the option to download your favorite shows and movies for offline viewing. What’s more, you can also configure the app to check for the available downloads. To get it done, open the TV app on your Mac > click on the TV menu at the top left of the screen and select Preferences. Now, make sure the General tab is selected. After that, check the box for “Always check for available downloads.” Be sure to click on OK to confirm the action.


Note: As of now, there is no option to download content from the Apple TV app on Apple TV, supported smart TVs, streaming devices, and tv.apple.com.
8. Automatically Delete Watched Content from Your Mac
Once you have watched all of your favorite flicks and TV shows, it’s apt to wipe them out. Else, they will eat into a lot of space on your device. And the best way to clean up all the watched content is enabling the automatic deletion. This way, you won’t have to worry about removing the already watched content manually. To do it, open the TV app on your Mac> click on TV menu > Preferences. Next, make sure that the Files tab is selected. Then, check the box for Automatically delete watched movies and TV shows. In the end, make sure to click on OK to confirm.


Note: To delete any item manually on your Mac, open TV app > Library. Now, hover your pointer over the particular item and click on the More (…) button. Finally, click on Remove Download to get rid of the specific item.
9. Wipe Out Redundant Items in TV App from Your iPhone or iPad
Unlike TV app for macOS, the iOS or iPadOS counterpart doesn’t offer a way to delete useless items automatically (as far as I can tell). However, there is an upfront way to wipe out unnecessary items manually. To do so, open the Apple TV app on your iPhone or iPad. Now, tap on Library and head over to the Downloaded section. Next, swipe left on an item and hit Delete. Then, tap on Delete Download to finish.


Note: You can also delete Apple TV content from the Settings app on your iPhone or iPad. To do so, open Settings app > General > iPhone/iPad Storage. Now, scroll down to TV and tap on it. Then, tap on Review Apple TV Downloads. Next, swipe left on an item you want to remove and hit Delete.
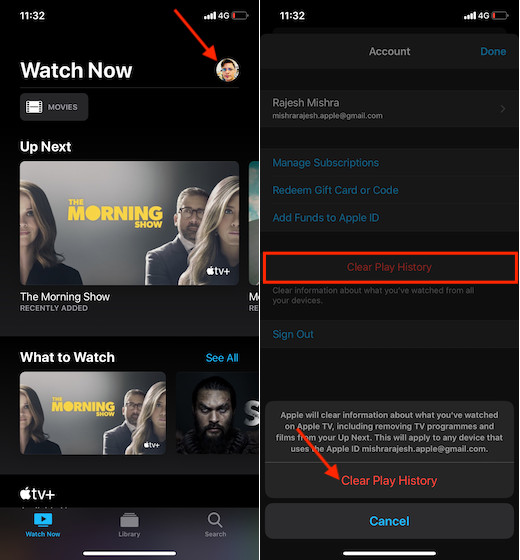
10. Clear Your Play History
From time to time, I like to clean up the play history for a couple of main reasons. First and foremost, it helps me protect the privacy of what sort of content I watch. And second, it also plays a good role in keeping the app clutter-free. If you also belong to the same boat, be sure to get rid of the play history.
On the iPhone or iPad: Open TV app > Profile picture. Now, tap on Clear Play History. Next, a popup menu will appear from the bottom saying, “Apple will clear information about what you have watched on Apple TV, including removing TV programs and films from your UP Next, And it will apply to any device that uses the Apple ID.” Tap on Clear Play History again to confirm.
On your Mac: Open TV app > TV menu > Preferences. Now, choose the Advanced tab and click on Clear Play History. Click on Clear Play History again in the popup to give your confirmation.


11. Stop Apple TV from Showing Sports Scores
Sports fans like to keep a track of the latest scores to stay in the loop. That’s why Apple TV shows the sports scores to keep users updated about what’s happening in their favorite games. But what if you aren’t a fan of sports and find those scores unnecessary, wouldn’t you want to prevent the app from showing them? Most probably, you would. Luckily the app offers you the option to disable this feature. Head over to the Settings app on your iPhone > TV. Now, turn off the switch for Show Sports Scores.

12. Show Tickboxes in Library
This little hack will let you show tickboxes in the library. In case you are unaware of this feature, let me tell you that only the ticked items will be automatically synced across your devices. To use this nifty little feature, open the Apple TV app on your Mac > click on the TV menu and select Preferences. Now, make sure the General tab is selected. Then, check the box for “Tickboxes in Library. Click on OK to finish.


Bonus: Keep Video Playback on Top of All Other Windows
Personally, I like to keep video playback on top of all other open windows as I find it a tad convenience to access the video playback. By default, this option is disabled. But, you can easily turn it on. To do so, launch the TV app on your Mac > TV menu > Preferences. Now, be sure the Advanced tab is selected. Then, check the box for “Keep video playback on top of all other windows.” Do click on OK to confirm.


Best Tips and Tricks to Use Apple TV+ Like a Pro
With these cool hacks at the disposal, you can get the most out of the streaming service. So, never fail to try them out to enhance your media watching experience. But before kickstarting the show, let us know if we have missed out on any Apple TV+ hacks. Moreover, it would also be cool if you could spill some beans about where Apple’s offering seems to be placed in comparison with Netflix and other streaming services.


