
Apple has put more emphasis on improving Accessibility in iOS 14. While the introduction of “Headphone Audio Customization” and “Back Tap” has added new functionalities to the already feature-rich suite, the redesigned magnifier has made the utility more helpful. For a change, the digital magnifying glass is no longer buried deep into the Settings. Now, you can use the redesigned magnifier on your iPhone/iPad in iOS 14 or iPadOS 14 right from the home screen just like any other app. Sounds interesting, right? Let me help you get started!
Use the Redesigned Magnifier on iPhone and iPad
Times when the eyes fail to discern tiny printed text, an always-on and quickly accessible magnifier becomes a lifesaver. With the revamped Magnifier promising to be more practical and user-friendly, I don’t think too many people may still want to carry a physical magnifying glass.
Featuring a variety of filters, neat brightness, contrast, and zoom adjustment tools along with a quickly accessible torch, the Magnifier had never looked more closer to being a perfect utility tool.
- Enable Magnifier in iOS 14 and iPadOS 14
- Activating Magnifier Using Shortcut on iPhone or iPad
- Access Magnifier from App Library/ Home Screen on iPhone or iPad
- Use Magnifier on iPhone or iPad
- Customize Magnifier Settings on iPhone or iPad
Enable Magnifier in iOS 14 and iPadOS 14
Enabling Magnifier in the latest version of iOS remains as straightforward as ever before.
1. Head over to Settings app on your device -> Accessibility.


2. Now, tap on Magnifier and then turn on the switch.

Activating Magnifier Using Shortcut on iPhone or iPad
Once you have enabled Magnifier on your device, you can choose to activate it using the triple-click shortcut.
1. Open your Settings app on your iPhone or iPad -> Accessibility.
2. Now, scroll down and choose Accessibility Shortcut.


3. Next, make sure Magnifier is selected. From now onwards, you can triple-click the side button/home button of your device and then choose Magnifier in the menu to activate it.

Access Magnifier from App Library/ Home Screen on iPhone or iPad
After you have enabled Magnifier, you can access it right from the home screen or App Library of your device.
1. Go to App Library on the home screen (swipe towards left from the right edge of the screen to access App Library).

2. Now, search Magnifier in the search bar. When it shows up, tap on it to launch.

If you want to put Magnifier on the home screen of your device, simply drag it and place it on the desired home screen page. Going forward, you can launch it just like any other app from the home screen.

Use Magnifier on iPhone or iPad
- Launch Magnifier from the home screen or App Library ( triple-click the side/home button and choose Magnifier).
2. Now, use your device’ camera to magnify the thing in question. You can use the slider to zoom in or zoom out.

3. Right below the slider, you have the option to adjust brightness, contrast, choose from a variety of filters and even enable torch.

4. When you are happy with the result, hit the shutter button to capture the shot.

If you want to view and share your captured shots, tap on the view button at the bottom right corner of the screen.

Then, you can tap on the Share button to share it with your friends or anyone using the preferred medium like iMessage and email.

Note:
- It’s worth noting that Magnifier doesn’t save shots in the Camera Roll. It stores a few shots and automatically removes them after some time.
Customize Magnifier Settings on iPhone or iPad
Notably, you can customize Magnifier settings in iOS 14 or iPadOS 14. If you wish to have a more personalized experience, you should fine-tune it.
1. Open Magnifier on your device.
2. Now, tap on the tiny settings icon at the bottom left corner of the screen.

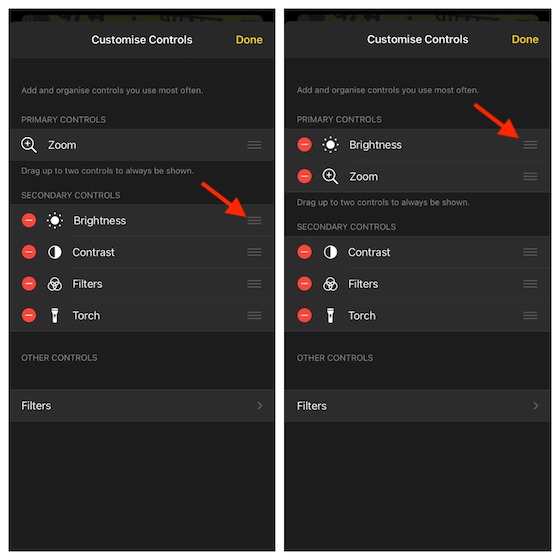
3. Next, you can add and organize controls. For instance, if you want to rearrange Magnifier controls, simply touch and hold the three horizontal lines next to specific control and then drag it at the desired spot.
4. If you wish to hide/show certain filters, tap on the Filters option and then select/unselect specific filters. By default, all the filters are selected. After you have hidden/shown the Magnifier filters, tap on the back button.
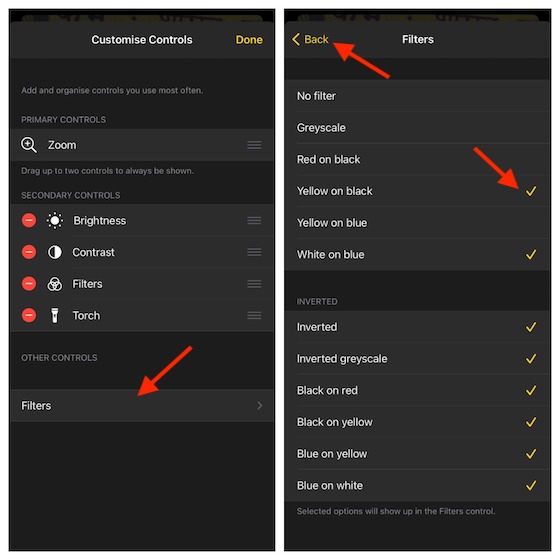
5. Finally, tap on the Done button at the top right corner to finish.

Use and Customize Magnifier on iPhone or iPad
So, that’s how you can get the most out of the revamped Magnifier on your device. With the much-improved interface and features like handy adjustment tools for contrast, brightness, torch along with several filters, it’s become more helpful than ever before.
If you have found this feature interesting, chances are you would also like to take a peek at the equally impressive features such as the ability to check carrier lock information, automatic reduction of loud headphone audio, and power reserve mode. Do check them out, if you are yet to catch up with them.

