The Oculus Quest 2 no doubt, is an immersive piece of technology that you can get lost in. However, as minutes turn to hours, the real world and its responsibilities get left behind. If you’re part of the users who have taken off their VR headset and exited the Metaverse only to find multiple missed calls and messages on your phone, you’re not alone. Fortunately, though, Oculus has thought ahead and included a nice feature that lets you connect your Android phone and Quest 2 together. So for those wanting to receive their Android notifications on the Quest 2, keep reading as I tell you all about it.
How to Receive Android Notifications on Your Oculus Quest 2 (2022)
While the guide itself is very straightforward, there are some requirements you will need to fulfill before you begin. However, if you already know what they are then feel free to use the table below and skip ahead.
Requirements to receive Android Notifications on the Oculus Quest 2
While I know you must be itching to receive all your Android phone’s notifications on the Quest 2, do keep in mind there are some things you need. Make sure you have the following before you proceed:
1. A fully updated Oculus Quest 2
The Quest 2 is no stranger to receiving periodic updates to introduce new features or fixes. For this particular feature, we will require that your Quest 2 is updated to the latest version or at least to Version 34 before you proceed. If you haven’t already yet, update to the latest version by going into Settings and Software Update.
2. The Oculus App Installed on Your Android Device
The official Oculus app is what we will be using to create a connection between both devices. So before you begin make sure to download the Oculus App (Android, iOS, Free) and install it on your device.
3. The Quest Paired with Your Android Through the App
You will also need to use the same app and pair your Quest 2 with your Android phone before you proceed. You can easily learn that by learning how to set up and use your Oculus Quest 2.
4. A Decently Charged Quest 2
And last but not the least, you will need to charge your VR headset to a good enough battery capacity lest you want it to shut down midway. So plug it in while you grab a cup of coffee and come back to this guide in a bit.
How to Setup and Receive Notifications on Your Quest 2
Now that all the requirements are met, let’s begin by setting up the phone to the Oculus Quest 2. Open the Oculus app on your Android phone and follow the steps below:
Note: This section assumes your Oculus Quest 2 has already been paired with the app. If that’s not the case, then consult the linked guide above on how to do so. This will also work with both Android and iPhone so both sides can follow the same steps. Open the Oculus app and follow the steps below.
1. With the app open on the main page, tap the Menu button from the bottom bar.
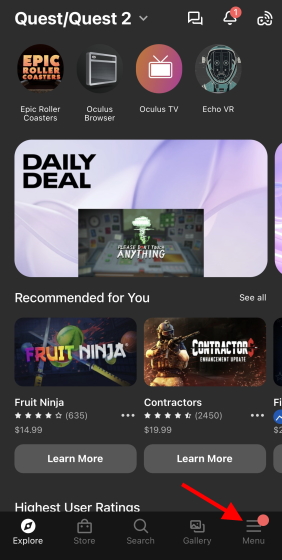
2. Tap the Devices button to open up your Headset settings.

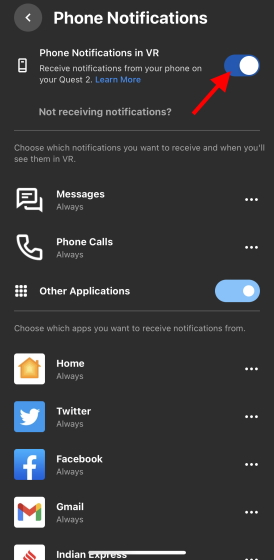
3. Under the headset settings, look for a section called ‘Phone Notifications‘ and tap that. Press Continue.
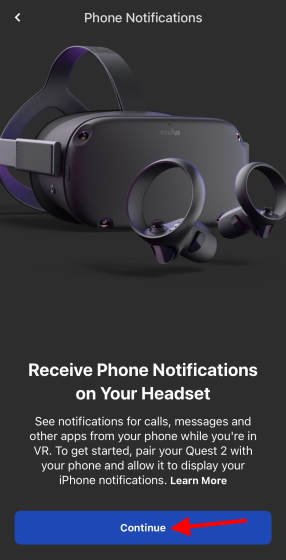
4. The next pop-up will ask you to allow Quest 2 to pair with your phone. Press Pair to do so.
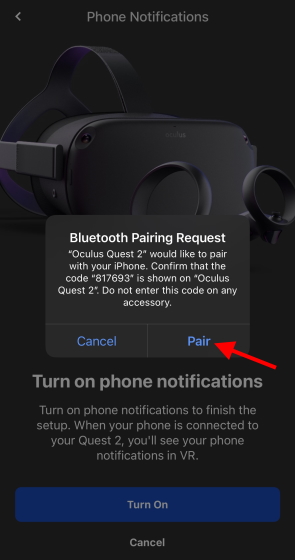
5. On the next screen, turn on Notification access to give it all the permissions.
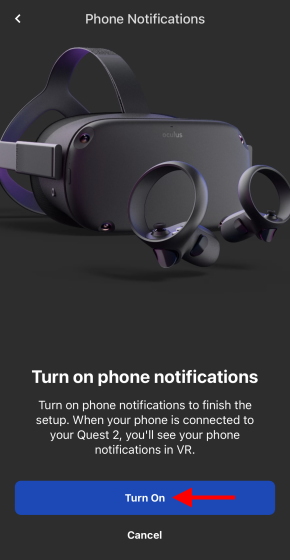
Now anytime you receive a notification in the form of a call, message, or email, you will see the same inside your Quest 2. You can even see app-specific alerts, provided you enabled them. However, do remember that you will not see any notifications for any apps that you have restricted on your phone.
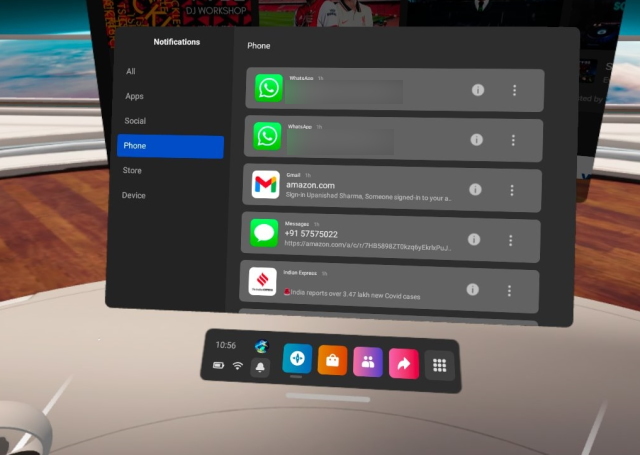
And if you want to turn them off, just click on Phone notifications from Step #3 and toggle it off.
Receive Your Phone Notifications on the Quest 2 and Keep Gaming
We hope the above guide will help you in connecting your phone to your Quest 2 for all your notifications. Once you’re done, why not head into the metaverse? Or maybe you would like to set up a virtual desktop in Oculus Quest 2 for your work as well? Need some help? Let us know in the comments below.


