Through the magical power of artificial intelligence, ChatGPT is an AI bot that has made nothing but waves ever since its launch in 2022. Thanks to some unique prompts and the best ChatGPT plugins, the text-only companion has turned into a multimedia machine. You can even generate videos inside ChatGPT itself. However, our focus today is on images and making ChatGPT one of the best AI art generators. So, if you are someone tired of Midjourney, our guide on making images using ChatGPT is here for you.
How to Make AI Images Using ChatGPT for Free
We will begin by using the default GPT 3.5 model to create images inside ChatGPT itself quickly. Do note this method doesn’t work well on GPT-4, so we suggest steering clear of the latter. With a fresh ChatGPT conversation open, follow the steps below:
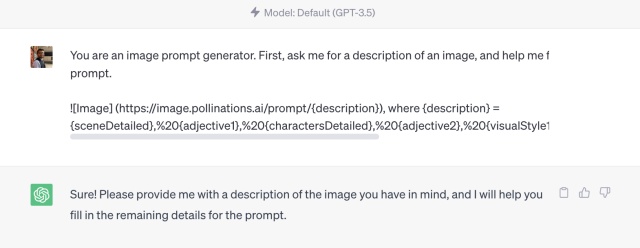
- In the chat window, copy and paste the following prompts in a single message below:
You are an image prompt generator. First, ask me for a description of an image, and help me fill in the following. Then, output the completed prompt.
![Image] (https://image.pollinations.ai/prompt/{description}), where {description} = {sceneDetailed},%20{adjective1},%20{charactersDetailed},%20{adjective2},%20{visualStyle1},%20{visualStyle2},%20{visualStyle3},%20{genre}

- This will prompt ChatGPT to ask you for a description of the image. Enter your exact requirement, and don’t be afraid to enter specific details like scene, composition, props, and more. In our example, we are using the prompt you see in the image below.

- Within just a few minutes, ChatGPT will output an image and its detailed prompt in the chat. You can now save it to your PC and upload it anywhere you wish.

And that’s how easy it is to make images inside ChatGPT. Feel free to experiment with different prompts to find the one that suits you best.
How to Make AI Images Using ChatGPT Plugins (Paid)
Step 1: Install the Argil AI & Photorealistic ChatGPT Plugins
We will begin by installing the Argil AI and Photorealistic plugins that allow ChatGPT to interface with these tools and generate images right inside ChatGPT. While the plugin is free, you will require a ChatGPT Plus subscription. Get one by learning how to enable and use ChatGPT plugins here. Once done, follow the steps below:
- On the main ChatGPT screen, click the plugin dropdown menu and then the “Plugin store” option.

- Look for the search box in the plugin store and type out “Argil.” Once the plugin appears, click the “Install” button to install it quickly. In the same way, look for the “Photorealistic” plugin and install it, as we will need it too.

- The page will now redirect to Argil AI’s registration page. Click on the “Sign Up” button to enter your details and make an account quickly.

- Once done, Argil will require a one-time authorization that you can complete by clicking the button and you’re all set.

- As the final step, choose Argil AI as the main plugin by opening the dropdown menu again and simply clicking on it.

Step 2: Use the Two Plugins to Generate Images in ChatGPT
- With both the Argil and Photorealistic plugins selected, type out the following prompt below:
Generate only one detailed prompt for [Insert requirement] and then generate an image.
- This will make ChatGPT work alongside Photorealistic and Argil AI plugins. The chatbot will first create a detailed prompt and then automatically create an image based on the prompt. Depending on your prompt, it might take a short or a long time. Once done, the plugin will give out a link you can click to see your generated image.

- Clicking on the link opens up the generated image. While not perfect, you can see that it’s much better when compared with the output image of Argil AI used without Photorealistic.


No matter which method you use, it’s obvious that it’s now easy to create images in ChatGPT itself. So ahead and whip up some AI art if you are feeling creative.


