
The Oculus Quest 2 brings about a gaming experience that is quite unparalleled to any other platform. However, no matter how many games you play on the Quest, it still suffers from the problem of game saves. As someone who wiped his entire progress of Resident Evil 4 VR, I can attest to the fact that you need more than just a local save. Thankfully, Oculus or Meta has thought ahead and provided the ability to save your game’s progress on the cloud. So if you’re someone who has made a similar mistake or wants to plan ahead, this guide is the perfect place for you. So power on your Quest 2 and learn how to enable cloud saves on it.
How to Enable Cloud Saves on the Oculus Quest 2
While this guide will show you how to go about enabling cloud saves on the Quest 2, I also discuss what exactly they are. However, if you already know that, then use the table below to skip to the process itself.
How Do Cloud Saves on the Oculus Quest 2 Work?
First things first, how exactly do cloud saves on the Quest 2 work? Essentially, whenever you download and use an app or a game, its data is stored in the same local folder on your Quest 2 itself. What this means is, if you ever decide to uninstall that game, you will also delete its entire save data in the process.
Cloud backup ensures that the save files for the apps and games are backed up online into Oculus’ servers. This way these files remain safe and you’re free to remove as many apps as you want with their backup being somewhere else. So the next time you choose to reinstall that game or app in question, its save files will automatically be downloaded to your Quest and the progress will be caught up again. However, do remember that all apps and games do not currently support the Cloud Save feature on the Quest 2. Don’t worry though as I’ll also show you a way to check that too.
How to Enable Cloud Saves on the Quest 2
Enabling cloud saves on the Oculus Quest 2 is actually very easy and straightforward to carry out. Just make sure your VR headset has enough battery and follow the steps below to start:
1. If not open already, press the ‘Oculus‘ button on the right controller to open up the Universal Menu.
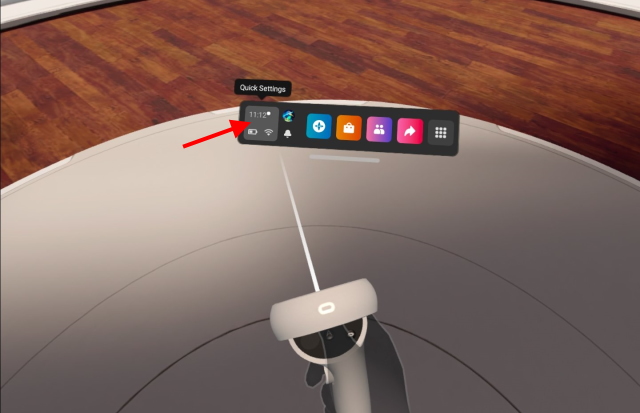
2. From the screen that appears, choose the Quick Settings panel displaying the time on the bottom left.

3. Tap the ‘Settings‘ cog on the top right of the menu to open up the main settings.


4. From the tiles that appear, select ‘System‘ at the top left.


5. A dropdown menu will open up, select Backup to open its settings.


6. Toggle on Cloud Backup and you’re all done. Once enabled, the toggle will turn blue.


And that’s all there is to it. Once that’s done, all supported apps and games will automatically start backing up their data onto Oculus’ servers. Just make sure you’re connected to the Internet otherwise the connection will be interrupted.
How to Manage Your Oculus Cloud Saves
While it’s good to know your game’s progress is safe, how do you know which game/app is being backed up securely? Well, there’s an easy way to find out. All you need to do is open up a web browser on any device and follow the steps below to do so.
1. Head on over to the official Oculus Website and sign in to the same account you use on your Quest 2.
2. Once done, click your profile picture on the top right and another menu will open up.


3. From the menu, click ‘Devices‘.


4. Once there, click on Cloud Backup from the list appearing on the left.


Here you can see the entire list of applications on your Quest 2. You can easily check if the app or game in question supports backup by looking for a Yes or a No under the option ‘Supports Backup’. If you see a No next to an app or a game you use regularly, make sure not to remove it lest you’d lose all your progress.
5. To remove a save for a specific application, click the Delete button next to it and it will be removed instantly.


Enable Cloud Saves on Your Oculus Quest 2 and Relax
I hope this guide will save your game’s progress on the Oculus Cloud. If you’ve already lost a file like me, then be sure to enable this and not repeat your mistake. New Quest 2 user and stumbled on here by mistake? Learn how to setup and use the Oculus Quest 2 easily here. If you’re already there, then try learning how to play SteamVR games on your Quest 2 easily. Need help on a step somewhere? Ask your questions in the comments below.


