
- If you are facing performance issues on Windows 11 while gaming, it might be because of the security feature called Virtualization-Based Security (VBS).
- If you want to turn off VBS on Windows 11 to improve performance, open Windows Security > Device Security > Core Isolation > turn off Memory integrity.
- You can also disable VBS on Windows 11 from Windows Components, Registry and Group Policy Editor.
Windows 11 impacts gaming performances to an extent. What’s the reason for the gaming performance hit, you ask? Well, it’s said to be due to Microsoft’s implementation of Virtualization-based Security (VBS). So if you find that your Windows 11 gaming setup is not as snappy as it used to be, you might want to disable VBS. In this article, we have compiled several methods you can follow to disable VBS in Windows 11.
What is Virtualization-Based Security (VBS) in Windows 11?
Virtualization-Based Security (VBS) is a security feature in Windows 11 (and Windows 10) that creates an isolated region of memory for security features. This virtual secure mode is created using Windows hypervisor and is separate from the rest of the operating system.
Microsoft says VBS can reduce the impact of kernel-level malware attacks. One key security feature enabled through VBS is memory integrity or Hypervisor-protected code integrity (HVCI). It checks all kernel-mode drivers and binaries before they are launched and stops unsigned drivers or system files.
Notably, VBS isn’t a new Windows 11 feature and has been around for years on Windows 10. What’s new, however, is the enforcement of the feature. While VBS was optional in Windows 10, Microsoft started enabling VBS by default for some PCs in late 2019.
Moreover, the Redmond giant is encouraging OEMs to enable VBS by default on PCs shipping with Windows 11 out of the box. Although VBS might be disabled if you manually upgraded from Windows 10 to Windows 11, it’s likely enabled if you purchased a new Windows 11 laptop or a pre-built PC. You can check the next section to know your PC’s VBS status.
Now, you might be wondering why you should disable VBS in your Windows 11 machine, especially since it is a useful security feature. That’s where things get tricky. According to benchmark tests done by PC Gamer and Tom’s Hardware, enabling VBS impacts performance, especially when you are using your Windows PC for gaming.
So if you are facing FPS drops in games on your Windows 11 machine, you could consider disabling VBS to increase the gaming performance.
Pros and Cons of Disabling VBS on Windows 11
Pros:
- Improvement in gaming performance
- Recommended for low-end gaming PCs
Cons:
- Weakened security
- Could break Hyper-V related features if you use virtual machines
How to Check Virtualization-Based Security (VBS) Status in Windows 11
Now, if you want to check whether VBS is enabled on your Windows 11 PC or not, follow the steps below:
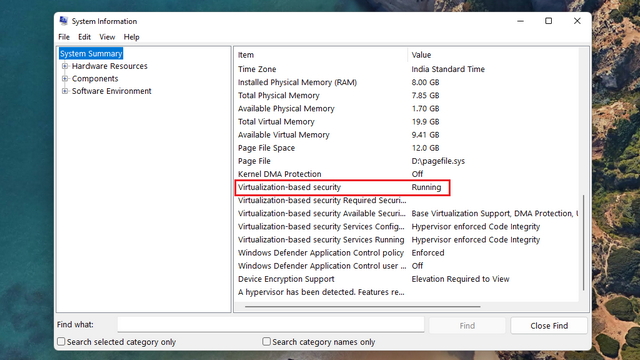
- Press the Win key to access Windows 11’s Start Menu, type ‘System Information’ or ‘msinfo32’ in the search box, and click on Open.
- Under the System Summary section, check for ‘Virtualization-based security’ on the right pane. If the value is shown as Running, VBS is enabled in your Windows 11 computer. If it shows ‘Not enabled,’ it denotes that VBS is disabled in your machine.

Method 1: Disable Virtualization-Based Security (VBS) from Settings
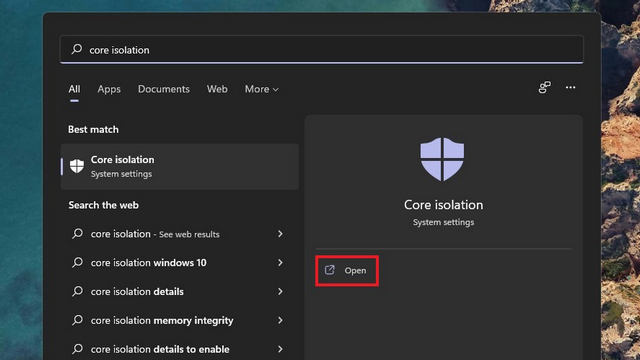
1. Press the Win key to open Windows Search, type ‘Core isolation’, and click ‘Open’.
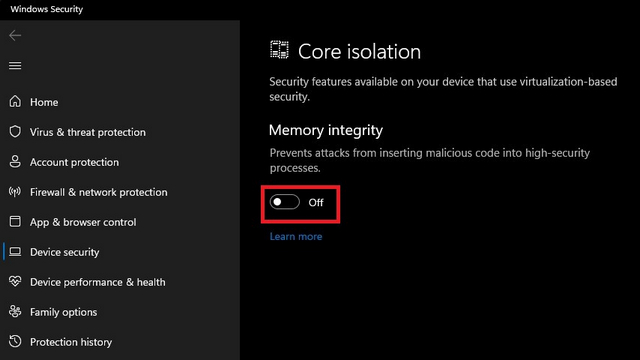
2. Check if the ‘Memory integrity’ toggle is enabled by default. If it is, all you have to do is turn off the ‘Memory integrity’ toggle to disable VBS on your Windows 11 PC.
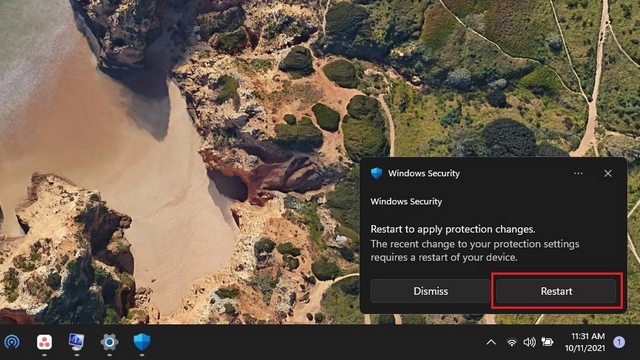
3. Windows Security will then prompt you to restart your PC. Click on ‘Restart’ and you are done.
Method 2: Remove Windows Components to Disable Virtualization-Based Security (VBS)
Another way of disabling VBS is by removing Windows components responsible for the feature. To be specific, you will have to disable Windows Hypervisor Platform, Virtual Machine Platform, and Microsoft Defender Application Guard on your Windows 11 PC.
1. To start, type in and search for ‘Windows features’ after pressing the Windows key and choose ‘Open’.
2. Here, uncheck Windows Hypervisor Platform, Virtual Machine Platform, and Microsoft Defender Application Guard. Once you have unchecked all of these options, click on ‘OK’ to save the changes.
Method 3: Disable Virtualization-Based Security (VBS) from Registry Editor
- You could also utilize Registry Editor to disable VBS in Windows 11. Open Windows Search, type ‘regedit’ or ‘Registry Editor’, and click on ‘Open’.
2. In Registry Editor, navigate to the path given below and double-click on EnableVirtualizationBasedSecurity on the right pane.
HKEY_LOCAL_MACHINE\SYSTEM\CurrentControlSet\Control\DeviceGuard

4. Set the value data of EnableVirtualizationBasedSecurity to 0 and restart your Windows 11 PC.
Method 4: Disable Virtualization-Based Security (VBS) from Group Policy Editor
This method won’t work on Windows Home editions even if you have used the workaround to enable Group Policy Editor.
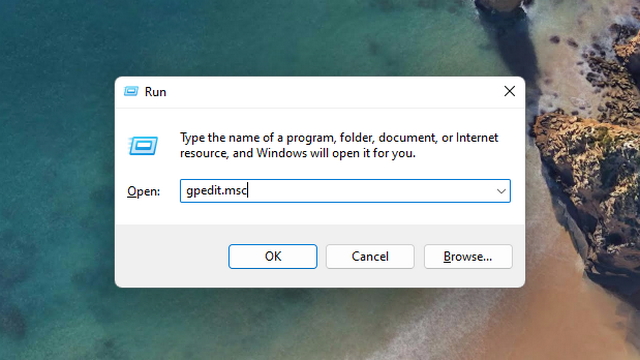
1. Open the Run window using the Windows 11 keyboard shortcut ‘Win + R’, type ‘gpedit.msc’, and click on OK.
2. Once Group Policy Editor opens up, navigate to the following path:
Local Computer Policy\Computer Configuration\Administrative Templates\System\Device Guard
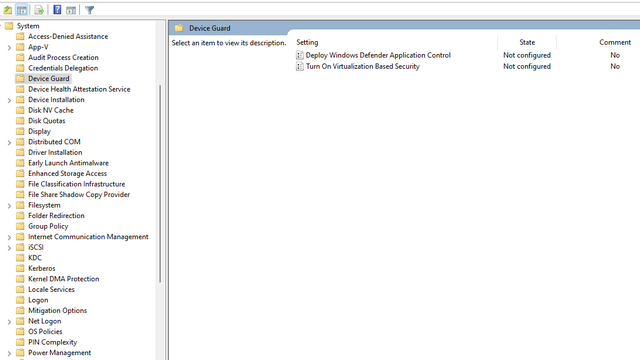
3. From the right pane, double-click ‘Turn on Virtualization Based Security’.
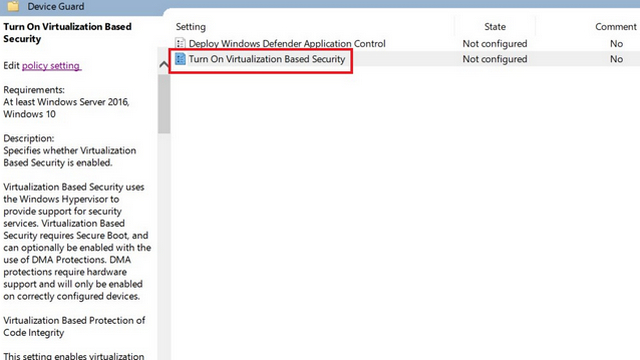
4. When Virtualization Based Security’s dialog box shows up, choose the ‘Disabled’ option and click ‘OK.


So that brings us to the end of our guide on how to disable Virtualization-Based Security (VBS) in Windows 11. Considering the security benefits of VBS and HVCI, we would not recommend disabling the feature.
However, it is something you could consider if your PC’s gaming performance has noticeably been impacted after the Windows 11 update. Meanwhile, you could also go through our dedicated guide on how to speed up Windows 11 to improve performance.

