So, you’ve been seeing a Blue Screen Of Death (BSOD) on your Windows 11/ 10 PC, with the ‘SYSTEM_SERVICE_EXCEPTION’ error code. After looking into the error code, it is most likely a driver issue, as discussed in many threads of Microsoft’s community forum. Whether it’s something related to a peripheral, your video card, or other components, we are here to help you solve this Windows error. So, let’s look at the best solutions to fix the System Service Exception error in Windows.
1. Verify Drivers Using the Official Windows Tool
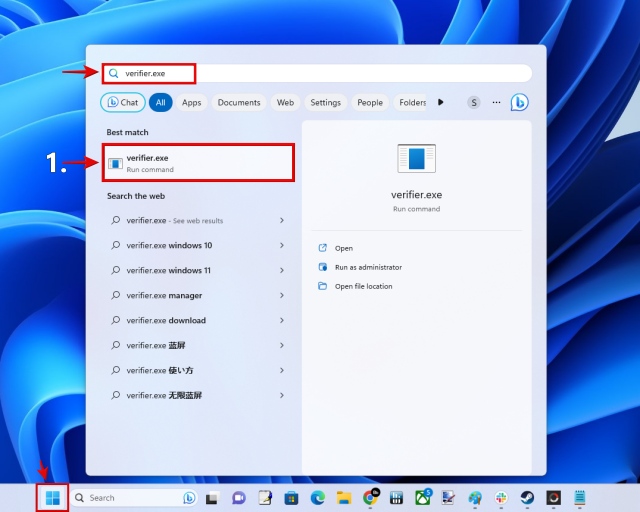
- Press the Windows key and type “verifier.exe” in the search menu.
- Then, click on the best match to open the app.
- Ensure that the ‘Create standard settings‘ is selected. On the next screen, ensure that ‘Automatically select unsigned drivers‘ is selected.


- The tool will let you know if you have any unsigned drivers, which is the first step toward fixing the System Service Exception BSOD error in Windows. If so, move to the next step to update the drivers.

2. Update Drivers Using Windows Update Or Third Party Tool
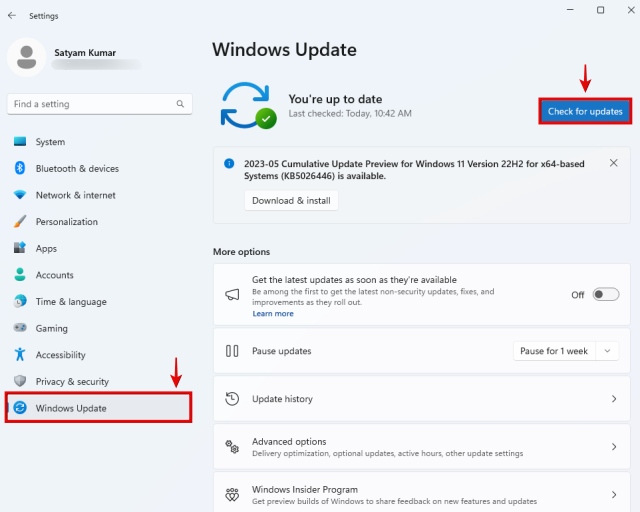
- Go to Windows 11 Settings and click on Windows Update in the left sidebar.
- Now, click on Check for Updates in the right pane.
- If you have any pending driver updates, it should tell you. If so, go ahead and update your drivers with Windows Update.
- If you have Windows 10, go to Settings -> Update & Security -> Windows Update.
- On this screen, click on ‘Check for Updates’ and finish the pending driver updates, if any.

- You can also use a third-party driver update tool on Windows 10 and 11, check out our list here. Use one of these apps to update the device driver of your Windows PC seamlessly. This should fix the System Service Exception error on your Windows 10/11 PC.
3. Run SFC & DISM Commands In Command Prompt
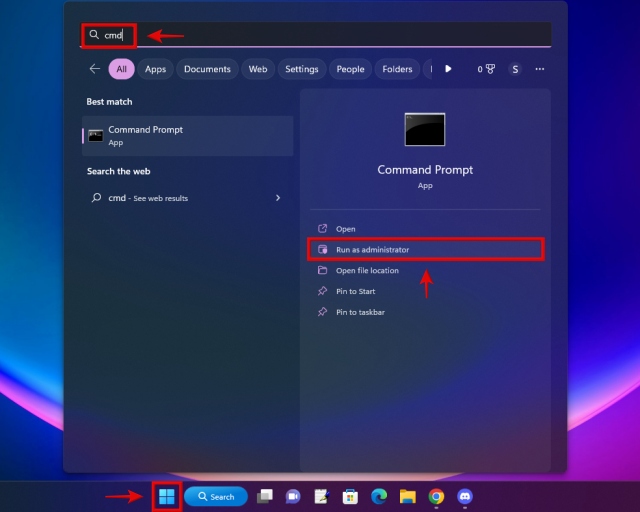
- Press the Windows key and type ‘cmd‘ in the search menu.
- When Command Prompt shows up, remember to click on Run as administrator.
- Next, copy and paste the below commands one by one in your CMD window, and then press Enter.
- Remember you have to run each command separately. Any damaged, corrupted, or missing files in your Windows installation will be repaired or replaced after you’re done running the SFC & DISM commands.
SFC /scannow
Dism /online /cleanup-image /restorehealth
4. Remove Overclock or Undervolt On Your PC
- Reset to default settings using your GPU’s software can also help fix the System Service Exception error on Windows. In our case, we are using ASUS GPU Tweak III for the RTX 3070 Ti in our build.
- In case you used a different application, refer to its support documentation to find the option to reset your GPU’s settings to default.

- If you were using AMD’s Ryzen Master to overclock your CPU, you can revert to the previous settings using the ‘Reset Profile’ button.

- For other cases, including if you have an Intel CPU in your Windows PC, refer to the final fix for the System Service Exception error & move back to default settings.
5. Set RAM to Stock Speed By Reverting XMP Profile
- To set your RAM to stock speeds, restart your PC and boot into the BIOS by pressing the designated key (usually F2 or delete), also displayed when your PC starts up. Here are some other methods to enter BIOS on Windows 11.

- Now, refer to your motherboard manual to find the RAM settings. In our case (ASUS Strix Z790-E), it was under AI Tweaker -> AI Overclock Tuner.

- After ensuring the RAM speed is set to stock, head over to X and select X. Your PC will restart and start running at stock RAM speeds again.

- I know you probably want your RAM running at full speed again, so follow our dedicated guide on enabling XMP. Do ensure that you follow the prerequisites so that your overclocked RAM profile (XMP) can work in a stable manner. You could also run a RAM stability test to ensure it hasn’t become faulty (especially if your PC is suddenly having BSOD issues)
6. Reset BIOS Settings in Windows PC
- In order to reset your BIOS to stock settings and fix the System Service Exception error, simply restart your Windows PC and access the BIOS by pressing the designated key (typically F2 or delete) that appears during the PC’s startup.
- Now, go to Exit (or the last sub-menu in your BIOS screen) and select ‘Load Optimized Defaults‘. Do refer to your motherboard’s manual if needed, and refer to its instructions on resetting your BIOS to default settings (in case your BIOS looks too different from ours).

- Your PC will restart and the BIOS will be reset to default settings.
Loading comments...
Recommended Articles


More In


