As a tech enthusiast, I have always been curious about how big a difference a NAS (Network Attached Storage) system actually makes in my data management. Fortunately, Synology sent over their 8-bay DiskStation DS1823xs+. So, I can finally put a full-fledged NAS system to the test and see it for myself.
The compact design, support for up to 160TB of raw storage before expansion, 10GbE connectivity, and Synology’s own DSM (DiskStation Manager) operating system, make this an appealing purchase. But, does all that translate well in real-world scenarios? Let’s find out in this detailed Synology DS1823xs+ review, as I gradually peel layers off this onion.
Our Arsenal, All Ready for Setup

Apart from the DiskStation DS1823xs+, Synology also sent over eight of its 3.5-inch 16TB HAT-3310 HDDs. Letting you in on the pricing a bit, diskless, the DS1823xs+ will set you back at $1,799.99. As for the HDDs, they cost around $305 each.
While the DS1823xs+ comes with an 8GB DDR4 ECC RAM stick, you can take it up to 32GB. It’s also dual-channel, by the way. So, we took it up to 16GB using the extra 8GB stick that Synology sent us.
As for the router, I’m rocking a TP-Link Deco X50 PoE that supports up to 2.5GbE via the Ethernet port. Sadly, we weren’t armed with anything to push the transfer speeds to its supported 10GbE cap (more on this later).
Ingeniously Crafted

The unit itself comes nicely packed in a suitcase-like cardboard box. It’s riddled with the Synology branding, from the body to the handle. I was also impressed by the commendable amount of protection for the system itself inside, with everything intact (phew).
Talking about box contents, alongside the unit, you get the screws for the storage bays, two keys to lock/unlock them in place, two Cat 5e ethernet cables, the mains cable, and some paperwork that displays the setup instructions as well as warranty details (it’s 5 years, for your information).
The Synology DiskStation DS1823xs+ is quite compact, sporting dimensions of 166 x 343 x 243 mm, and weighing about 6.2 kg. So, you won’t need a whole lot of space to fit this in, and that’s great news for those with smaller setups. The all-black also makes it quite sneaky, keeping your setup from appearing too loud or congested.
I liked the Synology branding on the sides which masks away mesh panels bringing passive ventilation to the NAS. Synology has also thrown massive rear 120 x 120 mm fans on this system to keep it cool. Now, although these are big fans, they aren’t nearly as loud as I expected them to be under normal loads. Under heavier loads, however, the fans are quite audible. If you’re like and get distracted easily, it may not be the ninja you were hoping it to be. Also, the Synology DSM also allows you to shift between the Full-Speed, Cool, and Quiet modes.
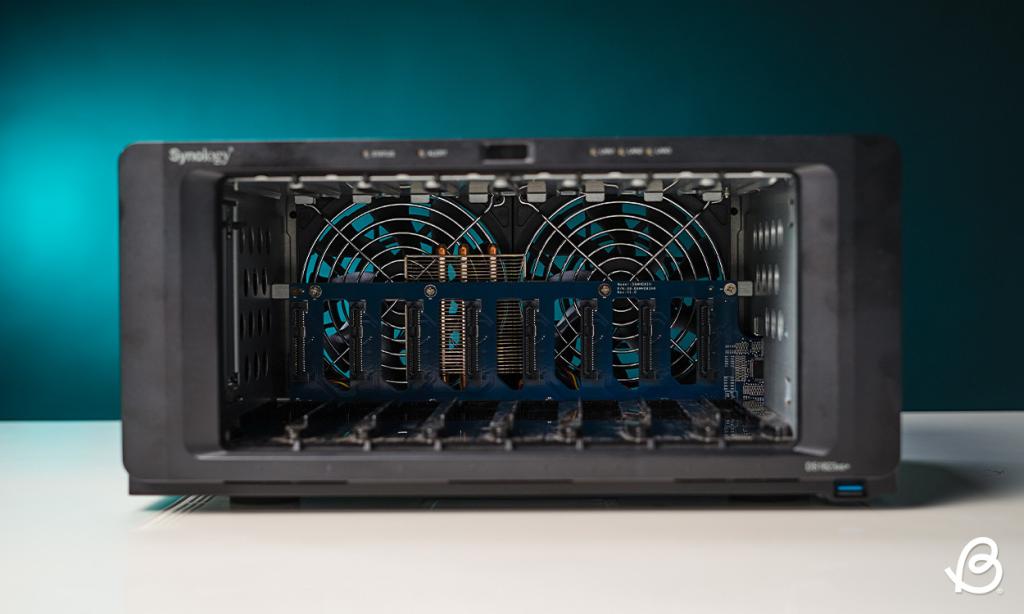


Once you take out the storage bays, the internals are pretty neat and shiny, structured to accommodate the 8-bay panels. You can either fit 2.5-inch or 3.5-inch SATA drives. The Synology DS1823xs+ also gives you two M.2 NVMe Gen 3 SSD bays on the inside. This is to take advantage of for faster read and write caching or even double down as storage pools.
At the back, there are 2x 1GbE ports and 1x 10GbE port as well. In addition, there are three USB 3.2 Gen 1 ports and two eSATA expansion ports. The big glaring port on the left is to connect a 250W PSU to the NAS. It’s a nice option to have, especially if you’re (and should be) looking to keep it active at all times.
Although there’s no display or anything to monitor the status of your LAN ports and disk drives, you do get LED indicators. There are three LAN 1, LAN 2, and LAN 3 indicators at the front alongside a Status and Alert indicator. Meanwhile, each of the drive bays feature an indicator shaped like a down arrow. And, as usual, green indicates good health, yellow is for subtle errors, and red is straight-up bad news.
Convenient Setup and Operation
As a novice in the world of LAN, I was quite nervous about having to set it up since it seemed complicated, courtesy of all the videos I had seen. Well, the Synology DiskStation DS1823xs+ shattered my expectations in the best way possible, as it took me just about 45 minutes to set it all up.
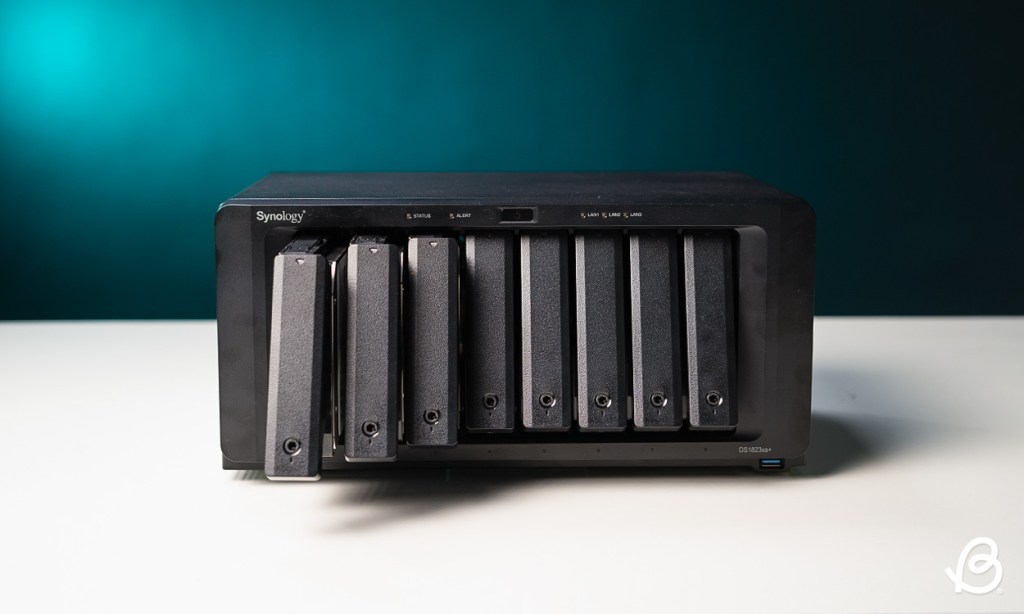


This was probably one of those rare times when the included manual actually came in pretty handy for me. So, I didn’t have to look anywhere else. From this paperwork, I got to know that a gentle push at the bottom of the drive bays clicks them out of place very satisfactorily. The correct orientation of the HDDs is also shown, and it was very easy to install all eight of them. You also get additional screws in the box for installing 2.5-inch drives.
At the bottom, you will find a small screwed-in panel, unscrewing which lets you upgrade your RAM. So, I went ahead and slapped the additional 8GB stick. Once that was done, I simply connected the NAS to my router via an Ethernet cable. Then, I just had to head over to the Synology Web Assistant to find the NAS system. Then follow some very easy-to-understand on-screen instructions to set it up and give this bad boy a name.


Also, when setting it up, I noticed that the Synology DS1823xs+ supports RAID 0, 1, 5, 6, and 10 architectures, which is amazing. However, when reading up on how RAID works, I was hoping for the DS1823xs+ to support SHR, aka Synology Hybrid RAID, but it doesn’t. So, I reached out to the brand to learn about its absence, and here’s what they had to say,
“As the DS1823xs+ is positioned as a business-grade NAS solution, particularly for SMBs and corporations, it is designed to offer more control over RAID configurations. In these environments, traditional RAID setups (RAID 0, 1, 5, 6, and 10) are often preferred due to their predictable performance and redundancy, which are essential for large-scale deployments.
While SHR offers flexibility, traditional RAID setups provide optimized performance for these high-demand use cases. That’s why SHR is not supported on the DS1823xs+ and other high-performance models.”
Anyway, after you’ve created the server and everything, the NAS will then proceed to do a firmware update, which is what takes the most time. Once done, you just have to log in to the system and go straight to the Synology DSM (DiskStation Manager). That’s where the magic starts.
Everything You Need and Then Some
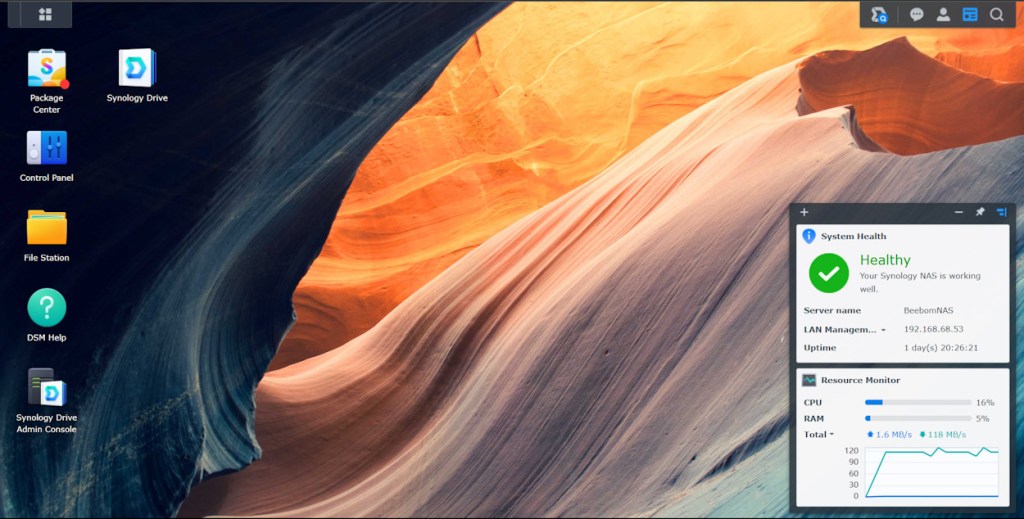
The Synology operating system is very easy to understand and looks mostly like a toned-down version of a desktop UI. Right on the home screen itself, the Synology DSM has dedicated widgets for System Health and Resource Monitor. Alongside that, you get shortcuts to the Package Center, Synology Drive, Control Panel, File Station, DSM Help, and the Synology Drive Admin Console.
Talking about the Package Center, you get all the fun features right here. What I liked was everything that I feared would be difficult to use as a novice, actually turned out to be quite simple. Now, I’m not sure if that’s due to the intuitive UI or a perk of working in the tech industry. Either way, setting up a virtual machine was super easy, thanks to the Virtual Machine Manager in the Package Center.
I ended up creating Windows and Linux virtual machines by simply using the Virtual Machine Manager to read a bootable ISO and that was it. Additionally, from the Package Center itself, you will be able to set up a Plex Media Server. While setting this up is a bit of a hassle, once you get the hang of it, it’s simple really.
Plex allows you to view your content anytime, anywhere. I uploaded one of our Beebom videos in 4K and was able to access it even outside the connected network. Having a dedicated Plex Media player for Android and iOS is an added advantage. The only downside is that to watch content in original quality or at higher resolutions, you will need the paid version of Plex. Otherwise, you are limited to a pixelated 320p.


Similarly, you will also find the entire Synology Office suite right here. It works exactly like Office 365, letting you create and edit documents, presentations, and sheets. What makes this special is that since you are on LAN, this is a collaborative experience on the server and real-time synchronization works like a charm.
You can also use the Control Center to assign storage quotas to different individuals that you share the NAS server with, create Shared Folders, Quick Connect IDs to instantly connect when on the local network, and more.
There’s also Synology Chat, which is Slack for businesses. Synology Calendar, Active Backup for Businesses, Hyper Backup, Central Management System, Audio Station, Video Station, and a lot more. You can also use the Synology Drive Android and iOS mobile app to access your files from anywhere. Put simply, you get all of Synology’s proprietary services with this and the use cases don’t end.
Performance You Can Count On
Now, the Synology DiskStation DS1823xs+ is powered by a quad-core 64-bit AMD Ryzen V1780B CPU, clocked at a base speed of 3.35 GHz. Meanwhile, it can also be boosted to a turbo clock speed of 3.6 GHz. This capable processor is what quite a few top-end NAS like the Synology RS2423RP+ and RS2423+ use as well.
To stress-test the CPU as well as get an idea of the read and write speeds of the NAS, I created a dummy 100GB file on my Windows system. Then, I set up the NAS as a network drive on my system to easily drag and drop files. So, using the drag-and-drop method, I started reading the 100GB file onto the NAS. Also, when doing this, my laptop was connected directly to the NAS via Ethernet.
I could hit a peak speed of 330Mbps, or 2.6Gbps, with my own system bottlenecking me out here. Had I been able to take advantage of the 10GbE port, these speeds would have been around five times more impressive. Also, during this time, CPU utilization peaked at 16% while the RAM was only at 7%.

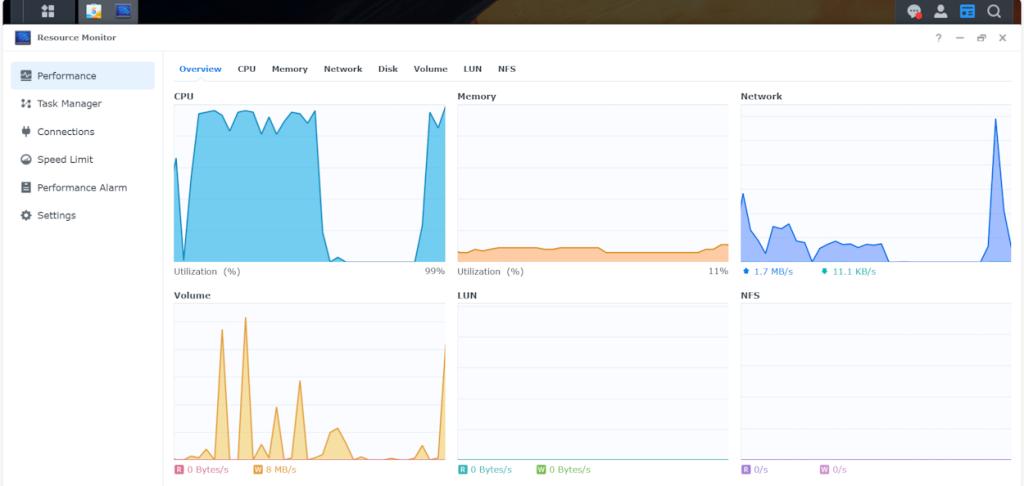
So, to further stress out the CPU, I took my coworker’s suggestion. I tried watching the 4K Beebom video that I had uploaded to my Plex server in any other quality but the original one, as it would require the CPU and RAM to kick in instead of just your network.
Upon playing the video in compressed quality on my laptop as well as the Plex mobile app, CPU utilization hit 99%. However, RAM was still just at 11%. The more users you add to the server, the more it will initiate the RAM. But, now you can see how even 16GB is a bit of an overkill for this and you should be fine with just 8GB. If you do want to use your NAS as a server for hosting virtual machines, that’s a different story though.
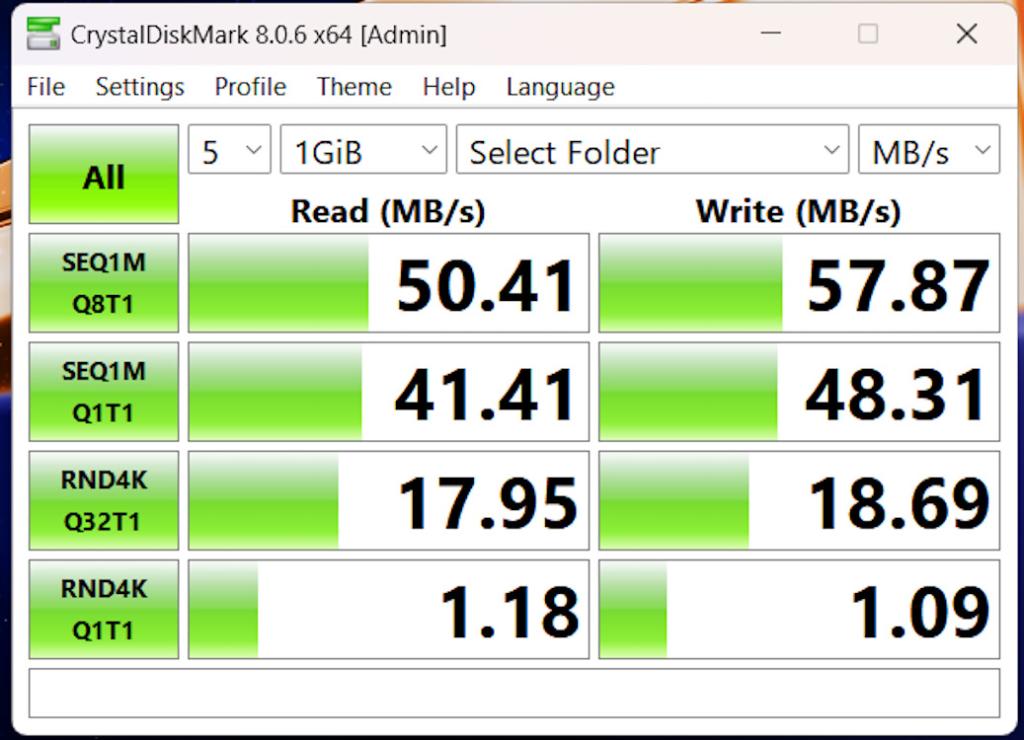
I tried out the NAS on a congested WiFi network too and used CrystalDiskMark to give me a good idea of the Read/Write speeds. Take a look:
However, you cannot edit videos directly from this machine, in case you’re wondering. But, if you want to store your large-scale video editing projects and timelines to get to them when needed, you definitely can.
While I was at it, I also got the horrible idea of simulating a power cut and disk failure to check the reliability of the Synology DiskStation DS1823xs+ (don’t try this at home). When backing files up to the DS1823xs+, I randomly cut the power out. When I powered it back on after a good 15-20 minutes, my files resumed backing up like nothing happened.
To simulate disk failure, I popped open one of the drives while the machine was running and the rest of the drives still worked fine. However, do note that if you’re using RAID 0, that will affect all your drives at once. RAID 5 or 6 seemed like the sweet spot for me.
Synology DiskStation DS1823xs+: Verdict

The bottom line is that the Synology DiskStation DS1823xs+ is easily one of the best NAS systems you can get for under $2000. The performance of this machine is pretty bonkers, and that coupled with some solid reliability makes this one hell of a storage solution. The feature-rich DSM is another thing to get this machine for, letting you create media servers, virtual machines as well as make use of the comprehensive Synology feature suit.
Most importantly, while there’s definitely a learning curve here, it’s not too steep and if you’re a novice, you will get the hang of it in no time. Yes, it could have used SHR support. But, apart from that one miss, I don’t see any reason to not get this powerhouse of a NAS system.
This is our first comprehensive NAS review and we thank Synology for making this possible. This also paves the way for us to cover more such NAS systems on the Beebom website. So, stay tuned, as we venture deeper into the world of NAS technology!


