
Wood is one of the most versatile materials in Minecraft. You can use wood to craft tools, furniture, utility blocks, and it can even act as a diverse building block itself. Thanks to the Minecraft 1.19 update, we now have nine types of woods in the game. But, because of its variety of uses, irrespective of how much wood you collect, it’s never enough. To help you with that, we’re here with a farm design that you can use to collect 10,000+ wood logs every hour. You simply need to learn how to make a tree farm in Minecraft, and then, you can go AFK while your automatic tree farm gets to work. But since this farm takes time to build, let’s not waste another moment and dive right in!
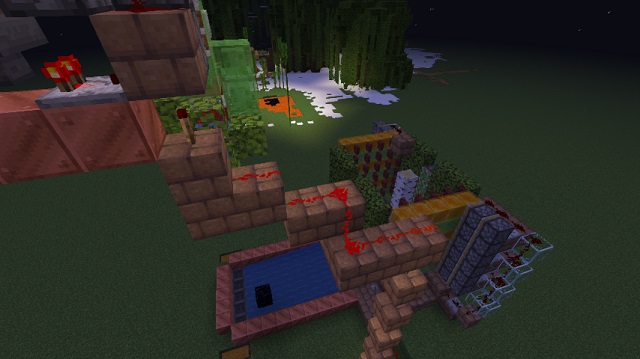
Build a Tree Farm in Minecraft (2022)
In this article, we have covered the material list, efficiency, and the building process of the tree farm in separate sections to make it easier to understand. First, let’s look at what wood you should use in this farm.
Efficiency of Minecraft Tree Farm
The time it takes for different types of trees to grow varies in Minecraft 1.19. Because of that, not every tree is equally efficient when making a Minecraft tree farm. So, based on the tests done by YouTuber Dusty Dude, who designed this farm, and our independent testing, you can expect the following results:
- Oak: ~ 10,282/Hr
- Spruce: ~ 8,626/Hr
- Birch: ~ 9204/Hr
- Jungle: ~ 6879/Hr
Please note that we’re not covering crimson and warped wood as they are a type of fungus (not a tree) that is only generated in the Nether biome. Alongside that, we are also leaving Acacia, Dark Oak, and Mangrove tree aside due to their complex growth mechanics. If you use their saplings, you might end up breaking your farm.
Items You Need to Make a Minecraft Tree Farm
You need the following items to make the most efficient tree farm in Minecraft:
| 208 Solid Building Blocks (Any) | 10 Redstone Dust Pieces |
| 91 Redstone Dust | 9 Chests |
| 82 Leaves | 7 Furnaces |
| 58 Fence Gates | 6 Water Buckets |
| 44 Hoppers | 5 Blocks of Redstone |
| 41 Sticky Pistons | 3 Levers |
| 36 Slime Blocks | 2 Dispensers |
| 38 Logs | 2 Observers |
| 38 Honey Blocks | 2 Redstone Comparators |
| 21 Glass Blocks | 1 Dead Horn Coral Fan |
| 17 Redstone Repeaters | 1 Detector Rail |
| 1 Dropper | 1 Piston |
| 1 Obsidian | 1 Stone Brick Wall |
| 1 TNT |
Even though the list of items might appear to be overwhelming, all of them are easy to collect. If you know about the Minecraft biomes, you can collect all of them in no time.
Note: We are using the Better Hoppers texture pack to make it more effortless for you to understand the direction in which a particular hopper is facing. You can do the same to make your life easier during this build.
Make Harvesting Area for AFK Tree Farm in Minecraft
Because of the farm design’s complexity, we have divided it into separate sections to make it easier to build. You can finish one section at a time to avoid overwhelming yourself. Now, let’s take it step by step:
Tree Growing Area
Follow the steps below to make the tree growing area of an AFK tree farm in Minecraft:
1. First, place a dirt block in the air. It should be two blocks higher than the ground.


2. Then, place a dropper facing upwards on one side of the dirt block.

3. After that, put a dispenser on top of the dropper. This dispenser should face toward the soil block.

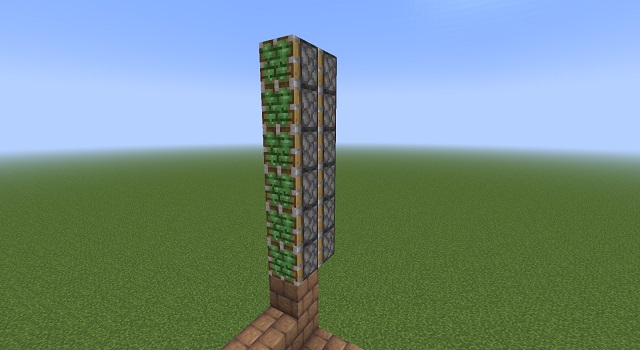
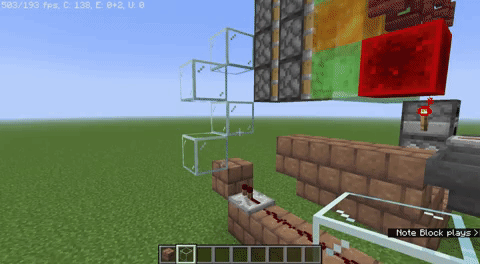
4. Now, build a small staircase right behind the dispenser using two building blocks. The final result should look like the following screenshot.

5. Then, put two observers facing each other right behind the lower building block. The opposite arrows on top of the observers’ heads will help you get it right.

6. Next, dig out three blocks in the ground beneath the latter observer. In the newly dug hole, place a sticky piston right beneath the observer.

7. Then, put a building block in the far end of the hole and use the middle empty block to put a Redstone torch on that building block. The torch will activate the sticky piston.

8. After that, go back to the floating dirt block and place a building block, two blocks away from the dirt block to the left. This new block should be one block above the ground.

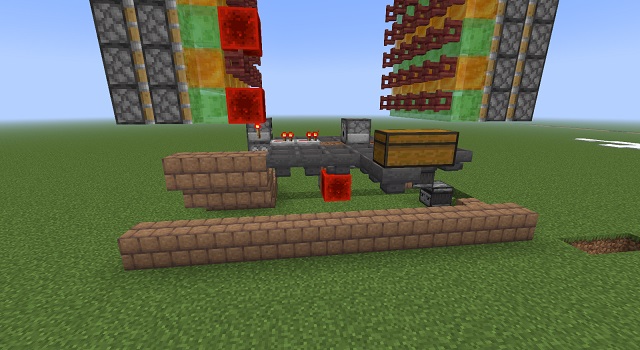
9. Then, stand on the newly placed block and put a dropper facing towards the building block. Now, put multiple hoppers that connect the original dirt block to the dropper. Look at the placement direction of the hoppers in the diagram below.

10. Then, place a row of 4 hoppers going into the dropper located next to the dirt block. These hoppers should be connected. Now, put a large chest on top of the hopper located furthest from the dropper.

11. Then again, start placing hoppers that go into the dispenser located next to the building block. These hoppers should surround the entire structure but shouldn’t be on top of the building blocks.

AFK Tree Farm Area
Follow these steps to expand the tree growing area into an AFK area for the tree farm in Minecraft:
1. First, go to the dropper located next to the building block. Then, put a furnace on top. You can use any other immovable block as well. Now, add a Redstone torch on the side of that furnace.

2. Then, place two repeaters between the building block and the dirt block. You have to crouch and then place the repeaters on top of the hoppers.

3. Then, expand the standing platform (the one next to the dropper with the furnace) by making it two blocks wide and three blocks long.

4. Then, create another 3 x 3 platform, one block lower than this one. This new platform should be on the left side of the existing one with one block going beneath the dropper.
5. Then, put a lever on top of the block next to the dropper on the new platform. After that, dig a tunnel beneath the lever that goes all the way to the block next to the sticky piston.

6. Then, fill the tunnel with Redstone dust. Now, that lever will act as an “On & Off” switch for your Minecraft tree farm.

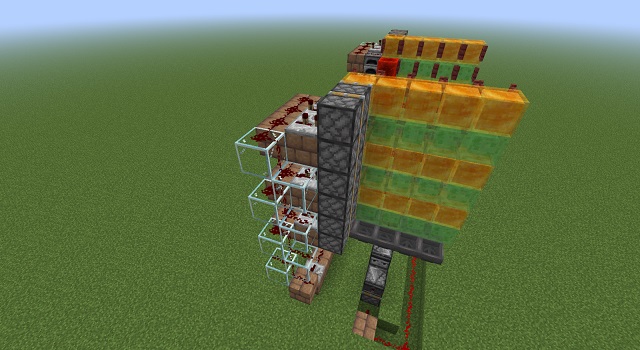
Make a Leaves Crusher
Follow these steps to make a leaves crusher for your tree farm in Minecraft:
1. First, go back to the standing platform and place three building blocks, one block higher, on the platform’s side, which is towards the chest. These blocks will act as a boundary.

2. Then, on the new wall, put a temporary block on top of the block that is furthest from the hoppers. Then, put a sticky piston on top of that block. It should face towards the hoppers.

3. Once the first sticky piston is in place, put another one right behind it using a temporary block.

4. Then, create a tower of sticky pistons using the same steps. It should be 6 blocks tall.
5. After that, create an alternating wall of slime and honey blocks right in front of the sticky pistons. It should be 5 blocks wide and start from the sticky pistons. The first row from the bottom has to be of the slime blocks.

6. Then, place a block of Redstone in front of every slime block that’s next to the sticky piston.

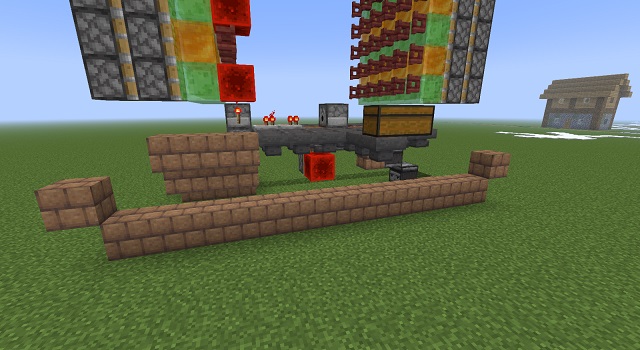
7. Finally, fill the rest of the wall by placing fence gates. All of the fence gates must be open while your farm is working. Just follow this diagram to understand the gate placement:

8. Next, make sure that you are equidistant from the main dirt block and recreate the same mirrored design. We had to break a row of hoppers to get equidistant from the dirt block. Also, you don’t need to put Redstone blocks on this side of the leaves crusher.

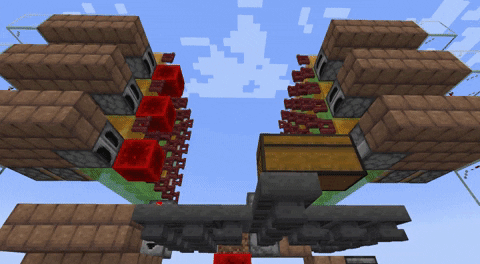
Automate Leaves Crushers
With the leaves crushers ready, it’s time to automate them so that whenever a tree grows up, the machine can remove its leaves.
1. First, go under the dirt block and place a sticky piston beneath it. It should face towards the chest. Then, place a Redstone block on the face of the sticky piston.

2. Then, with a gap of one block, create a row of building blocks that extends from one leaves crusher to the other. It should be one block beneath the height of the newly placed Redstone block.
3. Then, put one building block a block higher than the row on each side. This new block should be next to the row and not on top of it, as shown below:
4. Then, start from the middle of the row and put Redstone dust on the entire row, except for the corner blocks. On the last blocks of either side, put a Redstone repeater.

5. Then, create a glass staircase leading up to the top of the leaves crusher on either side. You have to use temporary blocks to put one glass right on top of the temporary block and one adjacent to it.

6. After that, go to the topmost block and build a 2 blocks wide and 3 blocks long platform with building blocks. This platform should be alongside the row with slime blocks and the block that connects to the slime should be immovable.

7. Then, set up the same Redstone mechanic on the platform as the following screenshot. After that, create the same platform next to sticky pistons on all slime rows of both leaves crushers.


8. Finally, connect the Redstone of these platforms to the row of Redstone on the ground. To do so, place Redstone dust on top of all the glass blocks in the staircase. There should be no glass block or temporary block higher than the topmost platform’s Redstone repeaters.
9. With that, your leaves crushers should be ready for use. You can put a lever next to the row of Redstone to test it out. It should accurately move forward and backward.
How to Automate a Minecraft Tree Farm to Collect Items
Log Pusher
Follow the steps below to create a log pusher for your tree farm in Minecraft:
1. First, place blocks to cover all the hoppers going from the double chest to the dispenser. We don’t want any products of leaves entering that system.

2. Then, put a glass block on top of the hopper next to the covered hopper and the dirt block. Now, use that glass block to create a tower of 5 wooden logs.

3. After creating the log tower, put a building block two blocks higher and right next to the tower. This block should be right above the dirt block and have a gap of 8 blocks between them.

4. Now, place two sticky pistons with the help of temporary blocks, right next to the chest. These sticky pistons should be behind one another and facing toward the glass block and the log tower.

5. Then, keep placing double sticky pistons again and again until you have a tower that is 6 blocks tall.

6. After that, go down to the row of Redstone located between the glass stairs. Here, place a building block next to the middle block of the row. Then, put a Redstone repeater on top at a 3-tick delay.

7. Then, create another glass staircase next to the new tower of sticky pistons. Once it’s completed, connect the sticky piston towers to the newly placed repeater by placing Redstone on the glass.

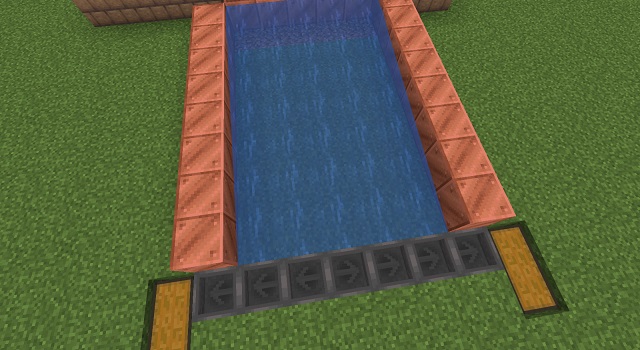
Item Collection Area
Follow these steps to make the item collection area of the tree farm in Minecraft:
1. Next up, go beneath the farm where the tunnel of Redstone is located. Here, create a row of blocks on the ground, next to the tunnel. This row should start from the second observer and go to the lever platform.

2. Then put Redstone on top of the newly placed row. One end of the Redstone should end at a block beneath the hopper and the other should end at the block connected to the observer. While you are here, you can also cover the existing tunnel of Redstone.

3. Then, right next to the covered tunnel, create a wall that is 5 blocks wide and 3 blocks tall from the ground.

4. Then, create one 8-block long row on each side of the wall.

5. Once the structure ready, put water on the bottommost row of the wall. The water will flow to the edge of the area.

6. Then, put a large chest outside either corner of the collection area where the water ends. These chests have to be placed on the ground and should not be in front of the structure.

7, Then, place hoppers in the ground right next to the water where the structure ends. Three hoppers should point towards one chest and four should point towards the other one.
Build the Tree Farm’s Boundary
1. Once the collection system is ready, you can put a boundary around the hopper to prevent random stuff from getting in.

2. Then, use leaves or building blocks to cover both sides of the main plantation area. This will prevent the tree leaves from falling outside the farm. But make sure to leave the space in front of the logs empty.

Make a TNT Duplicator
Follow these steps to add a TNT duplicator to your tree farm in Minecraft:
1. First, go to the wall of the item collection system that is towards the main switch of the farm. Then place an obsidian block above the water. It should be next to the wall, one block away from the hoppers.

2. Then create a temporary tower above the obsidian that is 12 blocks high. After creating the tower, place a leaves block next to the topmost block of the tower, towards the nearby wall.

3. Here, create a 3-block long canal, leading up to the temporary block by surrounding it with leaves blocks.

4. Once the canal is ready, put an open fence gate on top of the temporary block. Then release water into the canal from the opposite corner. You might have to place the water twice to avoid having waterlogged leaves in Minecraft.

5. Then, create an L-shaped structure with three slime blocks on the wall of the canal. This wall should be towards the main farm. Then put a wall block on the topmost slime block.


6. Then, use the wall block to create another L-shaped slime structure.

7. Next, put a detector rail on top of the new slime structure’s curve. It should be facing toward the higher-placed slime block.

8. Then put a minecart on top of the rail and a TNT block below the wall block.

9. After placing the TNT, put a dead coral fan on its side. It should be placed above the fence gate and the coral fan must be dead. Then, increase the height of the surrounding leaves block by one block.

10. Then, get on top of the slime block that is next to the minecart. Here, connect a sticky piston to the slime block with a block behind it. Then put a regular piston on top of the sticky piston. both pistons should be facing towards the minecart.

11. For the Redstone mechanic, make a platform right behind the pistons.

12. Finally, use the following screenshot to create a Redstone mechanic to run the TNT duplicator.

How to Activate Tree Farm in Minecraft
With that, your Minecraft tree farm is now ready. Now, all that’s left for you to do is activate it, and here’s how you can do that:
Activate TNT Duplicator
Follow these steps to activate the TNT duplicator in your Minecraft tree farm:
1. First, remove all of the temporary blocks that are below the TNT duplicator.

2. Then, go to the main lever and expand the Redstone tunnel by three blocks. It should go from beneath the platform to behind it. Then, create a tiny stair at the back edge. Place Redstone on the bottom part of the stair and connect it to the tunnel’s Redstone.

4. Then, use the upper part of the stair and create a Redstone torch tower. The floors of this tower will alternate between a solid block and a Redstone torch. This structure will have only 7 Redstone torches in it.

5. Then, create a staircase-like structure of building blocks to connect the tower with the TNT duplicator. The final result should look like the following screenshot.

6. Finally, put Redstone dust on the new structure. Then, put a Redstone torch beneath the building block next to the TNT machine to activate it.
How to Use Tree Farm in Minecraft
With everything else in place, follow these steps to use the tree farm in Minecraft:
1. First, go on top of the TNT duplicator and place any 5 stackable items in one of the hoppers. This will put your TNT duplicator into a loop, making it drop TNTs every few seconds.


2. Then, head to the large chest that is placed next to the tower of sticky pistons. You have to fill it with bone meals to make your farm the most efficient.


3. Finally, use the main lever to turn the farm on. Then, stand on the platform next to the dirt block, hold a sapling, and start right-clicking on the dirt block. It’s best if you have multiple saplings in your inventory. Though, the tree farm will start providing new saplings to you in no time.
How Does the Tree Farm Work in Minecraft
Using bone meal on saplings makes them grow at a significantly faster rate. The tree farm in Minecraft relies on this mechanic to give us reliable results. You have to stand at one spot to keep planting saplings on a dirt block. The easiest way to do so is by spamming the secondary action key and then unplugging your controller so that it keeps going on automatically.

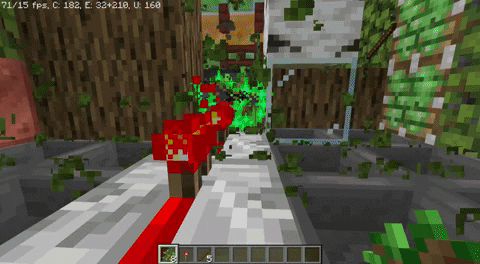
While you plant the saplings, it dispenses bone meals on them to make the saplings grow into trees. As soon as a tree grows, the leaves crushers get activated. They break the leaves of the trees and send the loot from these leaves (apples & saplings) to you. Meanwhile, the log pusher keeps pushing the main trunk of the tree towards the TNT duplicator. There, the logs are exploded by TNT and get collected by the water collection system.
Frequently Asked Questions
Do trees in Minecraft need sunlight?
Trees in Minecraft can grow around any bright source of light.
Can you grow a 4×4 tree in Minecraft farm?
While it is possible, we suggest you do not grow 4×4 trees in Minecraft’s tree farms as they can easily break your farm.
Why is my tree not growing with the bone meal?
If there is a block right on top of the sapling then the tree won’t grow. Moreover, some trees like acacia and dark oak require more space than other trees to grow.
How many Bonemeals does it take to grow a tree?
It usually takes up to 3-4 bone meals to grow a sapling into a tree.
Does TNT duplicator work on the latest Minecraft?
You can use the TNT duplicator even on the Minecraft 1.19 update without facing any issues.
Make Automatic AFK Tree Farm in Minecraft
With that, after extensive effort, you are now ready to make your own AFK tree farm in Minecraft. Once it’s ready, you will never run out of wood, saplings, and apples again. But, as you might have noticed, you need a lot of bone meals to get the farm running. For that, we suggest you make a mob farm in Minecraft, where you can kill skeletons to collect bones. Alternatively, you can also visit the Nether dimension to collect bone blocks. Both bones and bone blocks can be turned into bone meals. Having said that, what are you going to use your tree farm in Minecraft for? Tell us in the comments!


