
Windows 10 offers multitasking support with various notable features, including split-screen view for multiple application windows. Many of us use the split-screen feature on an everyday basis without fully exploring its true potential. So today, we will show you how you can use all aspects of the split screen feature (Snap Assist) in Windows 10. We will also take a look at some apps to split the screen for enhanced multitasking on your Windows 10 computer.
Use Split Screen in Windows 10 to Run Multiple Apps Side-by-Side
In this article, we will show you the various ways you can split the screen in Windows 10 to take full advantage of this built-in feature. We will also tell you about a third-party utility and a Microsoft app that offer additional features to help you multitask like a pro. So without further delay, let’s check out all the different ways in which you can multitask using the split screen feature in Windows 10.
1. Using Snap Assist For Split Screen Multitasking in Windows 10
Windows comes with a built-in feature called Snap Assist that helps users organize the space on their screen more efficiently. The feature enables users to quickly snap windows to the sides or corners using the mouse or keyboard without resizing them manually. First introduced in Windows 7, Snap Assist in Windows 10 includes more functionality, including the ability to snap up to four windows per monitor.
Snap Assist is enabled by default, but you can disable it or manually tweak the features depending on your use case. Here’s how you access can Snap Assist settings in Windows 10:
- Open Settings (press Windows key + I simultaneously) and click on System.


- On the left pane, click on ‘Multitasking’. Now ensure that the toggle under ‘Snap windows’ is turned on. The other three options below the toggle should also be ‘On’ for the feature to work perfectly.

2. Snap Two Windows Side-by-Side
Once you ensure that Snap Assist is enabled, you can snap up to four windows to any part of the screen. To do that, first select the window you want to use in split screen mode. Now drag the window to either the left or right edge of your screen, depending on where you want to snap it. A translucent outline indicates where the window will snap once you drop it. You can see it in action right here:


Once you have snapped the first window to one side, all the other open windows are displayed in the remaining half of the screen as thumbnails. Click on any of the thumbnails to snap that window in the empty half on your screen. Do note that once you’ve snap two windows side-by-side, you can resize them simultaneously by dragging the dividing line between the windows using your mouse.

3. Snapping More Than Two Windows
To snap more than two windows in place, you can drag a window to any corner of your screen. You will again see a translucent outline, and the window will snap to that corner. You will now have the option to snap three more windows to the three other corners on your monitor. But it is also possible to use only three windows in split screen mode in Windows 10 like we do in the example screenshot below.

Overall, Snap Assist will allow you to snap up to four windows on your screen. It could come in handy to keep track of stocks while investing, watching multiple videos, and in many other scenarios.

4. Use Keyboard Shortcuts to Snap Windows
Microsoft also offers keyboard shortcuts in Windows 10 to enable split screen mode. To do that, you first need to select the window you want to snap and press the Windows + Left/ Right arrow key to snap the window to one side of the screen. You can then also press the Windows key + Up/Down arrow keys to move the windows to a corner of the screen. You can also move it around using the Windows + arrow keys.
In my experience, the keyboard shortcuts work as advertised. However, they are neither as intuitive nor as easy-to-use as the drag-and-drop functionality using the mouse. However, it does provide you with an option to snap windows in place without using your mouse, which may prove helpful for some users.
5. Using Third-Party App to Enable Split Screen in Windows 10
While Microsoft offers a native split screen feature in Windows 10, some third-party apps take the functionality to a whole different level. We recommend the free app, AquaSnap, which offers several split screen features, including window docking, snapping, stretching, and shaking. It also supports keyboard shortcuts and helps users keep a window on top by shaking it using the mouse.


AquaSnap also has a premium, paid-for version that offers even more functionality. That includes mouse shortcuts, window tiling, the ability to move windows together, minimizing windows to the tray. Most importantly for gamers and power users, the paid version also offers multi-monitor support. You can check out AquaSnap on the developer Nurgo Software’s official website and see which version best suits your needs.
6. Using Microsoft PowerToys ‘FancyZones’
Another way to split the screen in Windows 10 is by using an official utility called PowerToys. Developed by Microsoft, it includes a feature called ‘FancyZones’ that acts as a supercharged window manager for all your multitasking needs. As we saw in our article on how to use PowerToys on Windows 10, it lets you tweak the window locations for efficient usage of space on your monitor.
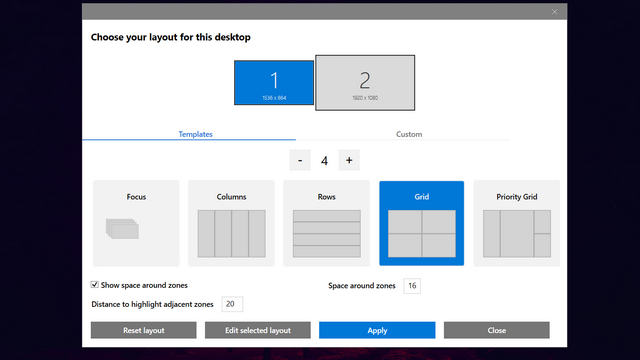
PowerToys enables you to activate the layout editor with a keyboard shortcut (Windows key + `). It also lets you use one of the five built-in templates, including focus, columns, rows, grid, and priority grid, or you can create a custom layout to suit your needs. You can also override the default Windows Snap shortcut (Windows + left /right arrows) to switch between zones.
Use Split Screen Mode in Windows 10 to Multitask Like a Pro
Multitasking is a breeze in Windows 10 with the split-screen view as it enables you to use multiple programs at once. Hopefully, this tutorial will help you make better use of the split screen function in Windows 10. Now that you have learned that, check out some of our other Windows 10 tutorials as well. You can learn how to password protect files and folders in Windows 10, how to find saved Wi-Fi passwords, and how to disable the lock screen in Windows 10. Also, learn to create a system restore point and fix network connection issues in Windows 10.

