
When you start learning something new, even the simplest tasks feel confusing, and that can be frustrating for anyone. Say renaming a file is one of the most basic tasks for file management, but newbies might face difficulty in renaming a file or batch renaming files in Linux. To help you with it, we have explained four easy ways to rename a file or even multiple files in Linux using the command line interface (CLI) as well as the GUI.
First, we will explain how to use the mv and rename commands to rename files using the Command Line (or Terminal) in Linux. And then, we will learn how to rename or batch rename files using GUI tools, including GPRename and the native file manager in your Linux distro.
Rename Files Using the Command Line
Even though using the command line for the simplest of tasks might sound intimidating at first, it boasts a lot of features and is the fastest way to rename files in Linux. Here, we are using the mv and rename commands, and both of them will work in any Linux distribution.
Rename Files Using mv Command
The mv command stands for “move” with its primary purpose being to move both files and directories in the Linux file system. But we can also use the mv command to rename files. The syntax for the mv command is:
mv <options> <source_file> <destination_file>
| Options | Description |
|---|---|
--backup | to make a backup of each existing destination file |
-f | to prevent the command from making a prompt before overwriting |
-i | to prompt before moving |
-u | to move the file only if the <source_file> is newer than the <destination_file> |
-v | to show information about the current operation being done |
| -n | to prevent an existing file from being overwritten |
Note: If you use any of the -i, -f, -n flags more than once, only the final one takes effect.
Rename Single File Using the mv Command
To rename a single file using the mv command, use the below-given syntax:
mv -v <old_file_name> <new_file_name>
The command results in the output below as confirmation, and you can verify the changes made using the ls command.
renamed '<old_file_name>' -> '<new_file_name>'

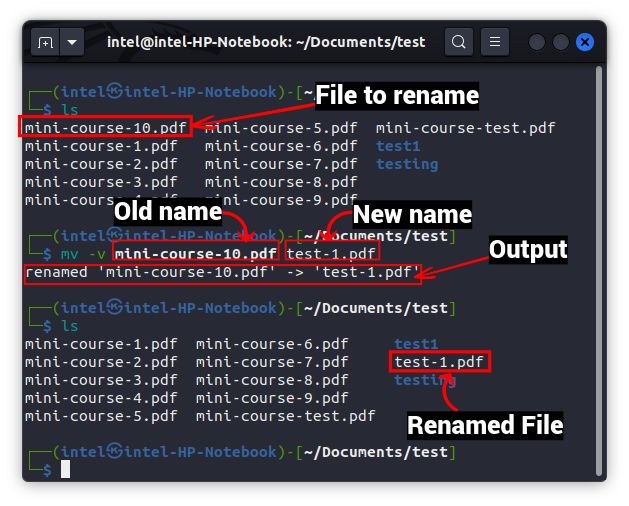
In the above example, we are renaming the file “mini-course-10.pdf” to “test-1.pdf” using the mv command. Here, the syntax looks like this:
mv -v mini-course-10.pdf test-1.pdf
After that, you can verify the change from the output of the mv command (highlighted in the image above), or you can further verify the output using the ls command. You will see the renamed file in the list of files in that directory.
Rename Multiple Files using the mv Command
The mv command can also be used to rename multiple files in a directory with some modifications. Here we will use some new commands along with the mv command. The command can prove to be difficult to understand with just raw syntax, so we have used it as an example below.
for i in *.pdf;do
        mv -v "$i" "${i/${i:0:4}/example}"
done
The above code snippet might look complex to beginners, but it is easy to understand. Once executed, the code snippet will look through the list of files with the extension “.pdf” repeatedly. It will then replace the first 4 characters of each file name with the replacement text “example“. Finally, it will stop executing when all the files have been renamed.


Rename Files Using rename Command
The rename command solves the complexity of the mv command with easy-to-use syntax for both single and multiple file renaming. The rename command generally comes pre-installed on most distros. If not, you can easily install it using a simple command:
- For Debian-based systems –
sudo apt install rename
- For Fedora-based systems –
sudo yum install prename
- For Arch-based systems –
sudo pacman -S install rename
The syntax to use the rename command in Debian-based systems is as follows:
rename <options> 's/<old_name>/<new_name>/' <file_names>
Since the rename command uses Perl in the backend, there are three types of regular expressions – match, substitute, and translate in Perl. The rename command uses the “substitute” and “translate” regular expressions. In the syntax above, the “s” is used to specify that you will use the substitute expression.
For RedHat, Fedora-based systems, you need to use the following command syntax:
rename <options> <old_name> <new_name> <file_name>
Some of the common options to work with the rename command are:
| Options | Description |
|---|---|
-v | Shows information about the current operation |
-n | stands for “no action” and is used for testing to see how the files are going to get affected after the operation |
-f | used to force overwrite the file name |
Rename a Single File
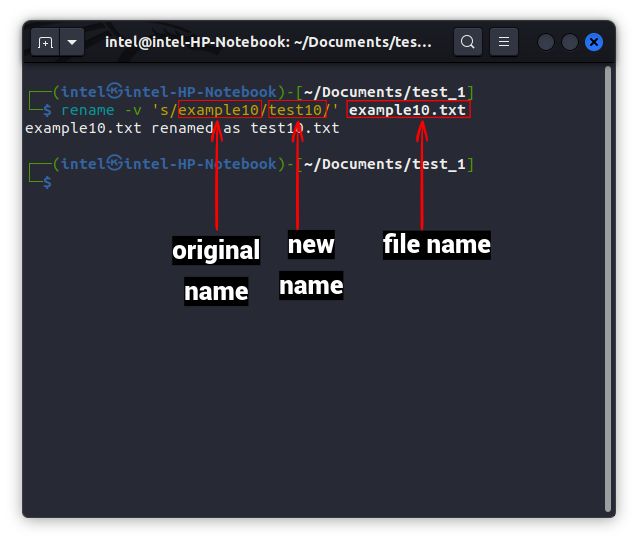
The rename command works much like the mv command when renaming a single file. To rename a single file, use the following syntax:
rename -v 's/<original_name>/<new_name>/' <file_name>

Rename Multiple Files
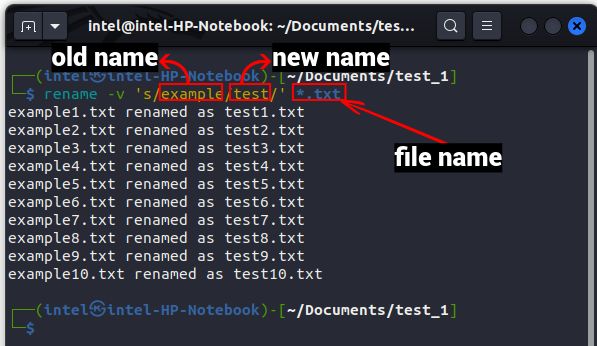
The main advantage of the rename command over the mv command comes into play when renaming multiple files. The syntax is simpler and faster to use. Here’s what it reads like:
rename <options> 's/<old_name>/<new_name>/' <files_to_rename>
The above syntax is similar to the one we used for renaming a single file except for the <files_to_rename> part, where you can use a common pattern using wildcards in order to recognize all files in a directory.

Rename Files Partially
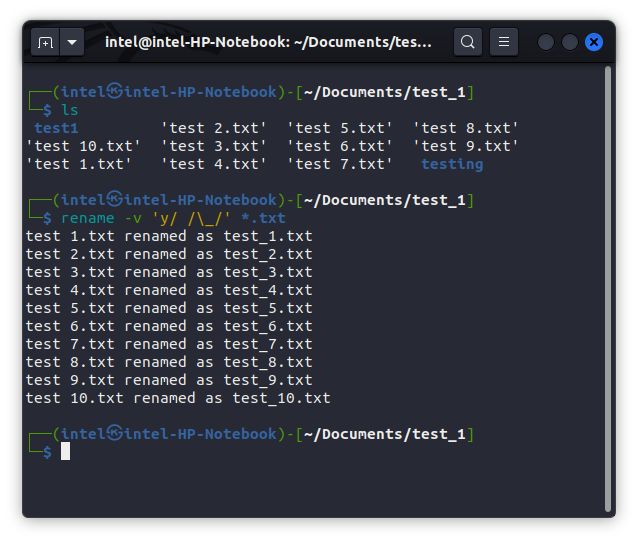
Suppose you have used spaces in all your file names, and now, you want to replace the spaces with underscores. You can use the rename command and convert spaces to underscores using the syntax shown below:
rename -v 'y/<original_part>/<part_to_replace>/' <files_to_rename>
Here, place the part that you need to replace in the <original_part>, and write the pattern you want to replace the <original_part> within the <part_to_replace>. The y is used to signify that you are using the “translate“ regular expression.
For the above situation to replace spaces with underscores, use the given command:
rename -v 'y/ /\_/' <files_to_rename>
Here, the \ is used to treat the underscore as a character and not a part of the command syntax.
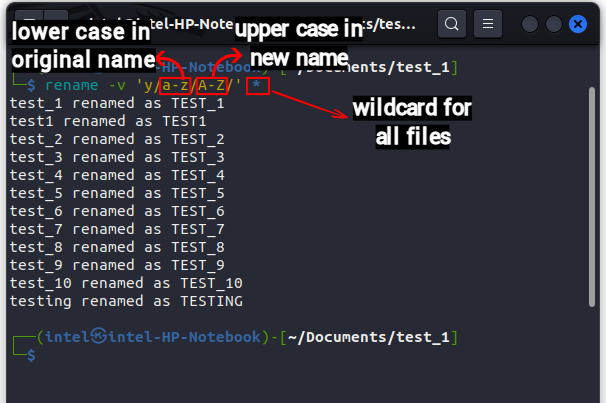
Change The Case of The Filenames
With the rename command, you can even replace the lowercase characters with their respective uppercase characters and vice versa. To replace the lowercase characters with uppercase ones, use the following syntax:
rename 'y/a-z/A-Z/' <files_to_replace>
And to replace uppercase characters with lowercase ones, use this syntax:
rename 'y/A-Z/a-z/' <files_to_replace>

Rename Files using the GUI in Linux
The GUI method is probably a boon for those users who find the command line daunting. For the GUI method, we are using the Nautilus File manager and GPrename in Ubuntu 20.04 LTS, but rest assured that these methods will work on any distribution – albeit with slight modifications in some.
Rename Files Using File Manager
This is one of the easiest methods to rename files in Linux. Every Linux desktop distribution comes pre-installed with a file manager such as Nautilus, Dolphin, Thunar, etc. We have explained how you can use these file managers to rename files, so keep reading.
Rename A Single File
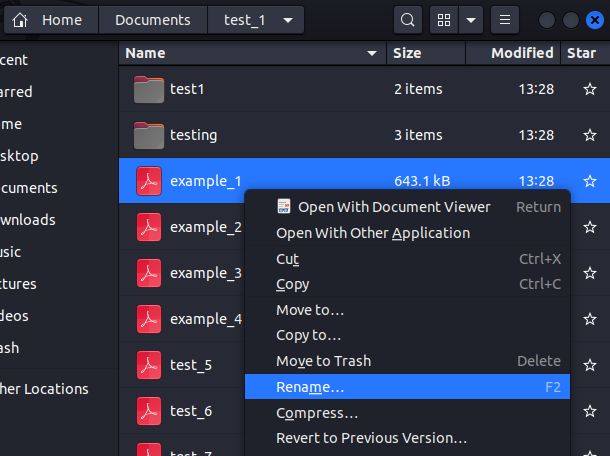
1. Open the File manager of your choice and navigate to the file which you want to rename. Select the file and right-click on it.
2. From the right-click menu, select the “Rename” option. Alternatively, press the F2 button on your keyboard to rename files without using the mouse.

3. Then, type in the new name for the file and click on “Rename” or hit Enter on the keyboard. And that’s it.


Rename Multiple Files Using File Manager
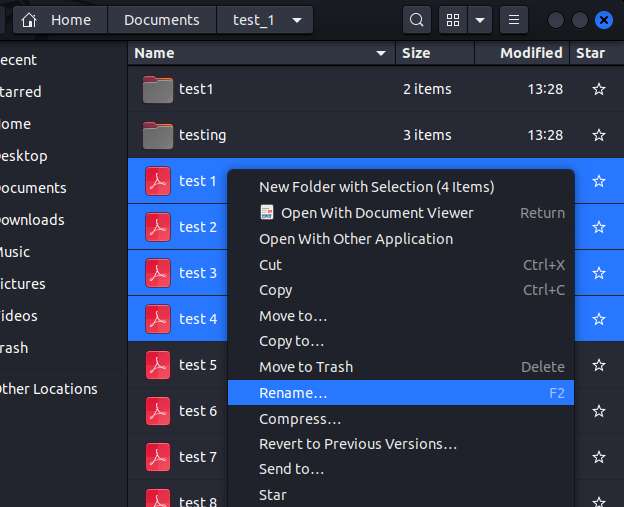
1. Select multiple files you want to rename by pressing the Shift button and then right-click on the selected files to open the context menu.
2. In this context menu, select the “Rename” option. Or, you can press the F2 button on the keyboard to access the rename option.

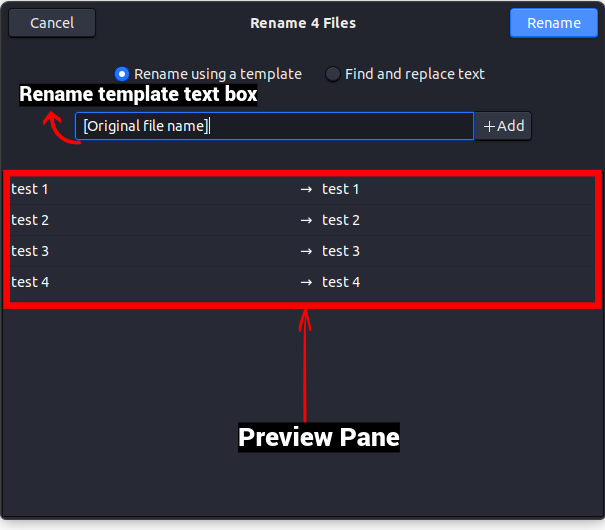
3. This will open a new rename window, as shown below. Here, you get two options to rename the files, so let’s learn how to use both of them one by one.
Rename Using a Template:
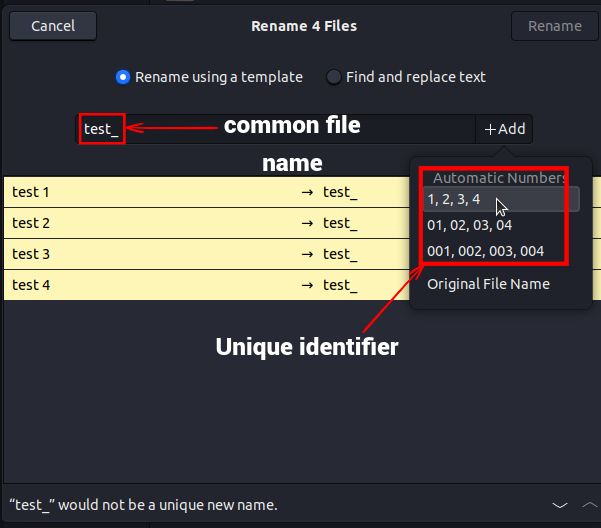
1. In this option, you will see a text box with the default value as [Original file name]. In the text box, enter the common name that will be used for all the files.

2. We are using “test_” as the common file name here. Next, click on “+Add” next to the common name and choose the automatic numbering scheme to be used as a unique differentiator for each file.

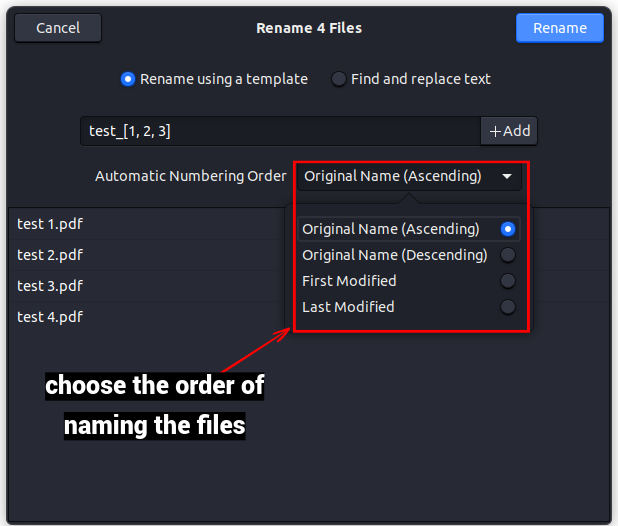
3. Then, choose the order of naming the files from the “Automatic Number Order” drop-down menu. You can choose between Ascending, Descending, and more.

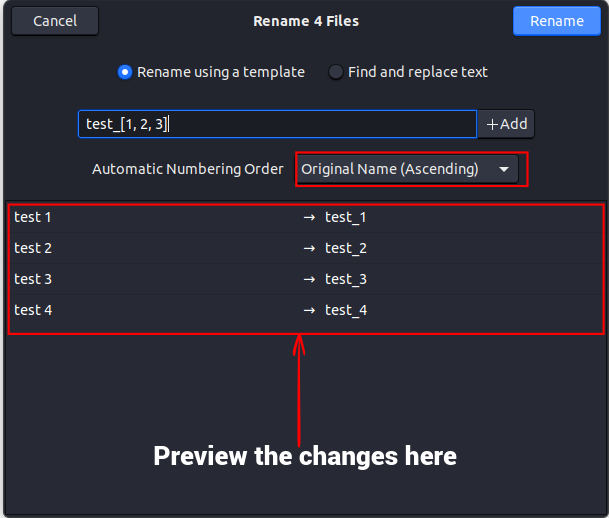
4. Verify the changes in the bottom pane and finally click on “Rename” in the top right corner.

Find and replace text:
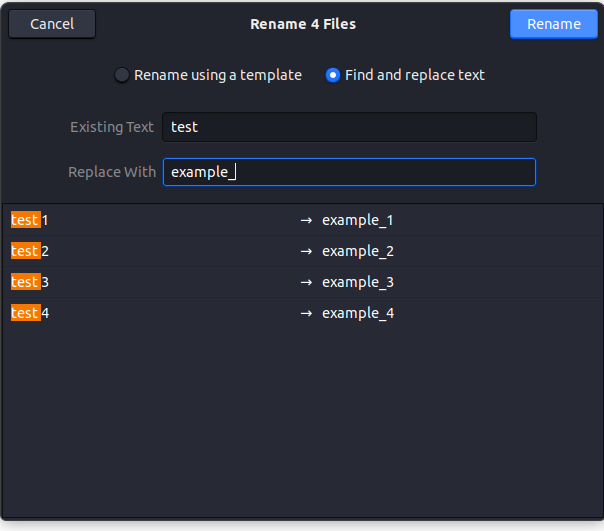
You can use this option when your file name already contains a common name, but you need to replace it with a new text. Here’s how it works:
1. Enter the current common name in the “Existing Text” field. In the bottom pane, you will see the common name get highlighted.
2. In the “Replace With” text box, enter the new common name you want to replace the current name with.
3. Verify the changes in the bottom pane and click on “Rename” in the top right corner to apply the same.

Using GPRename to Rename Files
GPRename is a lightweight batch renaming tool that comes with several different options that can prove useful while renaming files using the Linux GUI. This tool can be helpful for users who find it difficult to batch rename files using their native file manager. Sadly, it doesn’t come pre-installed, but can easily be installed using the following commands:
- For Debian-based systems –
sudo apt update && sudo apt install gprename
- For Fedora-bassed systems –
sudo dnf install gprename
- For Arch-based systems –
sudo pacman -S gprename
Rename A Single File with GPRename
1. Open GPRename from the Applications menu or type gprename in the Linux Terminal.
2. Use the file system tree on the left to navigate to the desired folder. Then, select the file you want to rename in the right pane.

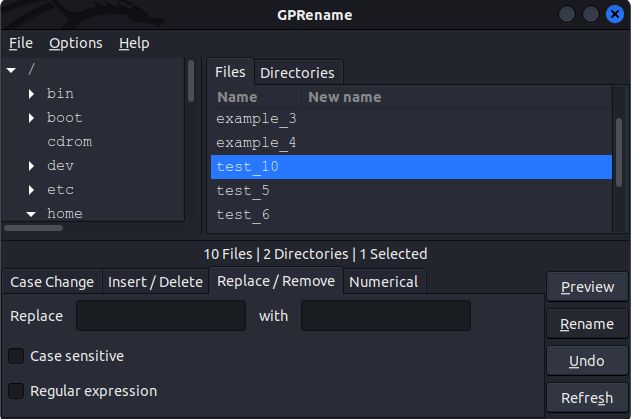
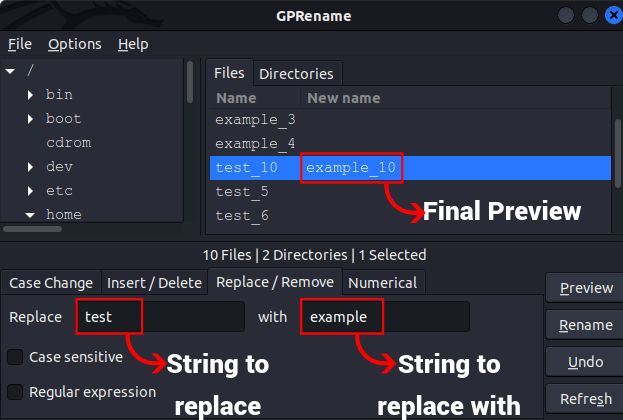
3. In the bottom pane, select the action you wish to take. For example, if you want to replace a word in the file name with another word, go to the “Replace/ Remove” tab. Next, enter the string you want to replace in the “Replace” text box and the new string in the “With” text box.
4. Verify the changes using the “Preview” button on the right. Once you are satisfied, click the “Rename” button under it.

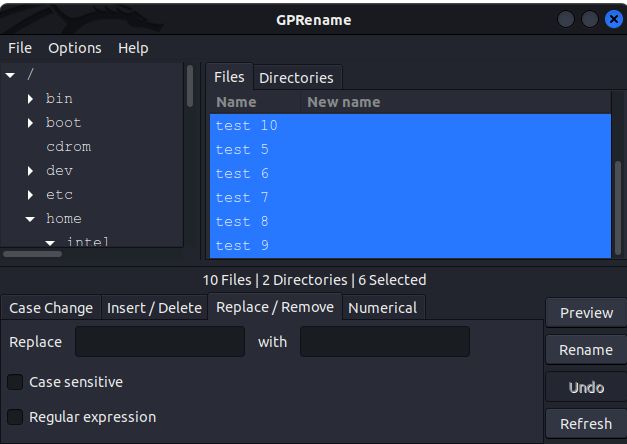
Rename Multiple Files with GPRename
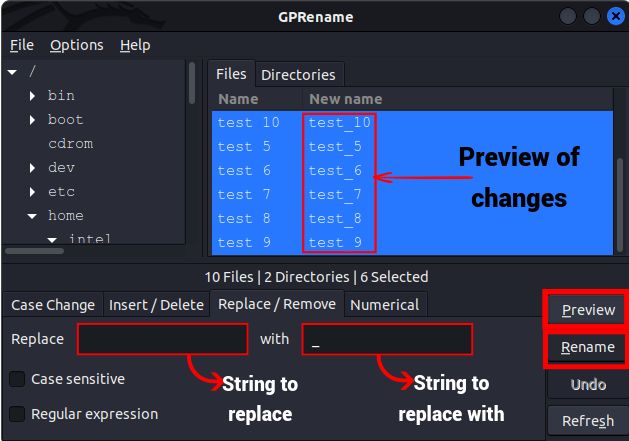
1. As explained above, use the file system tree on the left to navigate to the desired folder. Then, select the files you want to rename and choose the appropriate option from the bottom pane.

2. To verify the changes, click on the preview button on the right and finally click on the “Rename” button below it.

As a beginner, it is important to understand the nuances of file management in Linux and renaming files is something you might need to do often. In this guide, we have shown you four methods (2 CLI and 2 GUI) to rename a single file and multiple files in a directory. Though the file manager will likely be the go-to for most Linux users, the mv and rename commands explained above are also widely used for renaming files via the Terminal. Which of these methods do you prefer to rename files in Linux? Let us know in the comments below.
Even though the rm command may seem like an acronym for rename, it stands for remove and is used to delete files and folders in Linux.

