Installing beta updates on iPhones and MacBooks is a fairly easy task. You simply need to enroll yourself in the Apple Beta program and install the updates when you receive them. However, the same is not the case for the AirPods. Apple does not offer an easy way to simply install beta firmware on AirPods, AirPods Pro, and AirPods Max.
Installing AirPods beta software is a tricky task and requires fiddling with Developer Mode on an iPhone, that in itself, is intended only for developers and testers. But you need to install the latest beta firmware to test out new AirPods features like Adaptive Audio. Below, we have detailed the steps to installing AirPods beta firmware, but we would not recommend you to do so unless you are ready to take some serious risk.
Note: Once you install AirPods beta firmware, Apple does not offer any method to roll back to a stable version. Your AirPods will continue to run on beta firmware until a stable (non-beta) firmware is released. While you can choose to stop receiving beta updates, there’s no option to downgrade to a stable version.
Prerequisites to Install AirPods Beta Firmware
As stated above, installing beta software on AirPods is not a straightforward process and there are a couple of prerequisites that you need to fulfill before you begin the process.
- Installing beta firmware is only supported on a few AirPods models, namely AirPods (2nd and 3rd Generation), AirPods Pro (1st and 2nd Generation), and AirPods Max.
- iPhone and a Mac device with the Xcode app.
How to Install Beta Firmware on AirPods Pro
Now that you have met the requirement, it’s time to begin the process. We are using AirPods Pro 2 for this guide, but the procedure is the same for all the supported AirPods models.
Step 1: Enable Developer Mode on iPhone
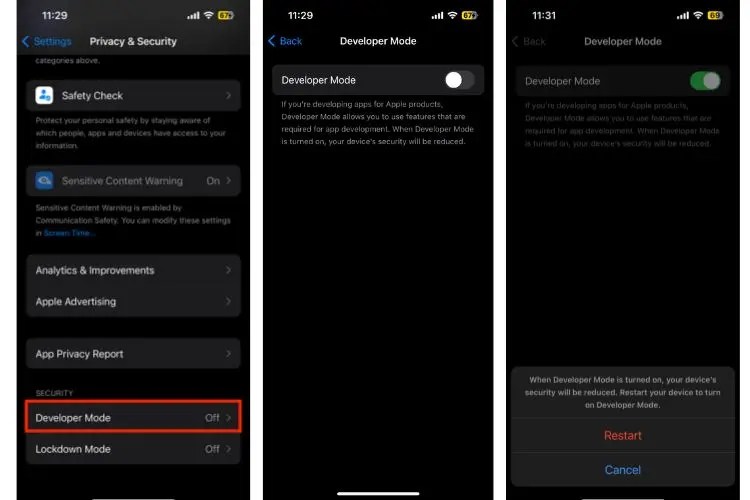
You can only install beta firmware on your AirPods if you have enabled Developer Mode on your iPhone. Here’s how you can enable the Developer Mode on your iPhone via the Settings app.
1. Open the Settings app on your iPhone and go to the Privacy & Security section.
2. Scroll down and find the Developer Mode option. Turn on the toggle to enable Developer Mode. Your iPhone will now restart.

If you don’t find the Developer Mode option on your iPhone, you will have to enable it using Xcode. Refer to our detailed guide on how to enable Developer Mode on your iPhone.
Step 2: Turn on AirPods Pre-release Beta Firmware
Now that you have enabled Developer Mode on your iPhone, follow the next steps:
1. Go to Settings -> Privacy & Security and then tap on the “Developer Mode” option.
2. Scroll down and tap on the “Pre-Release Beta Firmware“ option under the AirPods Testing menu. Enable the toggle against your AirPods name. Finally, tap on Agree.
Now, you might have to wait up to 24 hours to get the new AirPods beta firmware as there is no way to “force update” AirPods at the moment. Apple says your AirPods will receive the beta firmware update when your AirPods are in their case and near the iPhone on which you have enabled the toggle. The beta software will be auto-installed.
Step 3: Check AirPods firmware version
While Apple does not notify you when your AirPods are updated to the beta firmware, you can check manually. Here are the steps for that:
1. Under Bluetooth in the Settings, tap on ‘i’ against your AirPods’ name and check the version.
For reference, the latest stable AirPods Pro 2 firmware version is 5E135, and the beta firmware build number is 6A238h.
How to Turn off Beta Software Updates for AirPods
Now, if you wish to stop receiving beta updates for AirPods, AirPods Pro, or AirPods Max, you can turn off the toggle against your AirPods name in the Developer option on your iPhone.
Please note that this will only stop your AirPods from receiving future beta firmware updates and will not downgrade to the stable version. Your AirPods will keep on running beta firmware until a stable update arrives for them.