
With iOS 16, Apple introduced a Developer Mode for iPhones. This new feature allows users to access features that are hidden and using them inadvertently might lead to unexpected errors and abnormal device behavior. While it is not recommended to try out such features unless you are a developer who knows the nitty-gritty of what you are doing, sometimes curiosity kills the cat. For such times, you must know how to turn on Developer Mode on your iPhone if you want to debug an app, and it is not as straightforward as turning on a toggle. So, let’s look at the detailed steps to enable Developer Mode on iPhone.
Prerequisites to Enable Developer Mode on iPhone
First things first, you need a MacBook and an iPhone (of course) to access Developer Mode on your iOS device. Here is the list of items that you must gather before starting the procedure.
- iPhone running iOS 16 or above
- A Mac device with macOS Ventura 13.3 or later
- A lightning cable to connect iPhone to the Mac
How to Enable Developer Mode Directly via Settings
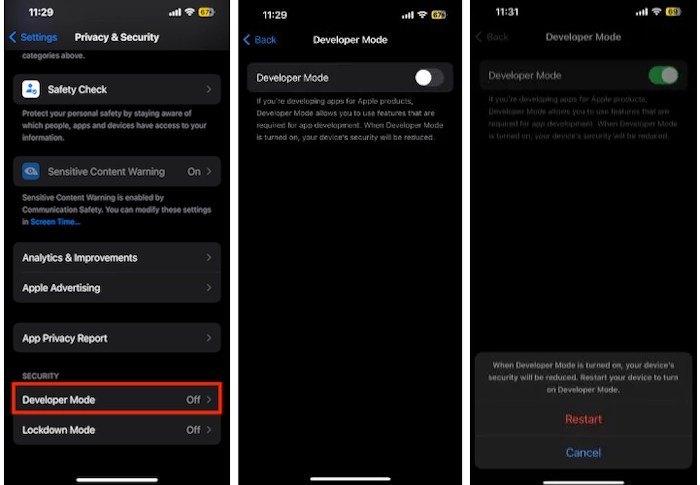
The easiest way to enable Developer Mode on your iPhone is via the Settings app. Here are the steps to follow:
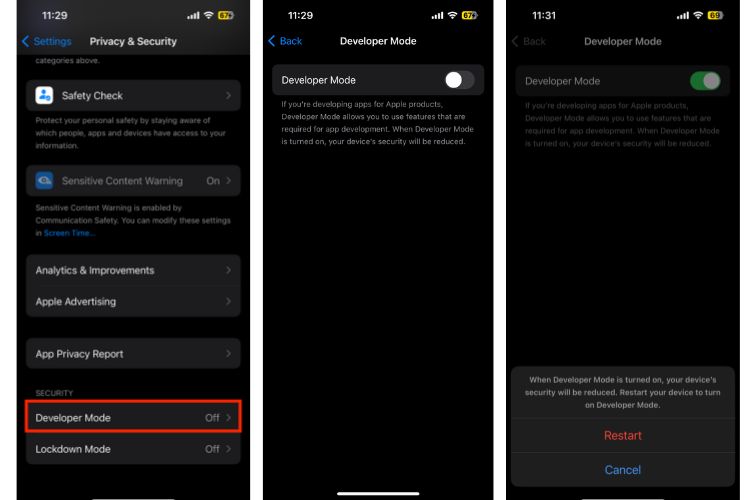
1. Open the Settings app and go to the Privacy & Security section. Here, scroll down and find the Developer Mode. Tap on it and enable the Developer Mode toggle.
2. You will be prompted to restart your iPhone to turn on Developer Mode.

How to Enable Developer Mode via Xcode on iPhone
Now, in our testing, this option was not available for some users, and they had to resort to a longer route to enable Developer Mode on their iPhones. The longer method involves installing Xcode, Apple’s integrated development environment for macOS.
Follow the guide below for the steps to turn on Developer Mode on iPhone via Xcode:
Step 1: Download & install Xcode
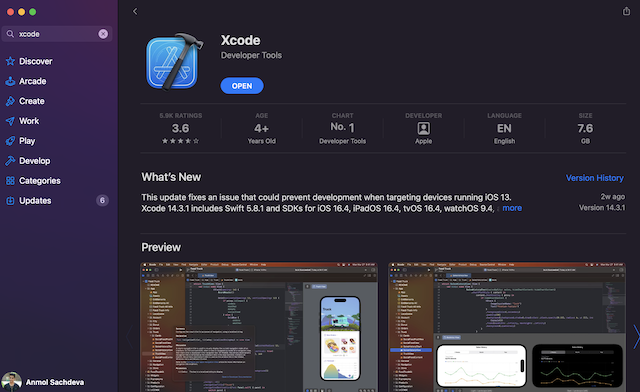
1. Go to the App Store on your macOS device and search for Xcode. Download the Xcode app (Free).

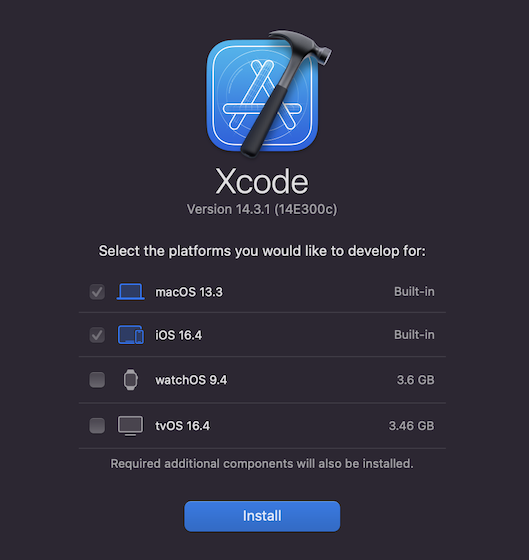
2. Open the Xcode app and accept the terms and conditions. Enter your device’s password to proceed.
3. Click on the Install button on the subsequent window.

Step 2: Connect iPhone to Mac & Enable Developer Mode
Once you have installed Xcode on your Mac, you can easily turn on developer mode on your iOS device. Here are the steps:
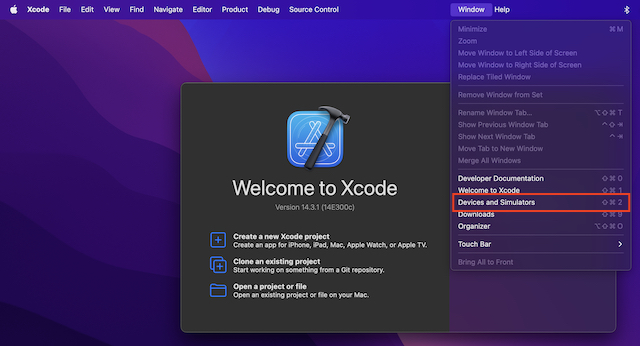
1. Connect your iPhone to your Mac using a wired connection.
2. Now, from the menu bar, go to Window -> Devices and Simulators.

3. If you are connecting your iPhone for the first time with your Mac, click on the “Trust this Computer” option when it appears.
4. Now, on your iPhone, go to Settings ->Privacy & Security, scroll down and you will see the Developer Mode option.
5. Tap on Developer Mode and turn on the toggle. Your iPhone will restart to turn on the Developer Mode.

Now, even if you disconnect your iPhone from your Mac, the Developer Mode option will be available on your iPhone. And you are ready to install the AirPods beta firmware or test your apps on your iPhone with ease.


