Time flies by when you are working on your PC or even if you are just playing a game that has you really engrossed, which can sometimes ruin your schedule. If you really want to discipline yourself, it’s important that you schedule your working hours or gaming hours. And you can do that by setting up your Windows 10 PC to automatically shutdown after a period of time or at a certain point of time daily. There are a couple of ways to schedule shutdown in a Windows 10 PC. Well, without further ado, here’s how you can auto shutdown Windows 10 PC:
Method 1: Schedule auto shutdown with Task Scheduler
You can use Windows’ built-in Task Scheduler to create a task, which will automatically shutdown your Windows 10 PC with ease. Here are the steps you need to follow:
1. Just hit Windows 10’s Cortana search bar and search for “Task Scheduler” and you should find the relevant result. Click on it.

2. The Task Scheduler window should open up. Here, click on “Create Basic Task…“.

3. You can then set a name for the task and add a description. Once done, click “Next”.

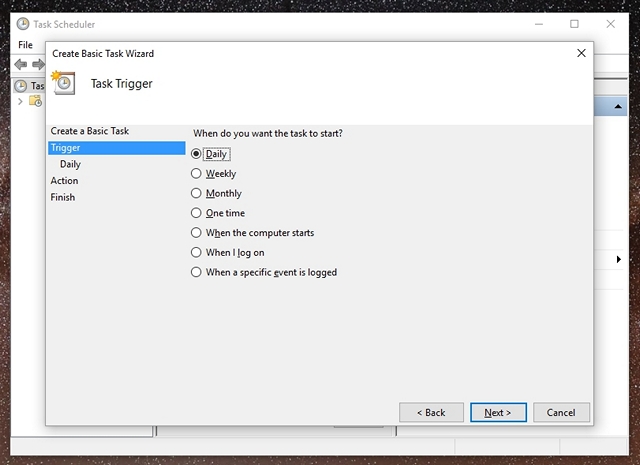
4. Then, you can set up whether you want the task to be active daily, weekly, monthly or you just want the task for this one time. You can choose to trigger the task when you log in to the computer, when the computer starts or when a specific event is logged in.

5. Once done, you can choose the exact time at which you want the task to start. You can also check the option to “Synchronize across different time zones”, if you travel to different countries a lot.

6. After you have selected the time of the task, you will have to choose the action you want the task to take. Choose “Start a program“. You can even choose “Display a message”, if you just want a display reminder to wake you up.

7. Then, hit the “Browse” button in the next page and go to the C:\Windows\System32 folder and select “Shutdown.exe“. In the add arguments section, type “-s -t 1800“, where 1800 is the number of seconds that the computer will take to shutdown after the prompt. Once done, click on “Next”.

8. You will then get an overview of the task. Click “Finish” to complete the task creation.

Once this task is created, you will get a notification at the time you’ve scheduled the task for, suggesting that your Windows 10 PC will shutdown after the specified time. We will recommend you to set the number of seconds in the 7th step, so that you have some time to save your ongoing tasks before your Windows 10 PC automatically shuts down.
Once the task is created, you can go to Task Scheduler->Task Scheduler Library and right-click on the task you’ve created and select “Properties“. Here, you can play around with various security options, conditions, history and more. You can also choose to run, end, delete or disable the task from the right-click menu.

Method 2: Auto Shutdown via Run or Command Prompt
If you don’t want to schedule auto shutdown for daily and you want it only for this one time use, you can use Run or Command Prompt or even Powershell to set a specific time after which the Windows 10 PC will shutdown. Here’s how to do it:
-
Run
Open Run on Windows 10 with the key combo Win+R. In Run, type “shutdown -s -t 1800“, with 1800 (30 minutes) obviously being the number of seconds after which the PC will shut down. Click on “Ok”, after which you will get a notification saying “Windows will shut down in 30 minutes”.

-
Command Prompt
You can just open up Command Prompt or Powershell and run the same command “shutdown -s -t 1800” to auto shutdown Windows 10 PC.

Note: You can replace “-s” with “-r” in all the shutdown commands to auto restart your Windows 10 PC.
SEE ALSO: How to Shutdown or Restart Windows 10 PC with Voice Using Cortana
Ready to automatically shutdown your Windows 10 PC at a scheduled time?

If you are looking to schedule shutdown your Windows 10 PC just for the time being, you can use the second method, as it’s pretty simple. However, if you are looking for an auto shutdown solution for a long term, you should use the first method, which is elaborate and offers a plethora of options. So, try both the methods out and choose the one that suits you better. Do let us know if you face any issues. Sound off in the comments section below.


