
Call of Duty Black Ops 7 is packed with content across all game modes, including the biggest round-based map in Zombies history, Ashes of the Damned. The TranZit-inspired dark aether map is drenched in mystique and features six different locations for you to check out. Of course, the map also comes with its own Wonder Weapon, and even a Wonder Vehicle named Ol’ Tessie that you’ll use to traverse its terrain.
With the game now live, many players are anxious to uncover the main easter egg and are wondering how to go about it. On that note, here’s everything you need to know about the Black Ops 7 Zombies Ashes of the Damned main quest easter egg.
Black Ops 7 Ashes of The Damned Main Easter Egg Explained
The Black Ops 7 Zombies Ashes of the Damned main quest has you upgrading Ol’ Tessie, rescuing Klaus, defeating one fearsome enemy after another, and deciphering a code in Yuri’s lab before taking on Veytharion. It’s easily one of the longest easter egg hunts in Zombies’ history, which is why it took the community over 11 hours to complete.
Here’s a simple breakdown of how to complete the main easter egg before we jump into detailed sections:
- Follow the directed steps to unlock the Pack-A-Punch and place it on Ol’ Tessie.
- Now, head to the Diner near Exit 115 and kill a Zombie to obtain the Freezer Key.
- Use the key to open the freezer near the kitchen, and retrieve the Abomination Carcass. Interact with the Ol’ Tessie to upgrade the Wonder Vehicle.
- Go to Janus Plaza, and you’ll find an Uber Klaus enemy patrolling the roads nearby. Defeat it to obtain the Stabilizer Chip.
- After this, head to a Crafting Table and create at least four Stun Grenades.
- Head to the Sheriff’s Office in Ashwood, and you’ll find Klaus locked up inside.
- Lob four Stun Grenades through the cell’s bars, make sure they land close to Klaus.
- Doing so will see Klaus break his chains and fly through the ceiling. You’ll be able to interact with him and control his location outside.
- Now, head to Support Systems in the Zarya Cosmodrome, and summon Klaus to remove the panel hiding an Aether Barrel inside.
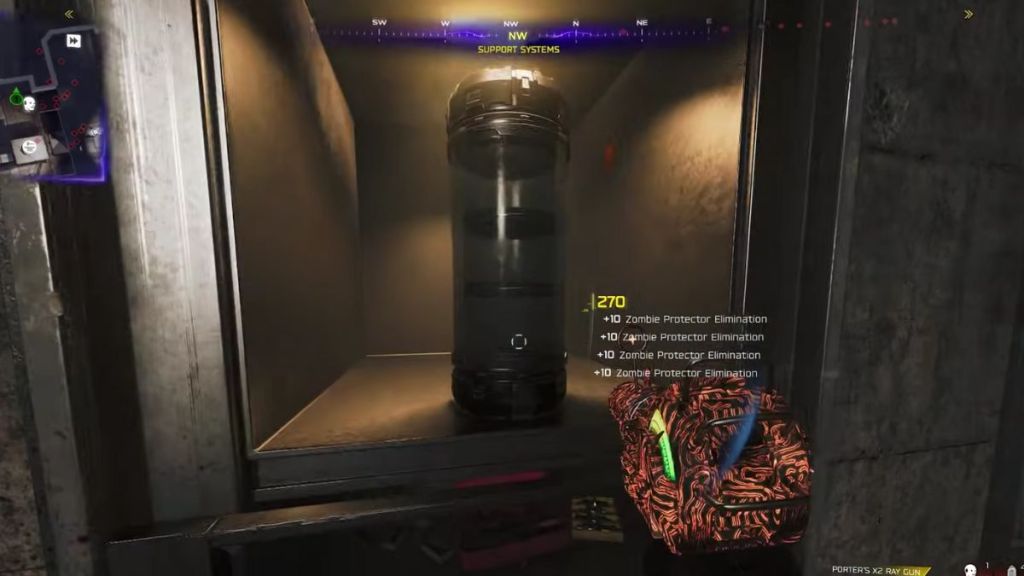
- Take the barrel to the Power Pumps at Ashwood, Vandorn Farm, and Blackwood Lake to extract its energy.
- Once the extraction is done, take the Aether Barrel to the underground cellar at Vandorn Farm and place it in the dark cube.
- After 30 seconds, you’ll see a bunch of symbols form around the cube. You’ll need to find three symbols displayed on nearby buildings and then match them on the cube.
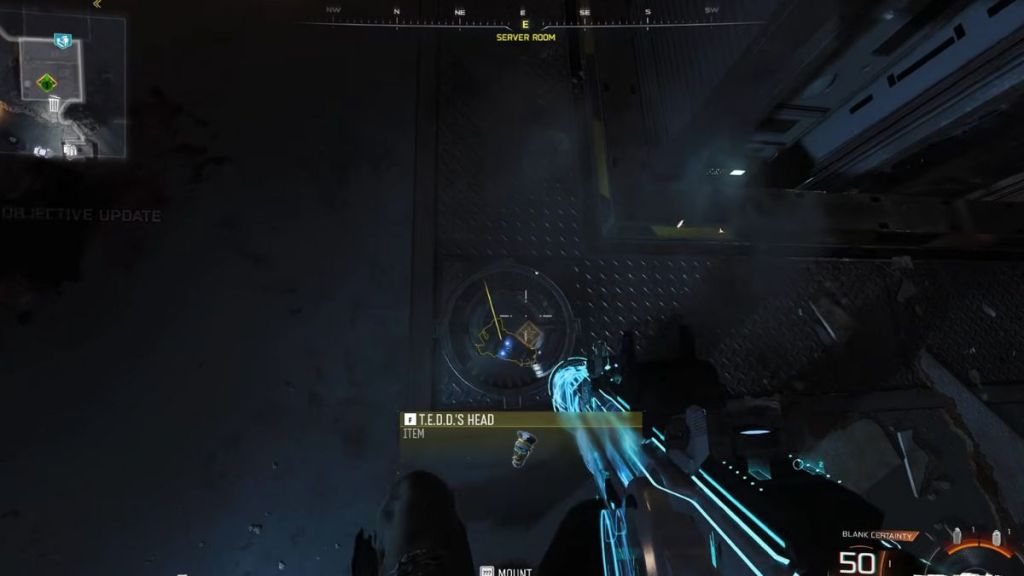
- If done correctly, a red eye will pop up on the side. Interact with it to obtain the Nercofluid Gauntlet Wonder Weapon.
- Now, you’ll have to collect six different ingredients by killing specific enemies to gather the ingredients for a serum. Take these items back to Yuri’s lab and place them in the trays to start a lockdown.
- You’ll now need to decipher a code in the lab, and if done correctly, you’ll be prompted to add your blood to the serum.
- After completing the previous step, you’ll need to go around collecting the Nightbird, Terrapin, and Bruin Keys.
- Doing so will unlock the DG-2 Turret Barrel upgrade for Ol’ Tessie, marking the midway point of the main quest.
- Before jumping to the final step, you’ll now have to complete every side easter egg in Ashes of the Damned. There are a total of four side objectives that you’ll need to wrap up the final boss.
- Once that’s done, hop inside Ol’ Tessie with your squad and head towards Blackwater Lake. Here, you’ll need to interact with Klaus to start a boss fight vote.
- Wait 20 seconds and then drive through Monolith Forest. You’ll spot glowing wisps that you’ll need to collect. These can be found in the major POIs of the map, and you’ll need to collect three wisps in every section.
- If you manage to collect the wisps in time, the final boss fight against Veytharion will automatically be triggered.
Activate Pack-A-Punch
On-screen indicators make activating the Pack-A-Punch machine pretty straightforward. Right after spawning, you’ll basically need to access Ol’ Tessie before driving the Wonder Vehicle to three Power Pumps scattered around the map. After clearing these pumps of infestation, you’ll need to restore power to the Ashwood POI. This will open up a garage where you can park OI’ Tessie, and inside will be the Pack-A-Punch upgrade for the vehicle.
Obtain the Abomination Carcass
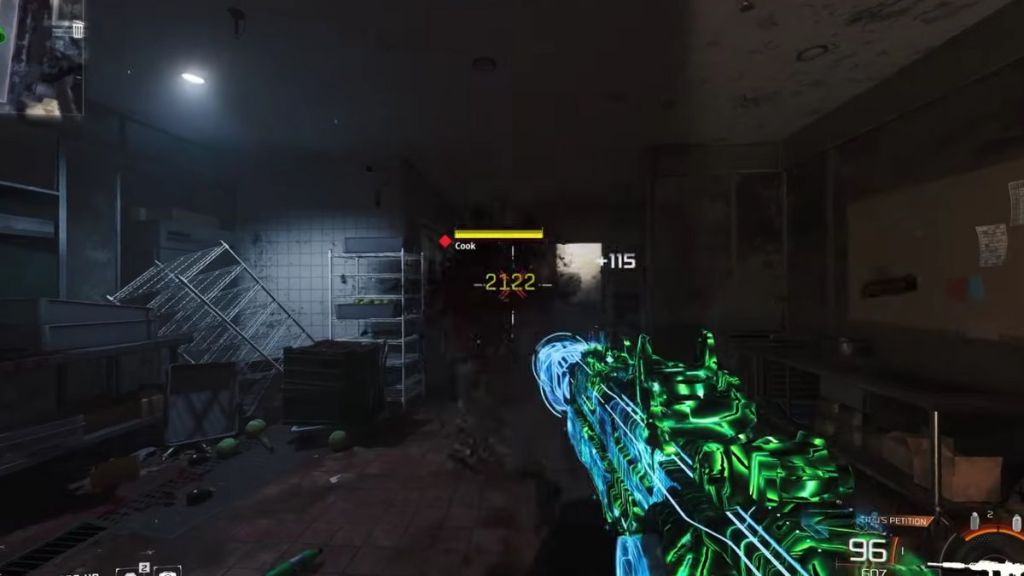
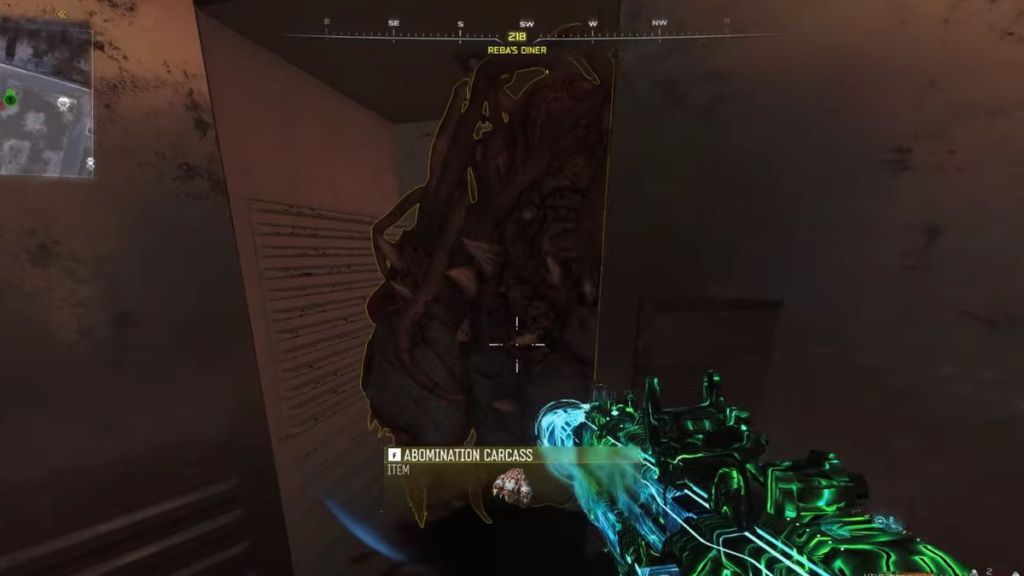
After installing the Pack-A-Punch, head to the diner near Exit 115. Inside, you’ll find a bunch of zombies (of course), including one named Cook. On dying, this zombie will drop the freezer key. Use it to unlock the cold storage near the kitchen and collect the Abomination Carcass, which can be used to upgrade the Wonder Vehicle.
Defeat Uber Klaus and Collect Stabilizer Chip
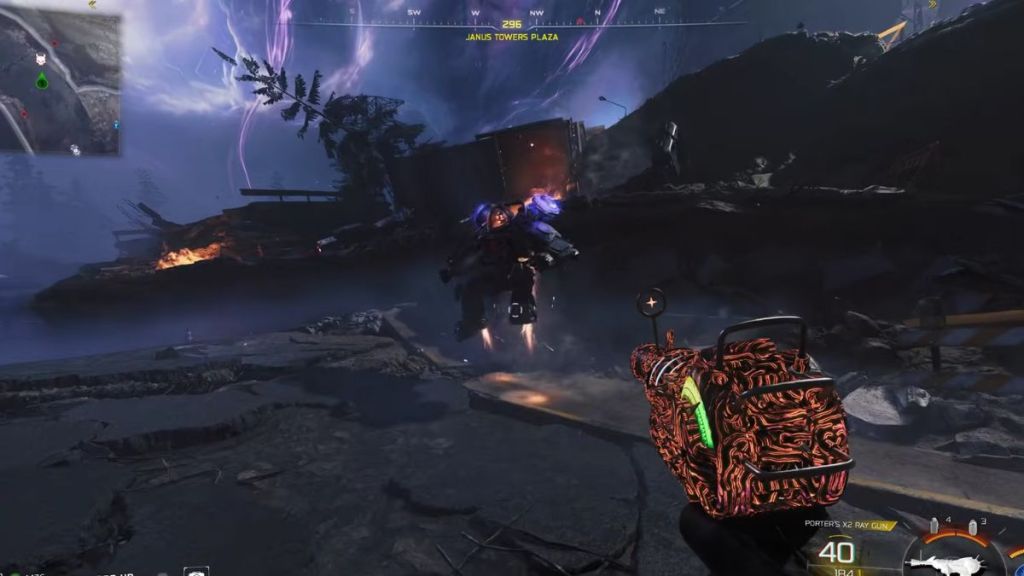
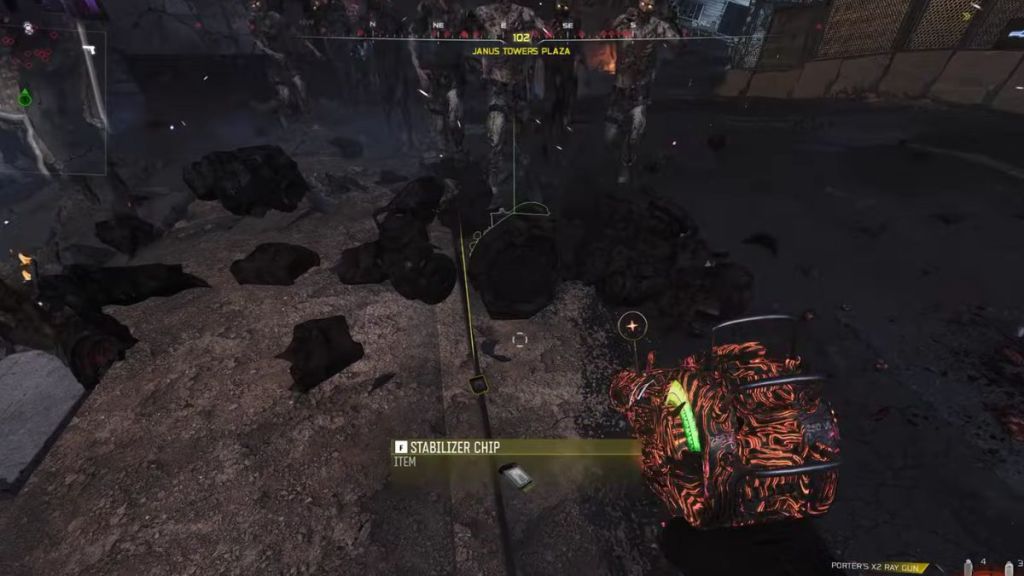
After reaching Round 8, you’ll want to head towards Janus Tower Plaza. On the road leading up to the POI, an Uber Klaus enemy will spawn. Make sure you’re well-equipped before taking it on. Once the enemy is down, it’ll drop the Stabilizer Chip item.
Rescue Klaus
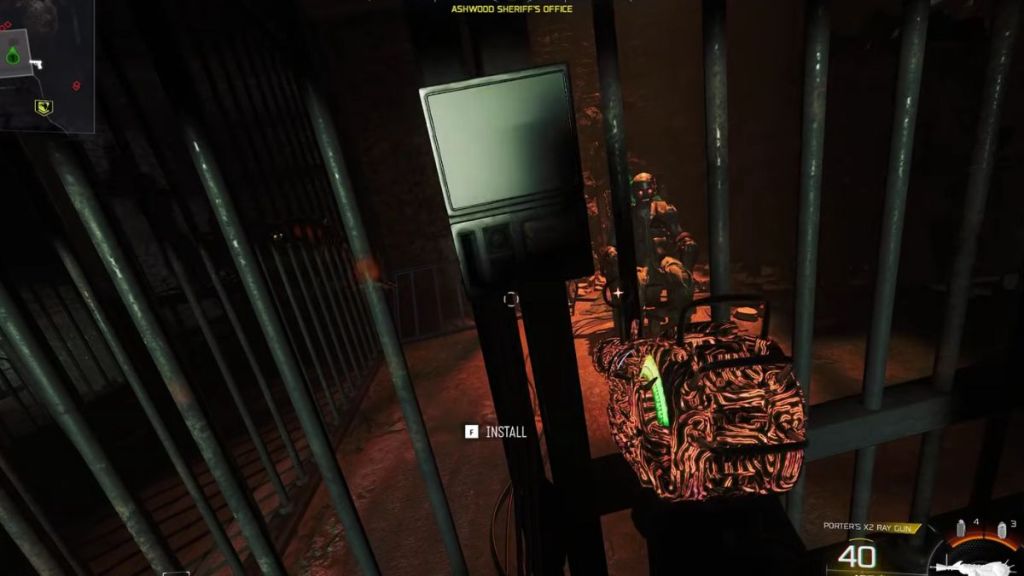
Once you’ve got the chip, head to a crafting station or purchase at least four stun grenades. Take them to the Sheriff’s office in Ashwood. Inside, you’ll find Klaus locked up in a jail cell. To rescue him, slot the chip into the panel placed on the cell. Now, lob four stun grenades towards him, make sure they land near him. After he’s stunned, Klaus will fly through the ceiling, land outside the office, and start following you.
Obtain the Necrofluid Gauntlet
Collecting the Wonder Weapon requires the completion of multiple steps. Here’s how to go about it:
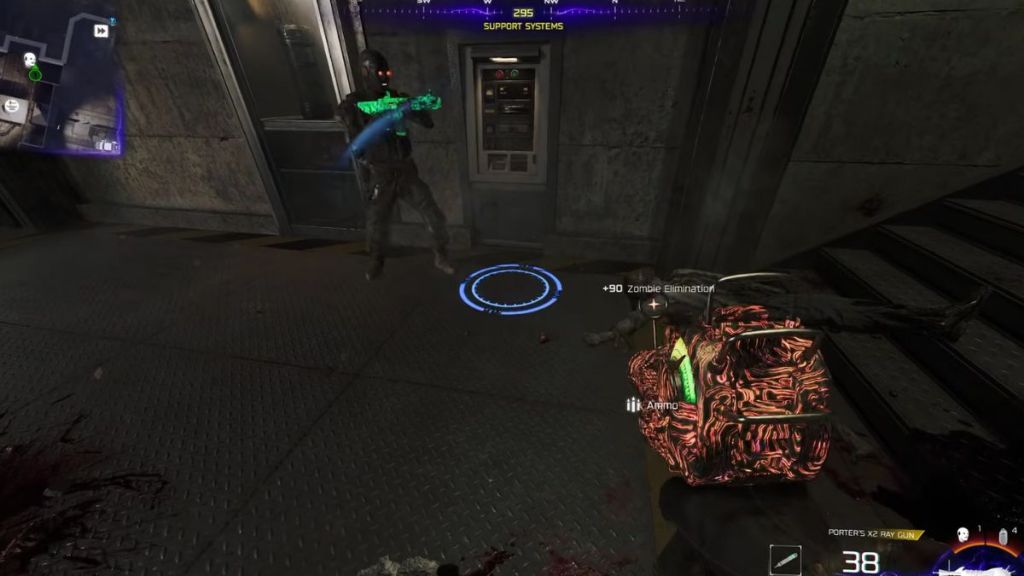
- Head to the Zarya Cosmodrome POI and towards the ramp on the right. You’ll find a panel on the wall nearby. Spawn Klaus to activate it and obtain the Dark Aether barrel.
- Take the Dark Aether to all three Power Pumps from the start of the quest and place it inside. You’ll need to hit all three locations within two minutes. Make sure to go to the Vandorn Farm Power Pump last.
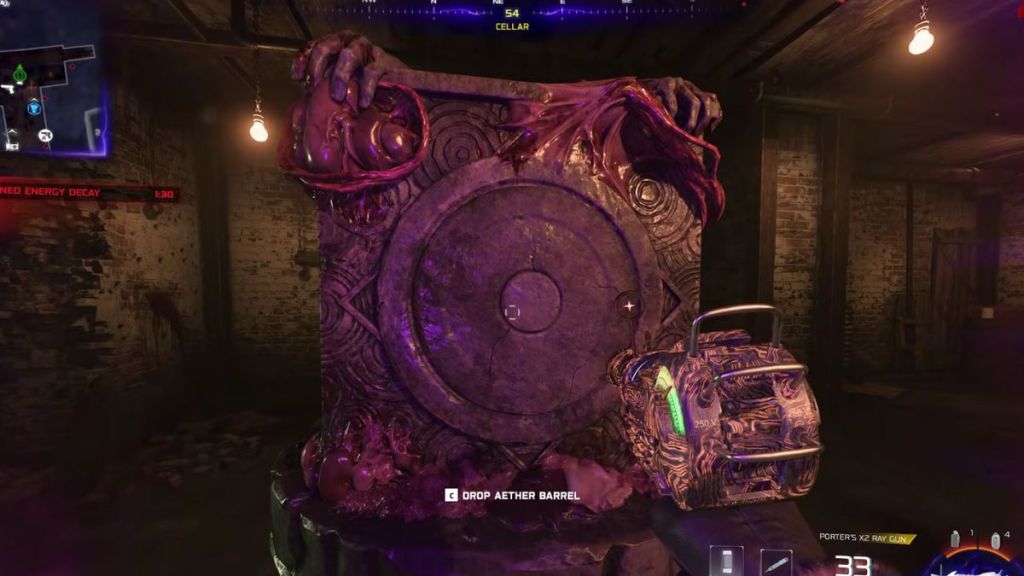
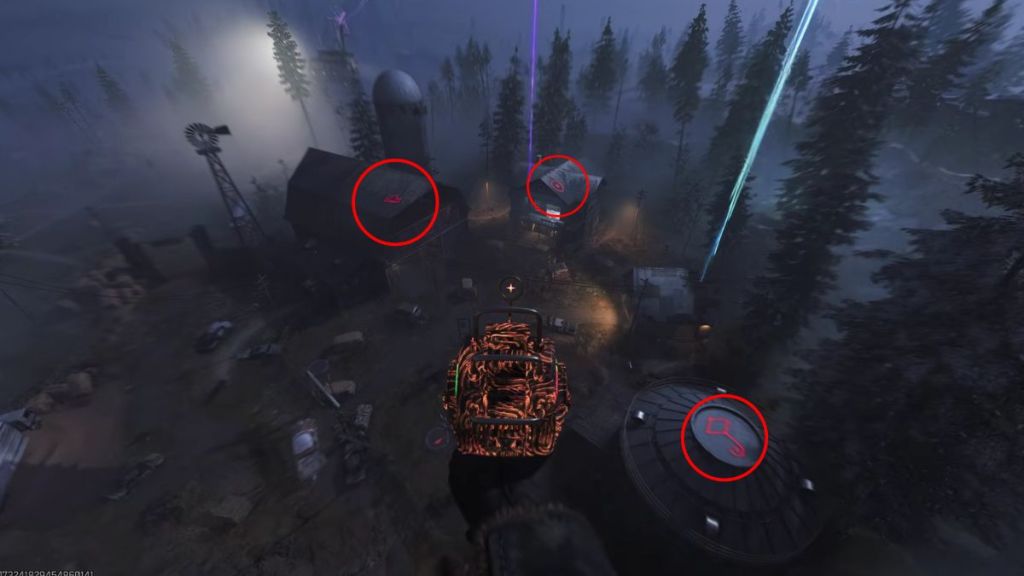
- Once the barrel is done extracting at Vandorm Farm, pick it up and head down to the cellar. In the basement, you’ll find a dark cube. Interact with it to start a ritual.
- Once the ritual is triggered, you’ll see a bunch of symbols appear on the cube. To complete this puzzle, use the Jump Pad placed near Vandorn Farm to spot the three symbols emblazoned on the nearby buildings.
- Match the symbols with those on the cube. This will cause a red eye to pop up on one of its sides. Interact with it to get the Necrofluid Gauntlet Wonder Weapon.
Collect Serum Ingredients
For the next step, you’ll need to collect six items to create a concoction in Yuri’s Lab. The items include:
- Human Bones
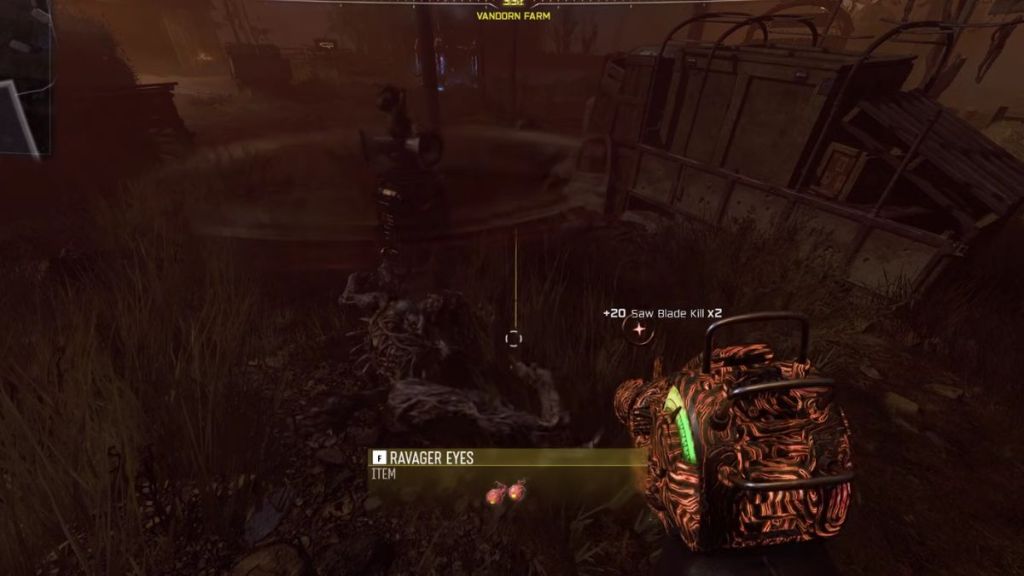
- Ravger Eyes
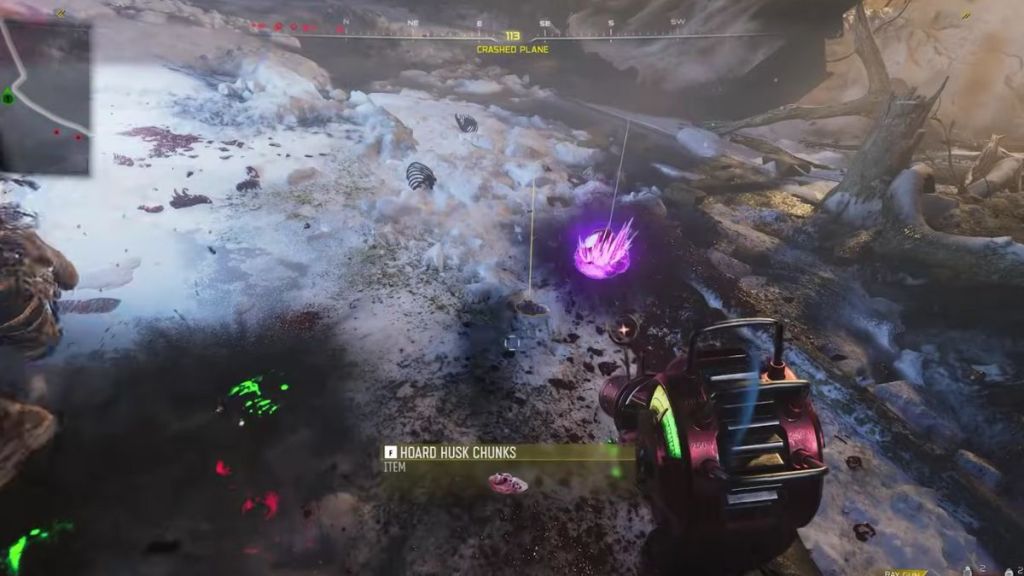
- Hoard Husk Chunks
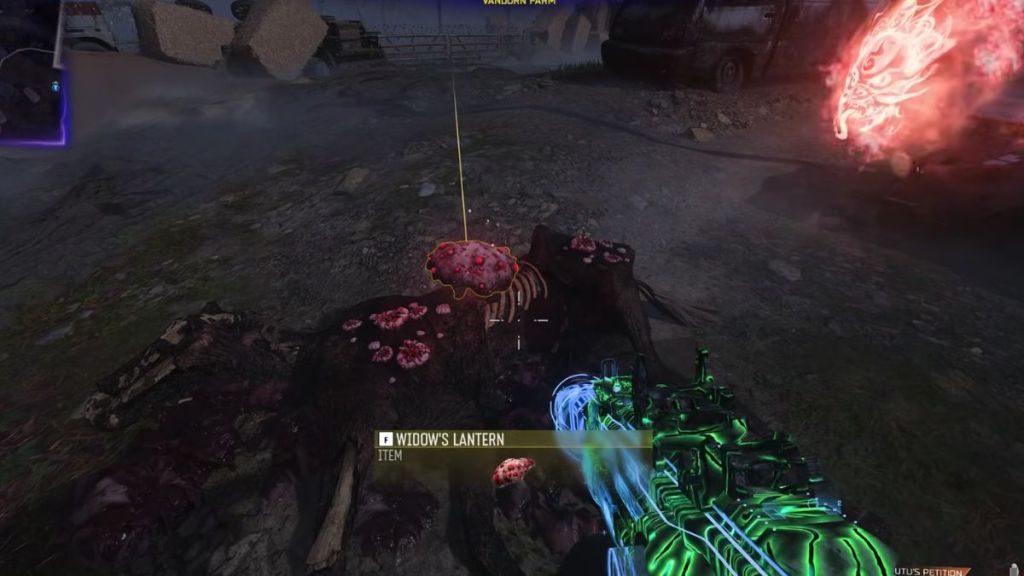
- Widow’s Lantern
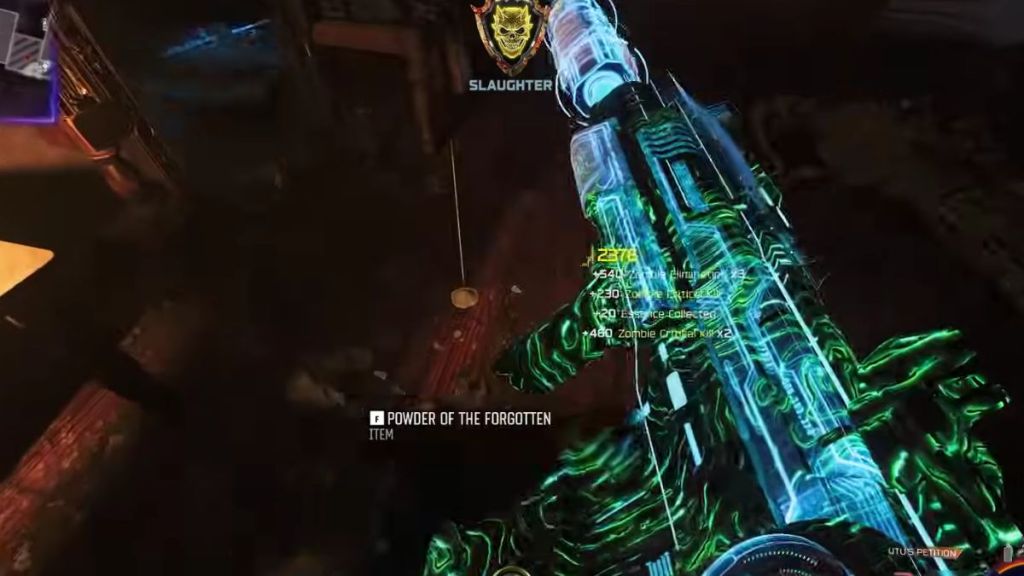
- Powder of the Forgotten
- Mysterious Limb
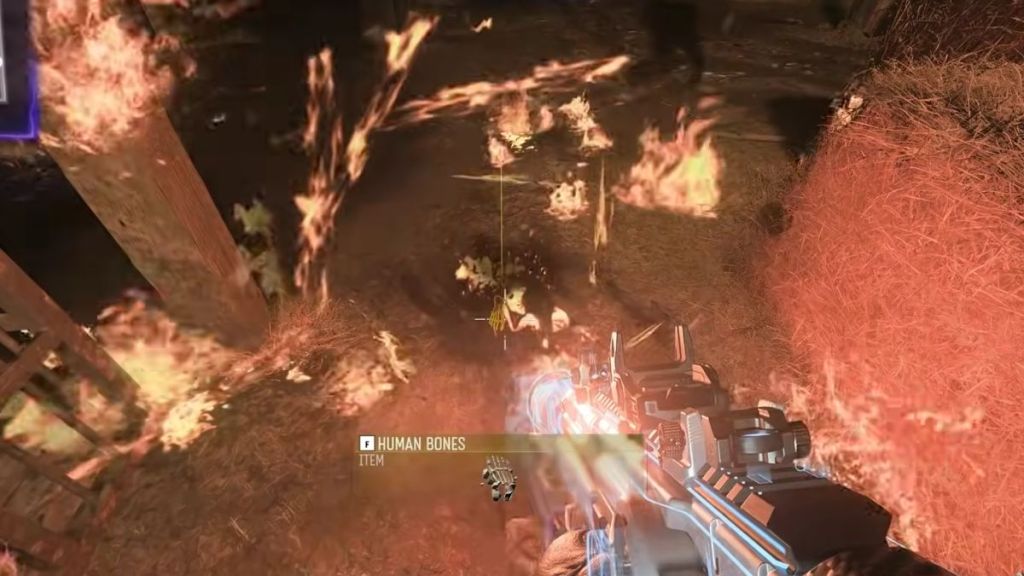
To get the Human Bones, go to Vandorn Farm and look for the hanging Zombie inside the barn whose foot is slightly detached. On bringing it down using a Combat Axe, the foot will fall to the floor, and if you torch it using a Molotov, it’ll turn into the Human Bones item that you can pick up.
For the Ravager Eyes, you’ll basically need to wait for a Ravager round to be triggered near the farm. Once it’s live, activate the Saw Blade Trap near the barn’s entrance. If a Ravager is caught in the trap, the Ravager Eyes item will drop.
Installing the Abomination Carcass item from earlier will give Ol’ Tessie the ability to fire laser beams. You’ll need to use this ability to fire at the glowing purple plants that are found on the highways leading from POI to another. Shooting them with the laser beam will cause Hoard Husk Chunks to drop.
To get the Widow’s Lantern, you’ll need to first go to the big house at Blackwater Lake. Inside, you’ll find the Jar of Spores item kept near the sink. Bring this item to Vandorn Farm and look for a horse carcass lying on the ground. Pour the jar’s contents on top and wait for two full rounds to get the Widow’s Lantern.
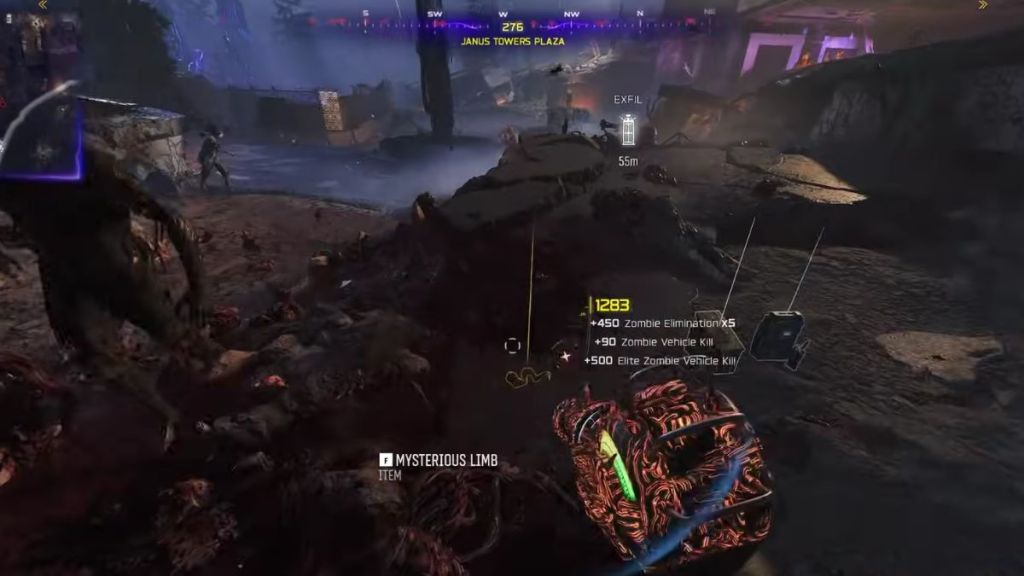
After hitting Round 15, the fearsome bear zombies, also known as Zursa, will begin spawning. Kill these creatures using Ol’ Tessie’s headlight laser beams to get the Mysterious Limb item. There’s no guarantee that the limb will drop right after your first Zursa kill, so keep at it until it does.
To get the last ingredient, head to the Wisp Teak Perk-A-Cola station near Zarya Cosmodrome. Purchase it and then go to the Taylor Shop room in Ashwood. Once you enter the shop, a wisp will get to work on uncovering a magical mirror. Hold off the Zombie waves until it’s done, and then fire at the mirror using the Wonder Weapon. This will cause the Powder of the Forgotten to drop.
Decipher Code in Yuri’s Lab
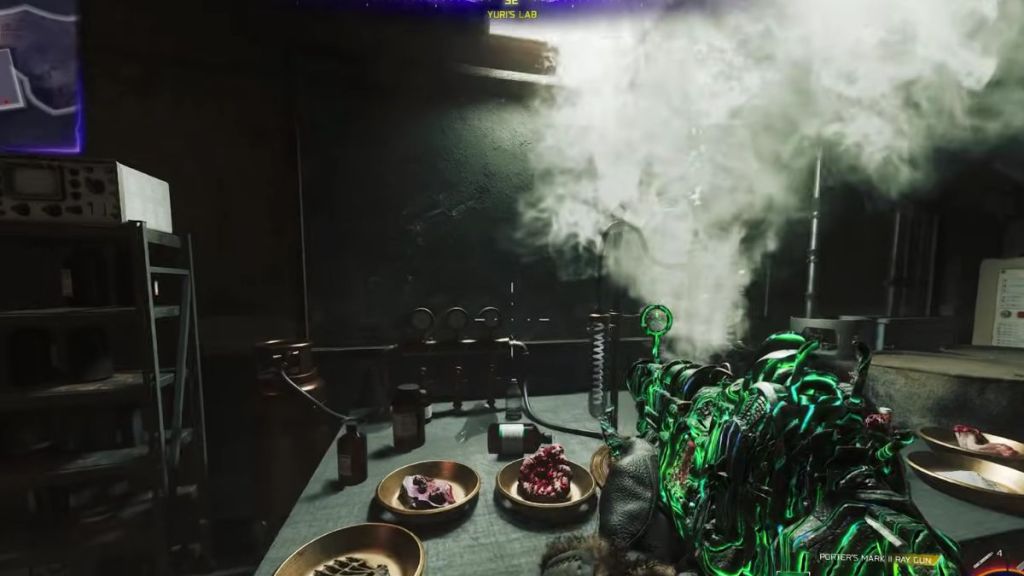
With all six ingredients in your possession, go to Yuri’s Lab in the Zarya Cosmodrome. The ingredients will automatically be placed on trays near the beaker. Interact with the Powder tray, which is the second one from the right. This will cause a code to appear on the chalkboard.
It consists of six symbols, each belonging to one of the six ingredients. Your goal is to look at the first symbol of each of the three rows, and then interact with the corresponding ingredient from top to bottom. Here are the ingredients that the symbols are tied to:
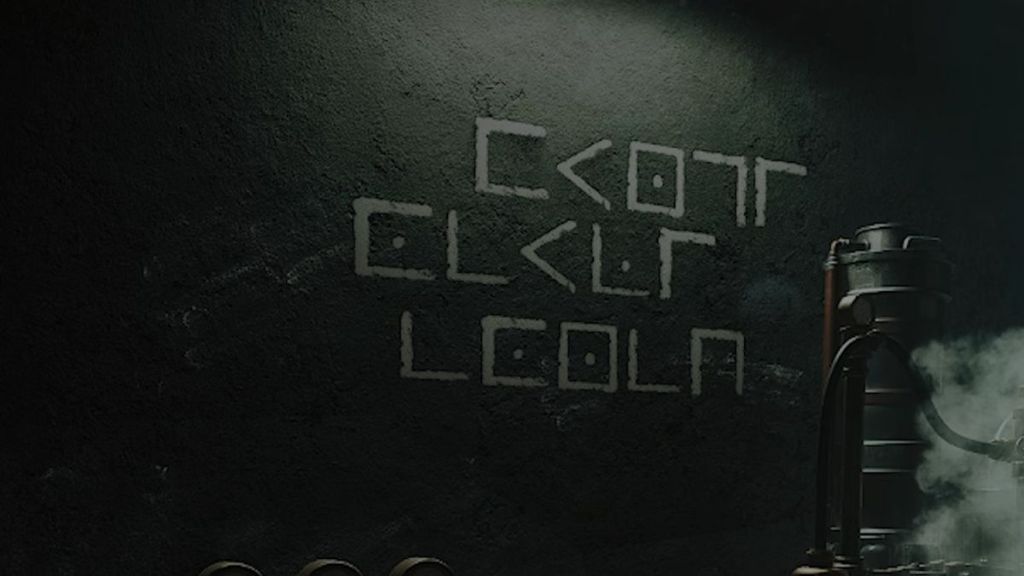
- >: Human Bones (First bowl)
- L: Hoard Husk Chunks (Second bowl)
- C: Widow’s Lantern (Third bowl)
- C.: Ravager Eyes (Fourth bowl)
- Ignore fifth bowl as you interacted with it to activate the puzzle.
- L.: Mysterious Limb (Sixth bowl)
If done correctly, you’ll see a prompt to add your blood to the mixture. This will trigger a lockdown, where your health will drop to 75 and you’ll be forced to survive a Zombie onslaught. Managing to do so will see a purple glass fill the area, meaning you can move on to the next steps.
Obtain all Three Keys
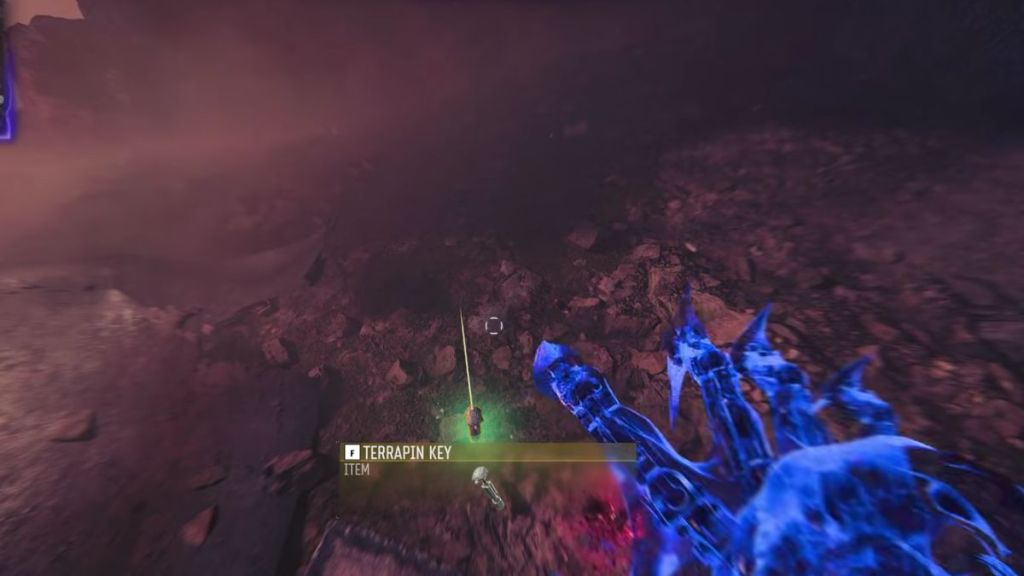
After decrypting the code, you’ll need to collect three keys scattered across the map. After collecting each key, a debuff will be applied to your character. So, make sure you’re well-equipped and well-prepared before attempting this step. Here’s a breakdown of where to find each key:
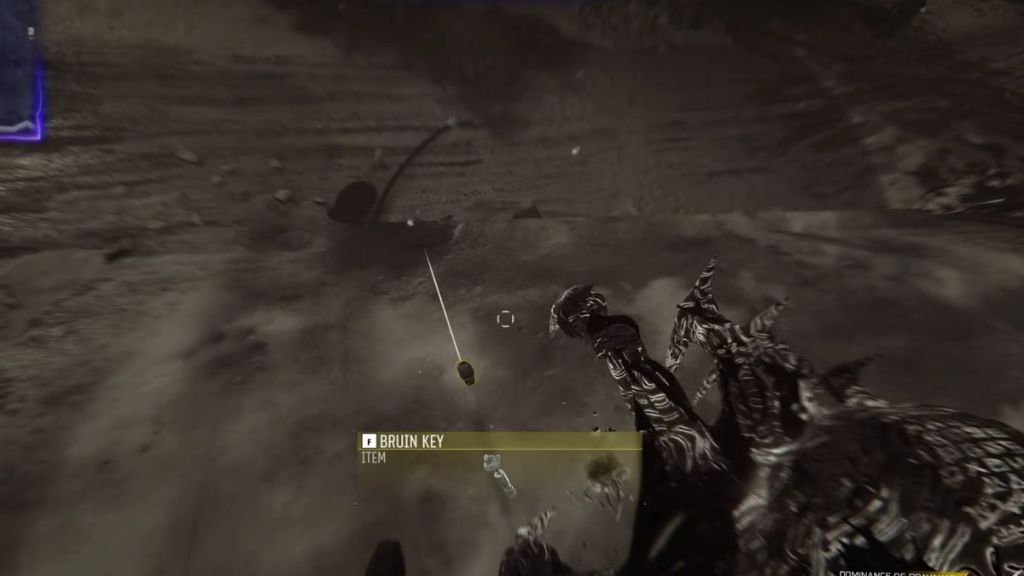
Bruin Key
- Hop inside Ol’ Tessie and drive towards the road between Ashwood and Zarya Cosmodrome. This is the location of the Crashed Rocket.
- The Bruin key will be located in one of these three spots:
- Inside the Radio Tower
- At the top of the cliff on the left
- Near the crashed pylon at the top of the building
- After spotting the key, shoot with the Necrofluid Gauntlet and then reload it to obtain the item.
Terrapin Key
- The Terrapin Key is found near the Grounded Ship, located between Ashwood and Vandorn Farm.
- It can be found in these three spots:
- Right underneath the ship
- In the cabin on the ship
- Hiding inside a slightly open container at the top of the ship
- Again, grab using the gauntlet. Make sure to clear the area of undead presence before doing so, as you’ll lose the ability to sprint for a while.
Nightbird Key
- The Nightbird Key can be found at the Orda Graveyard, located between Ashwood and Exit 115. It’s basically the area with the giant dinosaur heads.
- Once again, the key will be in one of three spots:
- Behind the dinosaur skull at the southern point of the area
- Between the two Janus Plaza vehicles
- Wedged in the teeth of the dinosaur skull on the west side
- Collect the key using the Wonder Weapon
Unlock the Prism
The keys you just gathered can be used to unlock the dark Prism that’ll spawn near the Ashwood jail. Interact with it to slot the key and trigger a mid-game cutscene. Once the cutscene is over, you’ll see a DG-2 Turret Barrel floating right in front of you. Pick it up, head to the Ashwood garage, and upgrade the Wonder Vehicle.
Complete Side Easter Eggs
You’ll now need to complete four side easter eggs before moving on to the final step. These include ‘killing time’ in Ashwood, launching the Zarya Cosmodrome rocket, shooting projector reels in Blackwater Lake, and completing a ritual in Vandorn Farm.
Initiate Boss Fight and Drive Through Wisps

Once all four side easter eggs are completed, head to Blackwater Lake and interact with Klaus to continue to the boss fight. Hop behind the wheel of Ol’ Tessie and wait for a few seconds before driving into Monolith Forest. After venturing into the forest, you’ll see gray wisps start to pop up in front of you. Your objective is to drive through these wisps across four different areas before ending up back at the Lost Cabins.
Each area has three wisps to collect, and the route is as follows:
- Blackwater Lake to Janus Towers
- Janus Towers to Collapsed Towers
- Vandorn Farm to the Grounded Ship
- Ashwood Garage to the Lost Cabins
If done correctly, the boss fight will be triggered right after completing this step.
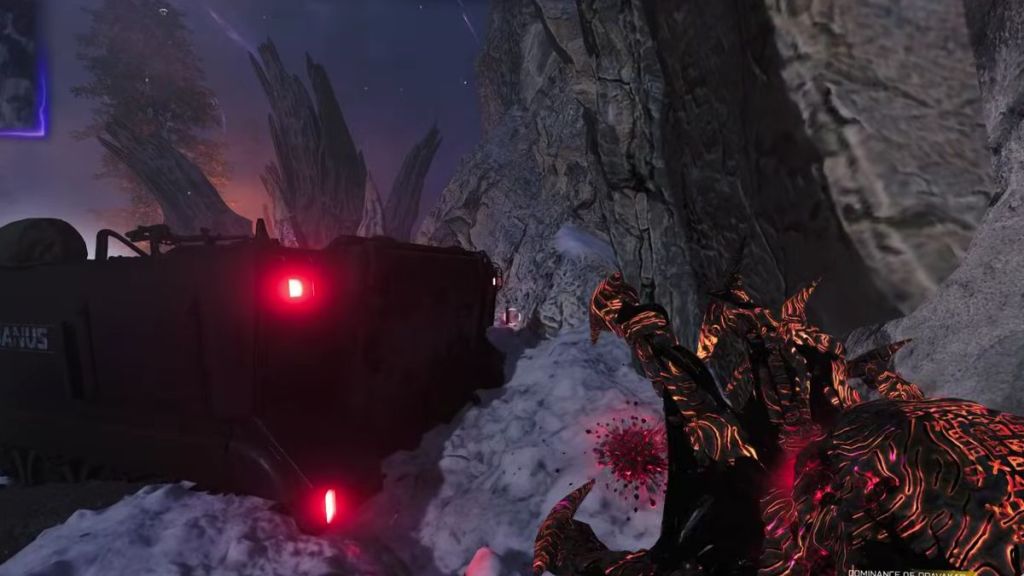
Fight Veytharion
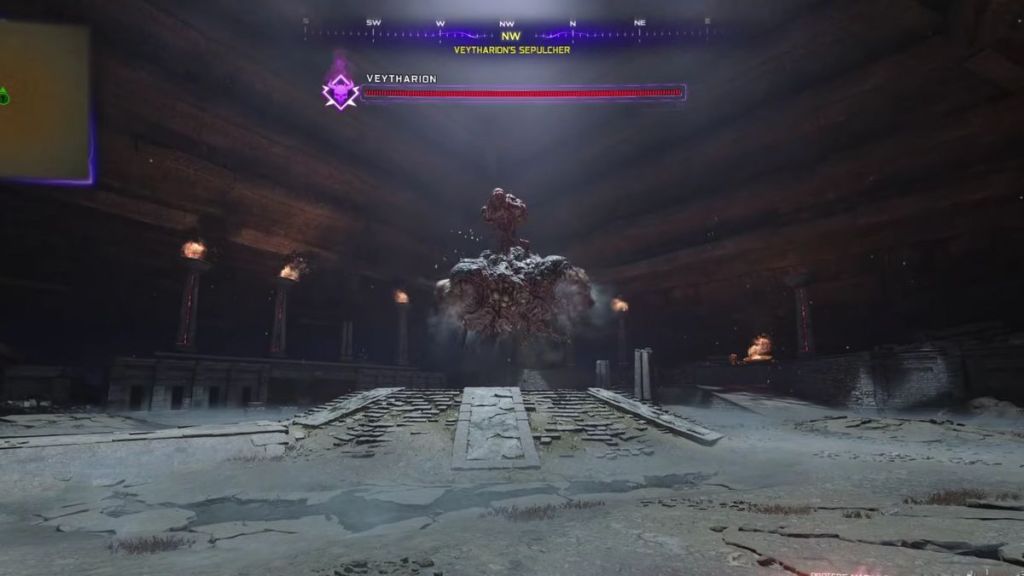
Unlike any other Black Ops Zombies boss fights, this one heavily relies on Ol’ Tessie and the DB-2 Turret instead of your movement and weapons. You’ll be able to maneuver on foot, but the vehicle will end up doing the most damage. It’ll also help in exposing the creature’s weak spots and making your attacks more powerful.
Veytharion itself is a really spongy boss and will require a ton of concentrated fire to take down. It’ll fire lasers at you, spin around menacingly, and be an all-around nuisance that will be difficult to deal with if you don’t use the Wonder Vehicle to attract its attention.
Make sure to focus your fire on the boss’s weak spots until it enters an immunity phase. To end this phase, you’ll need to keep firing at Veytharion using the DB-2 Turret until a blue beam of light pops up somewhere on the ground. Quickly drive through it before the boss reaches it to end the immune phase.
Its final attack phase will see Veytharion charge up a devastating laser attack that can destroy the Wonder Vehicle. Ram into the boss while it’s charging the laser to cancel the attack. Keep chucking away at its health and eventually, you’ll have beaten the boss, triggering the final cutscene.
BO7 Ashes of The Damned Main Quest Rewards
For completing the main quest on Ashes of the Damned, you’ll receive the following rewards:
- ‘Oorah!‘ Dempsey Operator Skin
- Ashes of the Damned-themed Calling Card
- 10,000 XP
And that wraps up our guide on the Ashes of the Damned Easter egg in Black Ops 7 Zombies. What are your thoughts on the first Zombies map of BO7? Let us know in the comments.
Yes, the Black Ops 7 Ashes of the Damned easter egg can be completed solo, although it’ll be significantly more difficult compared to a team of four players.
The Directed Mode for Ashes of the Damned will likely be released sometime in December alongside the Black Ops 7 Season 1 update.


 Aryan Singh