Windows 10 is a great operating system with advanced security features and lots of safeguards. However, we can’t rule out the possibility of a system failure with any electronic device. There can be hardware or software issues which may cripple the system completely. In such cases, taking a backup is highly recommended and it becomes more so given that Windows has been prone to system failures and BSOD errors in the past. While resetting Windows 10 can solve some of these problems, in most cases, you will stand to lose your data. So to avoid any such unforeseen failures, we should take a Windows 10 backup and store it on a separate memory device like an external hard disk. For this article, we have done thorough research and found some great native and third-party tools to create Windows 10 backup. So without further ado, let’s begin with the guide.
Creating Backup of Windows 10 Devices in 2020
In this article, we are going to discuss both native and third-party solutions for creating backup of your Windows 10 machines so you don’t have to lose your data.
Native Method
Microsoft offers three ways to create a Windows 10 backup. The easiest method is File History which lets you back up your important files to a separate memory device. The second way is to create a complete system image which will help you recover your PC from hardware failures or OS damages. The third one is a cloud-based backup through OneDrive. So having talked briefly about the different ways, let us dive deep and learn about all the methods in detail.
Back Up Windows 10 Using File History
Using the File History feature, we can create exact copies of drives and save it on a separate memory device. Keep in mind that this process will only backup your files and not Windows OS. In case, you want to completely create a full Windows 10 backup including system files, move to the next section. Also, you will need an additional memory storage device to store the backup. You can use a portable hard disk or pen drive to store the backup.
1. First of all connect your external storage device. Now, open Windows Settings by pressing “Windows” and “I” keys at once. Here, open “Update and Security”.

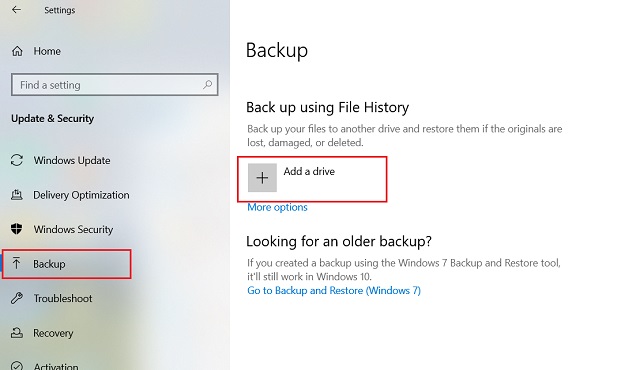
2. After that, switch to the “Backup” tab on the left pane. Under “Backup using File History”, click on “Add a drive” option.
3. Here, you will find the removable memory storage device. Click on it and you are all set to automatically backup your files.

4. On the next page, you can customize various settings like which folders to back up and the frequency of backups.

Create a Full Windows 10 Backup with Backup and Restore
You can create a full Windows 10 backup with Backup and Restore feature. It lets you create an exact copy of your hard disk including the operating system. In case, there are hardware failures or operating system issues in the future, the full system image can help you restore your PC to the working state with all your personal files intact. Interestingly, Backup and Restore was first released with Windows 7, but it’s not in active development right now. The same functionality has been shipped with Windows 10 without any major changes. Now having said all of that, let’s begin with steps.
1. Open Control Panel and click on “Backup and Restore (Windows 7)” under System and Security.

2. Here, click on “Create a System Image”.

3. Now select the drive where you want to save the complete system image and click on the “Next” button. It’s recommended that you save it on a separate memory device to recover your PC from unforeseen damages.

4. Next, you can choose the additional drives to include in the system image. After that, click on “Start Backup”. That’s it. The backup process will start in the background and you will be notified once it’s done.

Back Up with OneDrive
If you want to back up all your important files and folders to the cloud then you can use OneDrive. It comes pre-installed on Windows 10 so you will not have to manually install it. Here is how you can use it to sync your files seamlessly to the cloud.
1. Press the “Windows” button once and type OneDrive. You will find the app on the top of the search result. Click on it.

2. Here, sign in to your Microsoft Account. If you don’t have a Microsoft Account, go here and create one.

3. After that, you will find the OneDrive folder in your “User” folder. Here, you can move any file or folder and it will be instantly synced to OneDrive. If you want to access the files on the cloud, you can do so by following this link. You are done.

Third-Party Tools
In this section, we will learn about some great third-party applications which can create complete Windows 10 backups in a few clicks. We will talk about two awesome apps which can create a full system image and a separate app to backup your files to cloud. So having said that, let’s begin with the first app.
Macrium Reflect Free
Macrium Reflect is the best way to clone your hard drive to an external memory device. It works very similar to the Backup and Restore feature, but provides a lot of customization and features. The great part is that you can create a single system image which can be mounted on a pen drive or hard disk as a bootable media. Basically, you will be able to clone your system to other PCs in a few clicks. Now let’s go through the steps.
1. Download the free version of Macrium Reflect from here. You can also go for the paid version which costs $69.95 for extra features. However, the free version is quite good and has all the necessary features required for a complete Windows 10 backup.
2. Run the installer and you will get a bunch of options. Keep it as it is and click on the “Download” button. The installer will start downloading the setup file. Further, click on “Next” wherever necessary.

3. You will need to register your email ID and provide the key to continue with the installation.

4. After the installation is complete, Macrium Reflect will open up. Here, select the drives you want to backup and click on “image this disk”.

4. After that, choose the destination folder to save the Windows 10 backup image. Now, click on “Next”.

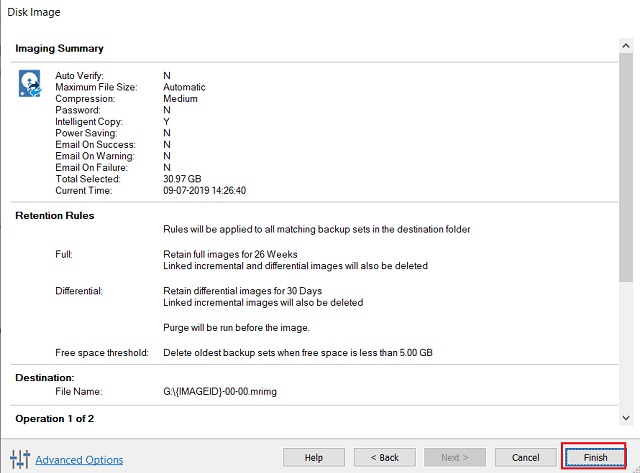
5. Here, choose the Template for your Backup Plan. It basically means how and when the backup schedule will occur. The best plan is “Differential Backup Set” so choose that and simply click on the “Next” button.

6. Here, you will be shown the summary of backup drives, rules, and schedules. Click on “Finish” and you are all set to backup Windows 10 without any issues.
7. It’s recommended to move the backup file to a separate memory device or simply choose a separate removable media as the destination folder. It will save you from a lot hassle if the hardware breaks in the future.
8. In case, you are swapping a new hard disk or moving to a new PC, I would recommend you to go for “Clone this disk” option. It will copy everything from boot partition to the type of disk including the OS and personal files. But you will need a separate hard disk to clone your system.
9. There are also various features available in Macrium Reflect including scheduler, backup for specific folders, system image backup, etc. You can go through them and find the best way to create a full Windows 10 backup.
AOMEI Backupper
AOMEI Backupper is another great utility for creating a complete Windows 10 backup. The USP of this app is its user-friendly interface. If you find Macrium Reflect to be overwhelming, you can go for AOMEI Backupper. It has got almost all the features including disk, files, system and partition backup. Here is how you can use it.
1. Download the free version of AOMEI Backupper from here. If you want advanced features, you can also go for the professional edition for $49.95.
2. Install the program and open it. You will find these two options on the home screen. Click on “Backup”.

3. Here, choose the type of backup you want to do. If you want to create a Windows 10 backup solely for the operating system, choose “System Backup” and click on “Next”.

4. Here, select the destination folder to save the backup file and click on “Start Backup”. You can use both, local or external drive to store the Windows 10 backup image.

5. In case, you want to backup specific folders, you can choose “File Backup”. And for complete hard disk backup, choose “Disk Backup”. If you want to backup folders at a specific time automatically then choose “File Sync”. Finally, if you want to retain the Master Bootloader with the recovery partition, choose “Partition backup”. This will let you backup the recovery OS mostly on laptops.
6. So that’s how you can create a Windows 10 backup image using the AOMEI Backupper. You can also use the “Clone” feature, in case you are swapping new hard disk or moving to an SSD.

Backup and Sync from Google
While local backup is great, sometimes the cloud storage solutions make things a lot easier in storing and finding our files. If you are looking to seamlessly back up important files to the cloud, Backup and Sync from Google is a great option. You can use it to upload your files and folders to Google Drive instantly. Here is how you can use Backup and Sync on Windows 10.
1. First of all, download Backup and Sync from here and run it. Now, log in to your Google account.

2. After that, it will ask you to select pre-defined folders which it will automatically back up. Click on “Next” and you are all set to backup Windows 10 files.

3. A Google Drive folder is also created on your “User” folder. If you want to instantly back up a file to Google Drive, just paste it in the Google Drive folder and you are done. You can find all your synced files and folders on Google Drive.

Take a Windows 10 Backup and Save Yourself from Unforeseen Data Loss
So that ends our article on how to create a full Windows 10 backup. As we saw, Windows 10 has two great ways to create a backup. If you want to back up important files and drives then File History can get things done. However, if you are fearful that someday your PC will fail you then you can create a full system image. It will help you in the long run. And in case, if you are not satisfied with native Windows’ tools then you can go for third-party apps. I would recommend Macrium Reflect as it is a powerful app with multiple features. So that will be all from us. If you liked the article or want to share your favorite method to backup Windows 10 then do let us know in the comment section below.


