
Unbeknownst to many, Windows 10 comes with a built-in ‘alarms and timers‘ functionality that works much like any other alarm-clock app that you might have used on mobile devices. Here, we’ll show you how to access that feature and how to set alarms and timers in Windows 10.
How to Set Alarms and Timers in Windows 10
Today we will show you not only how to set alarms and timers in Windows 10, but also how to disable to delete them when you don’t intend to use them any more. Note that both Alarms and timers will only work as long as the PC is awake and Notifications are ‘On’. If you put your PC to ‘Sleep’ mode or if notifications are switched off, they will not work.
Enable and Use Alarms in Windows 10
- To set an alarm, launch the Start Menu and select ‘Alarms and Clock’ from the app list.


- On the app home screen, select the ‘Alarm’ tab on top. Now you can either toggle on or off an existing alarm or create a new one by clicking/tapping on the “+” sign in the bottom-right corner.


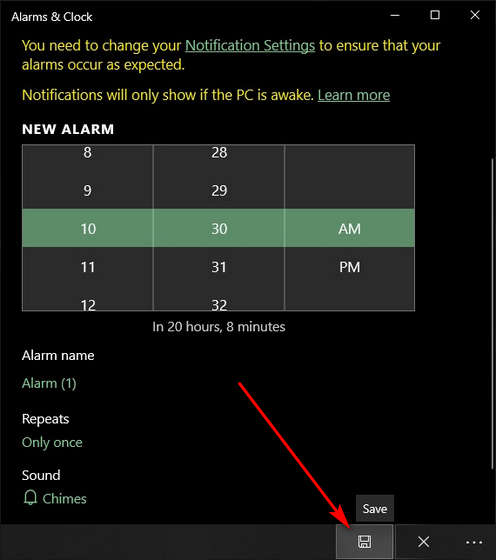
- Next, set the time using either the scroll wheel on your mouse or the direction arrows that appear when you move your mouse cursor to any of the columns.


- You can also configure the alarm using the options in the bottom-half of the window. As you can see, you can choose a name for the alarm, how often it repeats, and even its sound. Once you’re done choosing your options, click/tap on the ‘Save’ button.
- Your new alarm will be enabled by default, but you will be able to toggle it on or off like any other alarm. You can also change the time etc by tapping/clicking on it.

- Once the alarm goes off, you’ll get a notification at the bottom-right corner of your screen. You can snooze or dismiss it using the appropriate option.


That’s it. You now know how to set alarms in Windows 10.
Set Timers in Windows 10
- To set a timer, you’ll need to select the ‘Timer’ tab at the top of the ‘Alarms and Clock’ home screen. You can start an existing timer by clicking/tapping on the ‘Start’ button in the center or change the timings by clicking on any other area in the highlighted part.

- To create a new timer from scratch, tap/click on the “+” button at the bottom and follow the same process as creating a new alarm.

That’s it. You can now set timers so that you don’t forget to switch off the gas or turn off the sprinklers in time.
Disable or Delete Alarms and Timers in Windows 10
- To disable existing alarms, tap on the ‘Alarm’ tab on the home screen of the app and toggle off the one(s) you want to disable.

- To delete existing alarms or timers, first select either the Alarm or Timer option from the tab on top. Next, click/tap on the ‘Select’ button at the bottom to select the alarms or timers you want to delete.

- Now use the check boxes to select the alarms you want to delete and click on the ‘Delete’ button as seen below.

Now you can not only set alarms and timers in Windows 10, but also disable or delete them if you want.
Easily Enable Alarms and Timers on Windows 10 PC
While most of us use smartphones to set reminders, alarms, and timers, you don’t necessarily need a mobile device for that. Now that you know how to set alarms and timers in Windows 10, use it on your computer and let us know if it’s as convenient as using your Android or iPhone. While at it, you should also check out some of the important Windows 10 features rolled out recently with the October 2020 update, along with our favorite Windows 10 tips and tricks.

