
Before we get into this article, let me make one thing clear, I love Bixby. When Bixby launched and I actually used it, it was immediately clear about how useful the new voice assistant was. However, I do think that keeping a dedicated button to summon it is a bit much, especially when you can easily call Bixby with a voice command. If only we could remap that button to our liking. Well, we already covered a method which allowed users to do so, but that method required root. Well, today we are going to show you a method using which you can remap the Bixby button without root. Not only that, you can also assign different functionalities for single-press, double-press, and long-press actions. So, if by now you are intrigued, here is how to remap Bixby button without root:
Remap Bixby Button to Perform Any Action
Note: I tried the following process on our Galaxy S8 running Android 7.1 but the process should be identical for the Note 8 as well as Galaxy S8 Plus.
To Remap the Bixby button, we are going to use the help of a third-party app which is available on the Play Store. You will also need a computer handy which will be used to grant permissions to the said app. So, with your computer and phone ready, let’s remap the Bixby button:
- Download and Install the bxActions app from the Play Store by clicking here.
- Open the app, and tap on “Continue”. Now, you can choose two different modes to remap the Bixby button, the first is “Blocking mode” and the second is “Control mode”.


The Blocking mode when enabled first blocks Bixby and then performs the function (hence you will see Bixby icon for a moment before it is blocked), while the “Control mode” disables Bixby so that it is not visible anymore. Also, to enable the Blocking Mode, you don’t need a PC but you will need it for enabling the Control Mode. However, although Control mode is harder to activate, it also brings more features. With Blocking Mode, you can only perform a single action with the Bixby button while the Control mode allows you to perform multiple functions which we will see later in this tutorial.
Remap Bixby Button: Blocking Mode
- Enabling blocking mode is pretty easy as you don’t require a computer to do it. Just tap on the toggle next to where it says, “Blocking mode” and enable it. Here, you have two options (Performance and Comfort), choose either.


For reference, I am choosing to launch the camera with it. So, when I press the Bixby button, first it opens the Bixby home page and then blocks and opens the camera app. Most of the times it is so quick that you won’t even notice the opening and blocking of Bixby home page. However, if you want to cut the launching and blocking of Bixby and mover directly to your actions, use the second method explained below:

Remap Bixby Button: Control Mode
In the control mode, we have the benefit of using the Bixby button to perform multiple functions using the single-press, double-press, and long-press actions. Not only that, you can also assign different functions to these button presses depending on whether you are on your lock-screen or home screen. So, let’s see how to do that, shall we?
1. First, launch the app and disable the Blocking mode by tapping on Buttons and the turning the toggle off.

2. Now, tap on Control mode and then tap on “Please unlock permissions using a PC”.

4. Now, copy and paste the following command in the terminal/command prompt and hit return/enter. We are doing this to see if everything is okay. If your device is connected properly you will see an alphanumeric code representing your device followed by the word device as shown in the picture below.


adb devices
5. Now, copy and paste the following command and hit enter/return.


adb shell pm grant com.jamworks.bxactions android.permission.WRITE_SECURE_SETTINGS
6. Again copy and paste the following command and hit return/enter.
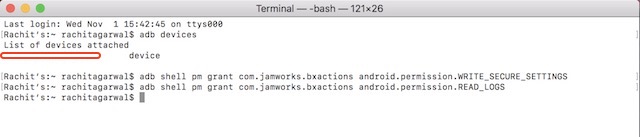

adb shell pm grant com.jamworks.bxactions android.permission.READ_LOGS
7. Now, disconnect and restart your phone. Again launch the app and tap on Buttons and then on Control mode. Here, you should see the “Permissions granted” text, showing that our process was successful.

8. Now, tap on the following link to download the APK file for adhell app and install it, then follow the on-screen instruction to grant permissions to the app. We need to install this to disable Bixby Home.

9. Now, on the app’s homepage, tap on “package disabler” and then find Bixby Home and disable it.

10. Now, go back to Control mode and enable it and tap on “Actions” button on the homepage of the bxActions app.

11. Here, tap on Bixby. On this page, as you can see, you can remap the Single Press, Double Press, and the Long Press action for Bixby button. However, the Double Press and Long Press actions are paid options and you will have to buy the app for $1.99 to use them.

12. For now, we will set up the Single press action (both the Double press and Long press action can be set up the same way after buying the pro version. Tap on the Single press option and then select from multitudes of option as we did in step 5 of Blocking mode. To keep things same, I again choose the Camera to be launched after the Bixby button is pressed.

When you set up the Control mode, you will see that any action that you have mapped to the Bixby button happens instantaneously. The method works as if the button shipped with programmable feature natively. Well, we are done now. The process might be a little longer, however, once you set it up, it will be worth it
SEE ALSO: 50 Best Bixby Commands You Should Try
Remap Bixby Button Without Root on Galaxy Note 8 or Galaxy S8/S8 Plus
As I mentioned earlier, Bixby is great. But, don’t just take my word for it, read our comparison of Bixby vs Google Assistant vs Siri, to see for yourself. However, the Bixby button is something which is an added accessory and remapping it gives back more control to users. Using the above methods you can remap the Bixby button to perform any action including launching apps, executing shortcuts, media playback controls, and more. So, try it out on your phone and let us know in the comments section below how it goes. Also, since the method is a little more complex, if you are stuck anywhere, feel free to drop your questions below.

