
We have already covered how you can turn on Spatial Audio in AirPods Pro for an immersive listening experience. Now, we will show you how to enable Spatial Sound (3D Sound in Microsoft-speak) on your Windows 11 computer. As part of our endeavor to offer you additional know-how on improving the audio experience on your PC, we will guide you on how to enable ‘Enhance Audio’ on Windows 11.
Enable Spatial Sound and Enhance Audio on Windows 11 (2021)
Spatial Sound offers a more immersive audio experience on your devices, while Enhance Audio lets you configure certain audio settings for improved performance. Netflix recently started rolling out Spatial Audio support for iPhone and iPad, and Apple itself rolled out the feature for Apple Music globally earlier this year. So without further ado, let’s check out how you can enable Spatial Sound and Enhance Audio on your Windows 11 computer.
What is Spatial Sound in Windows 11?
Spatial sound is an “enhanced immersive audio experience where sounds can flow around you, including overhead, in three-dimensional virtual space.” The feature enables you to experience more immersive audio at the flip of a switch. According to Microsoft, it “provides an enhanced atmosphere which traditional surround sound formats cannot.”
With spatial sound, movies and games sound better on your Windows 11 PC, especially the ones that offer native support for the feature. However, while native support provides the highest level of audio immersion and location accuracy, the technology can also upscale traditional surround sound to deliver an overall better audio experience.
What Spatial Sound Formats Does Windows 11 Support?
Windows supports multiple spatial sound formats, including Windows Sonic for Headphones, Dolby Atmos for Headphones, Dolby Atmos for home theater, DTS:X for Home Theater, and DTS Headphone:X. Windows Sonic is Microsoft’s in-house technology that comes built into Windows 11 and is supported across all headphones and earphones. Dolby Atmos and DTS:X support, on the other hand, need to be purchased separately.
You need to purchase a license for Dolby Atmos using the Dolby Access app (Free) and the DTS Sound Unbound app (Free), respectively. You will get a 30-day free trial and then need to pay $14.99 for a Dolby Atmos license to continue enjoying a spatial sound experience.
Note: For more in-depth information about different surround sound formats, check out our detailed article on DTS:X vs Dolby Atmos. To know more about DTS:X, check out our detailed article on what is DTS:X surround sound.
How to Enable Spatial Sound in Windows 11
Spatial Audio is known as 3D Audio in Windows 11. You can enable it in two different ways – through Settings and from the Control Panel. We will demonstrate both methods in this article.
Method 1: Through Windows Settings
- Open Settings using the Windows 11 keyboard shortcut Windows key + I. Now, go to System -> Sound.

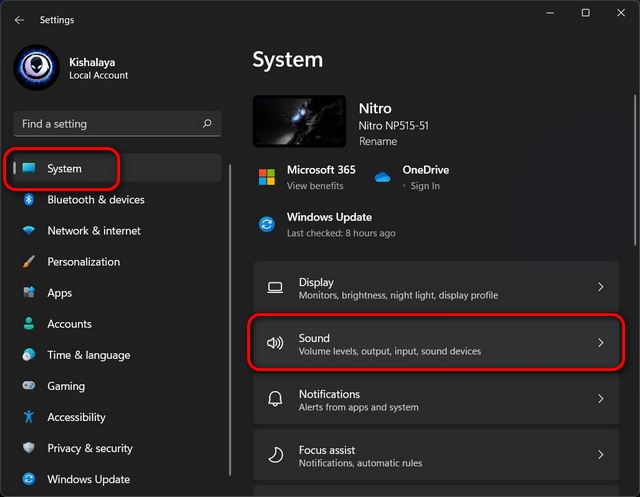
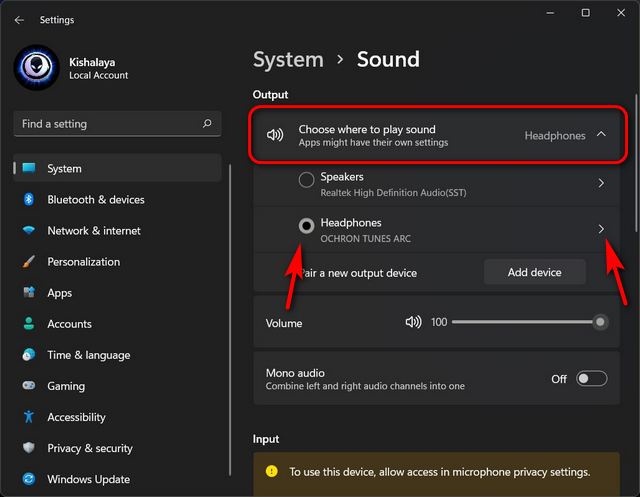
- Next, under “Output”, click on the card that says “Choose where to play sound“. You will now see a drop-down menu with a list of all connected audio output devices. Select the one you want to enable Spatial Sound experience for. Then, hit the arrow (>) next to it.
- Now, scroll down to the bottom and click on the “Type” drop-down menu under the “Spatial Sound” section. Finally, select “Windows Sonic for Headphones” as your spatial sound option.
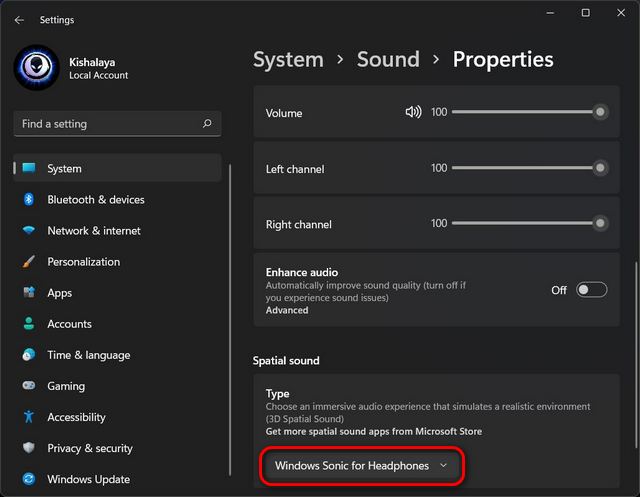
Note: As mentioned already, Windows Sonic for Headphones is the only spatial audio option available by default on Windows 11 PCs. For other options, you will have to download or buy third-party apps from the Microsoft Store.
Method 2: From the Control Panel
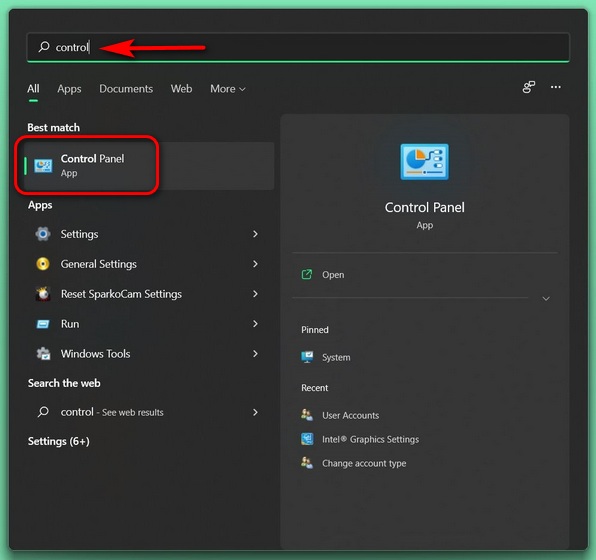
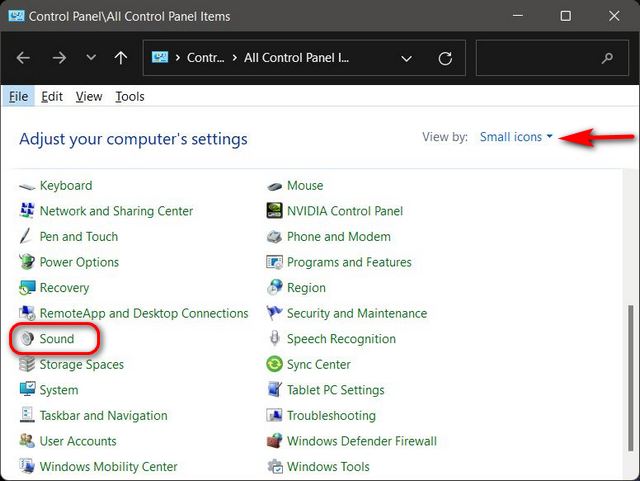
- First, open the Control Panel on your Windows 11 computer. To do that, search for ‘control’ (without quotes) in the Windows search bar and select “Control Panel” from the results.

- In the Control Panel, make sure you are using the “Icons” view (small or large). Then, select “Sound“.

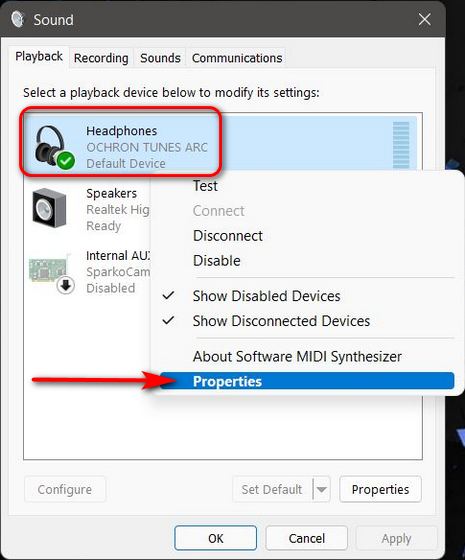
- On the next window, make sure you are on the “Playback” tab. Now, find your sound output device, right-click on it, and move to the ‘Properties‘ window from the pop-up menu.

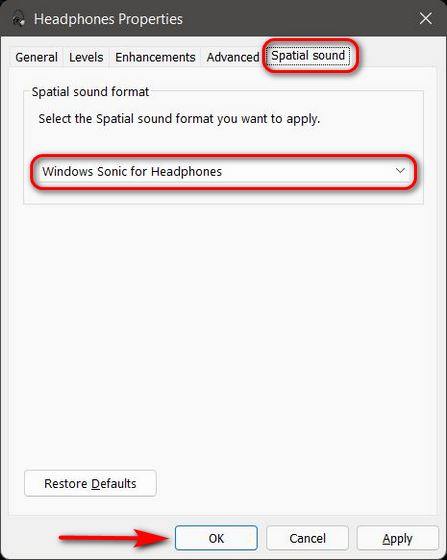
- On the next pop-up window, go to the “Spatial Sound” tab. Then, click on the drop-down menu under “Spatial sound format” and select “Windows Sonic for Headphones” or any other spatial sound app you might have purchased online. Finally, click “OK” to save your preference.

What is ‘Enhance Audio’ in Windows 11?
Enhance Audio in Windows 11 is a collection of configurable settings that help you tune the overall sound output of your headphones or earphones on your PC to your liking. Using the feature, you can normalize the audio output to prevent commercials from playing louder than the actual content. The feature also enables you to use stereo speakers for a surround sound experience, as well as boost the bass output of the speakers. So let’s check out how you can enhance your audio experience on Windows 11 with just a few clicks.
How to Enable Enhance Audio in Windows 11
Enabling the ‘Enhance Audio’ feature in Windows 11 is super easy as you simply need to head to the sound settings on your PC. Here’s how you do it:
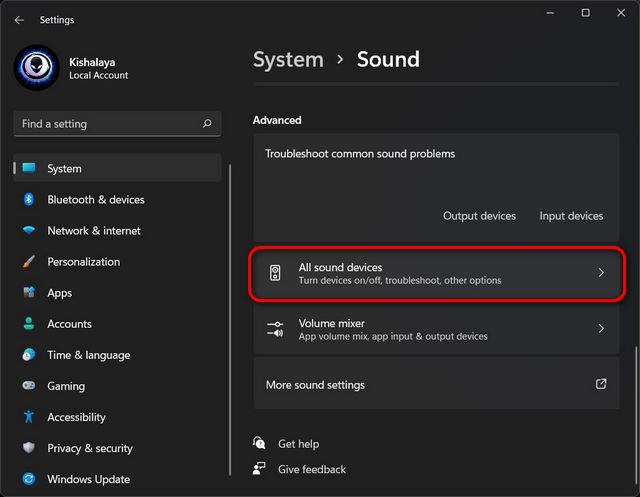
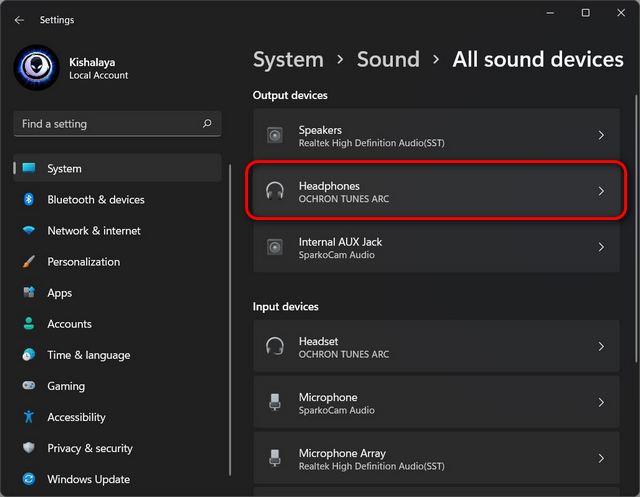
- Go to Settings -> System -> Sound, as explained earlier in the article. Then, scroll down to the “Advanced” section and click on “All sound devices“.
- Now, under Output devices, select the output device for which you want to enable the enhanced audio experience. For me, that would be my headphones.
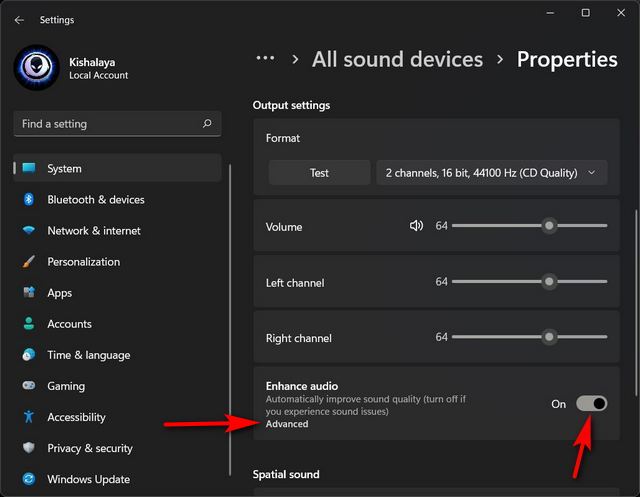
- Then, under the “Output settings” of your headphones, turn on the “Enhance audio” toggle. Microsoft says this should “automatically improve sound quality”. To further fine-tune and adjust your audio preferences, click on the “Advanced” option.
- Now, on the pop-up window, select the audio enhancements as per your preference. Finally, make sure to click “Apply” before you close the window to save the changes. That’s it! You now know how to enhance the audio experience on Windows 11.
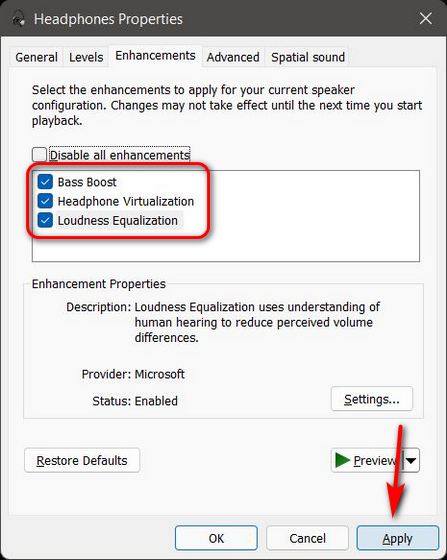
Note: Loudness Equalization, which Microsoft says “uses an understanding of human hearing to reduce perceived volume differences,” brings the most palpable difference, especially if you stream these best Netflix movies and TV shows on your computer. It reduces the increased volume of commercials, thereby preventing them from playing louder than the actual content.
Improve the Audio Experience on Your Windows 11 PC!
We hope that enabling Spatial Sound and changing the Enhance Audio settings will help improve the audio experience on your Windows 11 PC. Now that you know how to adjust the audio experience to your liking on your PC, learn how to improve the battery life of your Windows laptop. The linked article references Windows 10, but most of the methods work perfectly on Windows 11 as well. Also, you can keep an eye on the screen on time in Windows 11 and customize the Start Menu and Taskbar if you have upgraded to Windows 11 from Windows 10.

