
Computers on a network need unique names for proper identification when they are trying to communicate with one another. Most retail PCs come with generic names that may or may not be unique, but they do not reflect the user’s personality. However, you have the option to rename your Windows PC to something unique and in line with your personality with ease. So today, we will show you how to change your computer name in Windows 11.
Change Your Computer’s Name in Windows 11 (2021)
There are multiple ways to change the name of your Windows 11 PC. You can always use the Command Prompt, PowerShell, or System Properties to rename your PC. But starting with Windows 10, Microsoft introduced a GUI method of renaming Windows computers from the System Settings. We will tell you about all these methods to give you a comprehensive understanding of how you can change your computer’s name in Windows 11 in this article.
Things to Remember Before Changing Your Computer’s Name in Windows 11
You can change the name of your Windows 11 computer with ease, but there are a few things that you need to keep in mind before you get started. Here they are:
- Firstly, you need to log in using an Administrator account to be able to rename your PC.
- Secondly, you can only use standard characters in the PC name, including the letters A-Z (both uppercase and lowercase), the numbers 0-9, and the ‘hyphen’ (-) symbol. The name may not contain spaces or special characters, such as: `~@#$%^&*, etc.
- Thirdly, the name of your Windows 11 PC cannot exceed 15 characters.
- Finally, the name cannot consist entirely of numbers. It can, however, contain only letters of the alphabet or a combination of the two.
Note: Irrespective of the method you choose, you will need to restart your PC in every case for the name change to reflect everywhere. Without a restart, the new name will only show up in a few places and not across the system.
Method 1: Rename Windows 11 PC via Settings
Windows 11 offers you an easy way to change the name of your computer from within the Settings menu. Here’s how you go about it:
- Open Settings (use Win +I keyboard shortcut) on your Windows 11 PC and select the “System” tab if you are not there already. Now, click on “Rename” just below your current PC name at the top.


- In the pop-up window that opens, type a new name for your PC, and click “Next“.


- Finally, make sure you save all your work and then choose “Restart Now” to apply the name change.


Note: The Rename button doesn’t work for this option in Windows 11 Dev Preview build 22000.71.
Method 2: Rename Windows 11 PC from About Section
There’s another way to change your computer’s name from within the Settings. Here’s how that works:
- Go to Settings -> System as described earlier. Now, scroll down to the bottom on the right-hand pane and click on “About“.

- On the next page, click on the “Rename this PC” button next to your PC’s current name.

You will then be presented with the same “Rename Your PC” pop-up window as seen in the previous method. As explained already, enter your desired PC name on the pop-up, click on “Next“, and select “Restart Now” to implement the name change.
Method 3: Rename Windows 11 PC via System Properties
Before the GUI method(s) were introduced in Windows 10, the easiest way to change your computer name in Windows was to use the System Properties option. That method is still available in the latest version of Windows. Here’s how you use it:
- Open the “Run” dialog box (Windows key + R), type
sysdm.cpl, and hit Enter to open the System Properties window.


- Make sure you are on the “Computer Name” tab, and then click on the “Change” button at the bottom.


- Now, type in a new name for your Windows 11 computer and click “OK”.


- You will then see a small pop-up saying, “You must restart your computer to apply these changes”. Click on OK.


- Next, click the “Close” button to close the main System Properties window.

- Finally, on the next pop-up window, click “Restart Now” to reboot your PC and apply the name change.


Method 4: Rename Windows 11 PC Using Command Prompt
The Command Prompt has long been the go-to destination for geeks to implement many changes in Windows. While it is now being deprecated by the Windows Terminal, the Command Prompt remains an essential part of Windows 11. You can still use it to rename your PC, and here’s how:
- First off, open Command Prompt in Admin mode. To do that, search for “cmd” (without quotes) in the Windows search bar and select “Run as Administrator“.


- Now copy+paste the following command into the Command Prompt window:
wmic computersystem where name="%computername%" call rename name="<new name>". Finally, hit “Enter“. You will get a message saying, “Method execution successful”. The new name will come into effect once you restart your computer.


Note: Replace <new name> in the command with the new computer name and retain the quotes. See the screenshot above to clear your doubts.
Method 5: Rename Windows 11 PC Using PowerShell
Finally, we come to the PowerShell method of changing your computer name in Windows 11. It is also as easy as the Command Prompt method and doesn’t require a whole lot of technical know-how. Here’s how you do it:
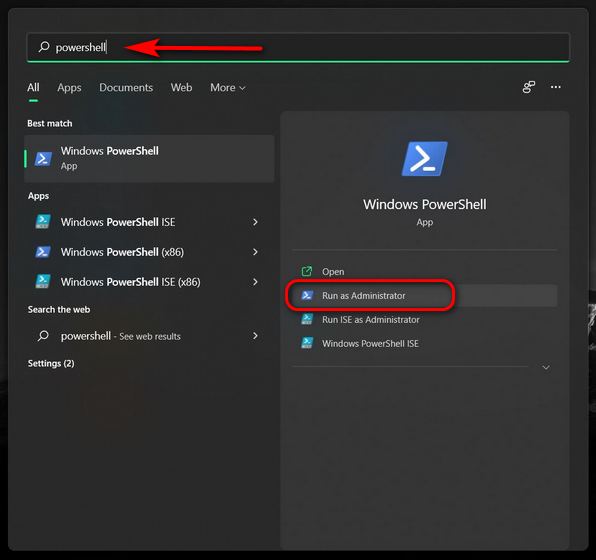
- Open Windows PowerShell in Admin mode. To do that, search for “powershell” in the Windows Search bar and select “Run as administrator“.
- Now copy+paste the following command and press Enter:
Rename-Computer -NewName "xyz". Restart your PC for the change to take effect.


Note: Like the Command Prompt method, replace “xyz” with the name of your choice.
Rename Your Windows 11 PC in a Few Simple Steps
So yeah, you can see that the process to change your computer’s name in Windows 11 is really easy, whichever method you choose. Now that you know how to do that, check out some other Windows 11 tutorials, including how to turn off notifications in Windows 11 and how to take screenshots in Windows 11. Finally, if you hate automatic updates as much as I do, check out how you can stop auto-updates on your Windows 11 PC.

