
For many, the Windows startup chime brings back lots of fond memories from their childhood, when their Windows XP or Windows 7 machines used to play a distinctive sound every time the machine was switched on. However, the startup sound no longer plays by default in Windows 10, although, you can still enable it in a few simple clicks. So today, we will show you how you can enable/disable the Windows 10 startup sound in three simple ways.
Enable/Disable Startup Sound in Windows 10
In this tutorial, we will show you three distinct ways to enable startup sound in Windows 10. While the first method is the easiest one (via Sound Settings) and can be done in a few simple clicks, the second one is through the Local Group Policy Editor. The third one, meanwhile, will require you to edit the Windows Registry (Regedit). So without further delay, let’s check out the three ways to enable or disable Windows startup sound in Windows 10.
Note: I am using Windows 10 for this demo, but the methods detailed below will work in Windows 7 and Windows 8/8.1 as well.
Method 1: Using Sound Settings
- Right-click or press and hold the ‘Volume’ icon on the bottom-right corner of your Windows Taskbar. Now click or tap on ‘Sounds’.


- In the Sound Settings menu, select the checkbox next to ‘Play Windows Startup Sound’. Now click on ‘Apply’ or ‘OK’ for your change to take effect.


The next time you switch on your Windows 10 computer, it will play your familiar startup sound.
Method 2: Using Local Group Policy Editor
Note: The Local Group Policy Editor is only available in the Pro, Enterprise and Education editions in Windows 10.
- Firstly search for ‘Run’ in the Windows Search Bar and choose the Run option from the results.


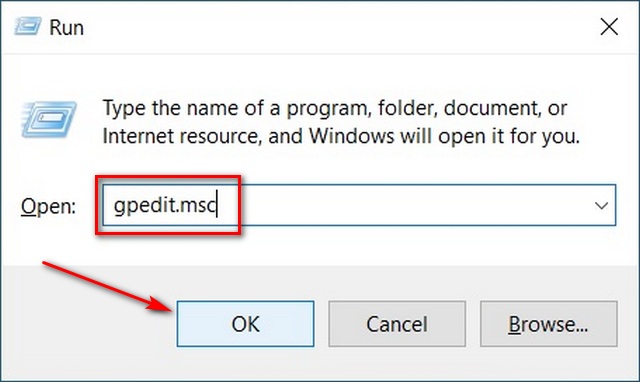
- In the Run box, type in
gpedit.mscand press Enter or click on ‘OK’ to open the Local Group Policy Editor.

- In the Group Policy Editor window, navigate to
Computer Configuration\Administrative Templates\System\Logonusing the left pane. On the right pane, double-click on the option that says ‘Turn off Windows Startup sound’.


- In the resultant popup window, select ‘Enabled’ or ‘Disabled’ based on your choice. Remember to click on ‘Apply’ or ‘OK’ to save your change.


That’s it. You have now successfully turned on startup sound in your Windows 10 computer.
Method 3: Using Registry Editor (Regedit)
- Open the Registry Editor on your PC by searching for ‘Regedit’ in the Windows Search Bar and choosing the obvious option.


- Within the left pane of the Registry Editor window, navigate to
HKEY_LOCAL_MACHINE\SOFTWARE\Microsoft\Windows\CurrentVersion\Authentication\LogonUI\BootAnimation.


- In the right pane, right-click on the entry that says ‘DisableStartupSound’ and from the popup menu, choose ‘Modify’.


- The hexadecimal value should be “0” for Enabled and “1” for Disabled. By default, it should be the latter in Windows 10. Make the change according to your choice. Finally, click on ‘OK’ and close the Regedit window.


That’s it. You now know three different ways to enable or disable startup sound in Windows 10. Your machine will now play a sound or tune of your choice every time you fire it up. You can also download a collection of startup sounds from all versions of Windows from the Microsoft Store (free).
Enable/Disable Windows Startup Sound in Windows 10
Windows 10 doesn’t play a startup sound by default, but that doesn’t mean you can’t enable it on your computer. Of course, you can also disable it any time by going through the same process if you don’t like to hear the chime every time you switch on. Meanwhile, since Windows 10 is your platform of choice, you should also check out some Windows 10 tips and tricks, how to use God Mode in Windows 10 and how to use PowerToys on Windows 10 to get the best out of your computer.

