
While I prefer to have the best photo editing apps at my disposal for enhancing my shots, they aren’t always on top of my mind. Especially when all I want is a handful of neat photo editing tools that can let me adorn my memorable shots without having to deal with complex software. At times, a variety of filters prove to be more than handy in sprucing up the pics. At other times, easy-to-use adjustment tools for exposure, contrast, and shadows turn out to be exactly what I need before sharing the images on social media or with loved ones. And for this purpose, I look no further than the stock Photos app for macOS. Let me show how you can edit images using the Photos app on Mac.
Pro Tips to Edit Images Using Photos App for Mac (2021)
Photos app for macOS has got almost all the basic editing tools. For instance, it features a solid collection of filters, a neat cropping tool, and even provides the flexibility to make the needed adjustments for color, light, saturation, exposure, and more. Oh yes, the app has also got a super handy auto enhancement tool especially for the times where you want to beautify your pics without having to go through a tedious editing session.
How to Duplicate an Image/Video in Photos App on macOS
The very first thing you should do before getting started with editing is to duplicate the image so that the original version will remain intact. As it’s known as the first step of editing photos, you shouldn’t fail to do it.
- Launch the Photos app on your Mac.


- Now, choose the image that you want to copy. After that, click on the Image menu and select Duplicate 1 Photo (or press Command-D).


It’s worth pointing out that you need to choose Duplicate to include the video portion, or Duplicate as Still Photo to pick just the still image when trying to duplicate a Live Photo.
How to Edit Images Using Photos App on Mac
- Launch the Photos app on your Mac and then head over to the image that you would like to edit and open it. Next, click on Edit at the top right corner of the screen.


2. There are six main tools located at the top: Zoom, Adjust, Filters, Crop, Rotate, and Automatic Enhancement.


Zoom in or Out on a Photo:
You can easily zoom in or out on a photo using the zoom slider. All you need to do is just click or drag the zoom slider left/right.
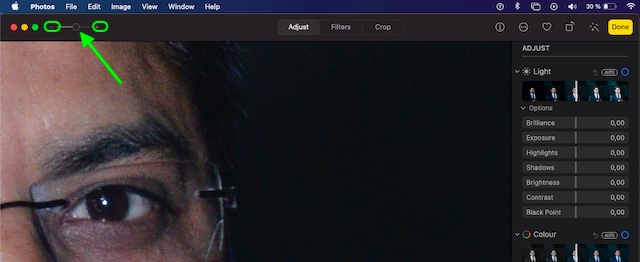

If you want to zoom in (to make the subject larger), either click on the “+” button or drag the slider towards the right. And if you wish to make the subject smaller in the frame, either click on the “-” button or drag the slider towards the left.
Adjust Light, Exposure, Brightness, Color, Black, and White
Photos app has got an impressive set of adjustment tools to let you fine-tune several crucial things like exposure, brightness, color, black and white, and more. To get going, click on the Adjust button at the top center.
After that, click on the arrow next to Light, Colour, or Black & White and then drag the slider to adjust everything in line with your needs. If you want the Photos app to automatically correct the image, click the Auto button.

If you wish to discard your changes and revert to the original settings for a specific adjustment, simply double-click its slider. A blue tick shows up right next to the adjustment’s name to confirm that a change was made. Based on your needs, you can select or deselect the tick to enable/disable adjustment temporarily and check how it affects the photo.
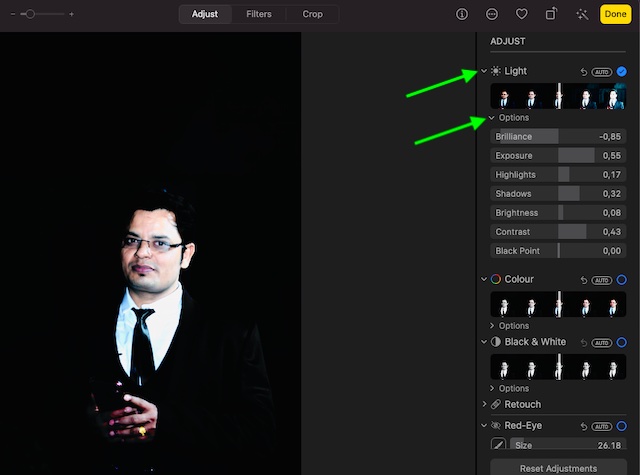
If you want to adjust light, click the arrow next to Light and then hit the arrow next to Options. After that, you can drag any of the sliders to fine-tune the look of your pic.
- Brilliance: Select it to make your image look richer and more vibrant. Notably, it brightens the dark areas and adds contrast to reveal details.
- Exposure: Choose it to fine-tune the brightness or darkness of the image.
- Highlights: Select it to adjust the highlight detail of the shot.
- Shadows: Choose it to adjust the detail that shows in the shadows.
- Brightness: It lets you adjust the brightness of the photo.
- Contrast: It allows you to adjust the contrast of the photo.
- Black Point: It lets you set the point at which the darkest parts of the image become pitch black by getting rid of all the details. Do note that setting the black point can play a key role in enhancing the contrast in a washed-out image. You can position the pointer over a slider and press and hold the Option key to increase the slider’s range of values.
Make Color Adjustments of Your Image
You can also fine-tune the saturation, vibrance, and color cast of your photo. To get it done, click on the arrow button right to Color. After that, click on the arrow right next to Options. Next, drag any of the sliders to change the appearance of your photo.


- Saturation: It allows you to adjust the image’s overall color intensity.
- Vibrance: It lets you fine-tune the color contrast and separation between similar colors in the image.
- Cast: It adjusts the color cast in the photo.
You can choose to place the pointer over a slider and press and hold the Option key to increase the slider’s range of values.
Make Black and White Adjustments
Photos app has also got some neat tools to make black-and-white adjustments. You can adjust the intensity of tones and grey areas as well as fine-tune your image’s grain.
Click on the arrow right next to Black & White. After that, hit the arrow button right next to Options. Then, drag the slider to make the desired adjustments.

- Intensity: It allows you to increase/decrease the intensity of the tones of an image.
- Neutrals: Use it to lighten/darken the grey areas of an image.
- Tone: Use it to adjust the image for a more high-contrast/low-contrast appearance.
- Grain: It lets you fine-tune the amount of film grain that shows in the image.
Apply Filters to Your Images
The Photos app for macOS comes with a handful of filters like Vivid, Vivid Warm, Vivid Cool, Dramatic, Dramatic Warm, Dramatic Cool, Mono, Silverton, and Noir that you can use to instantly transform the look of your image. So, try out each one of them to see how well they go with your image.


If you want to make your photo look more attractive, brighter, or punchy go with the Vivid filter. And if you wish to make your pic appear retro, choose Mono filter. Do note that you can also adjust the intensity of the filter. Simply choose a filter and then click on it to fine-tune its intensity.
Crop an Image Using Photos App
The cropping tool comes in handy when you want to get rid of certain portions of the image or improve its composition. Depending on your needs, you can crop an image to a custom aspect ratio, to a preset, or even constrain the pic to its original aspect ratio. Moreover, it also has a role to play when you wish to straighten photos to make them look better.


Simply, click on the Crop tool and then drag the handle to enclose the area of the image you want to keep. Check out the angle adjustment tool that can let you fine-tune the angle of the pic. Besides, there is also an option to automatically crop or straighten the photo.
Be sure to use the Flip and Aspect tools smartly to enhance the appearance of your image. As there is also a reset tool that can let you get rid of all the changes and start fresh, do not fail to go your all out.
Rotate a Photo/Video in Photos App
The rotation tool has a role to play when you want to have more control over the appearance of your pic. You can click on the rotate button in the toolbar to rotate the image anticlockwise. Continue to click on the rotate button until you get the desired orientation. If you want to rotate the image clockwise, Option-click the button.


Automatically Enhance a Photo or Video
Times when you don’t have much time to edit your pics, you should take full advantage of the “Auto Enhance” tool to have the color and contrast of your photo or get your video adjusted automatically. Just click on the auto-enhance button to make your shot look better instantly.


When you are happy with the result, click on Done at the top right corner of the screen or just press Return to finish.
How to Compare Photos Before and After Editing in Photos App for Mac
There is also an option to compare your photo before and after editing.
- Open the Photos app on your computer and then double-click a photo/video to open it. Then, click on Edit in the toolbar.
2. To view the original image, all you need to do is just click and hold the Without Adjustments button or press and hold the M key. After that, release the button/the M key to view the edited item.


How to Copy and Paste Adjustments in Photos App for macOS
One of my favorite editing features of the Photos app is the ability to copy and paste the adjustments. It plays a key role in accelerating photo editing, especially when you have to edit a ton of images.
Once you have adjusted a photo/video, you can copy the adjustments that you have made and then paste them on other items. Bear in mind that you are allowed to paste adjustments onto one item at a time. Also, do note you won’t be able to copy and paste the settings from the retouch tool, red-eye tool, crop tool, or third-party extensions.
- Open the Photos app on your Mac and then double-click an image to which you have already made adjustments. After that, click on Edit in the toolbar.
2. Now, select the Image menu and click on Copy Adjustments.


3. Next, double-click the item to which you want to apply the adjustments and then click on Edit.


3. Next up, select the Image menu and click on Paste Adjustments. Besides, you can also control-click an item in the editing view and select Copy Adjustments or Paste Adjustments.


How to Revert Photos to Original in Photos App for Mac
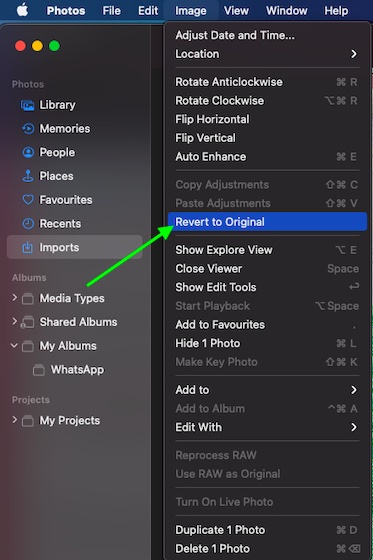
What if you don’t like the changes you have made to your photo and wish to revert it to the original? Well, there is a quick way to get rid of all the adjustments. If you want to discard all changes and start over, choose the item in question. Then, click on the Image menu and select Revert to Original.

Note: If you wish to undo the last change you made, click on the Edit menu and choose Undo or press Command-Z.
Edit Images Using Photos App on Mac Like a Pro
So, that’s how you can unlock all the handy editing tools of the Photos app for Mac. As I said above, the stock photos app has got all the basic editing tools just like its iOS counterpart, so make the best use of them to enhance the appearance of your photos with ease.
Have you found this article helpful? Do shoot your thoughts in the comments. Also, take a look at these equally useful guides like how to enable fast user account switching, how to use new battery settings and how to send iMessage with text effects on Mac if you want to explore more hacks.

