Classes in Dead Rails can provide the players with unique abilities and boosts throughout the journey to Mexico or the end of the run. While there are 24 unique classes, not all of them might be worth using up your precious Treasury Bonds for. And as a new player, we know how confusing it can be to find the right choice. Thankfully for you, we have brought about a handy Dead Rails Class Tier list that will help you understand which class to pick and when. So with that, let’s begin.
Editor’s Note: Last updated the Dead Rails tier list on March 1, 2026.
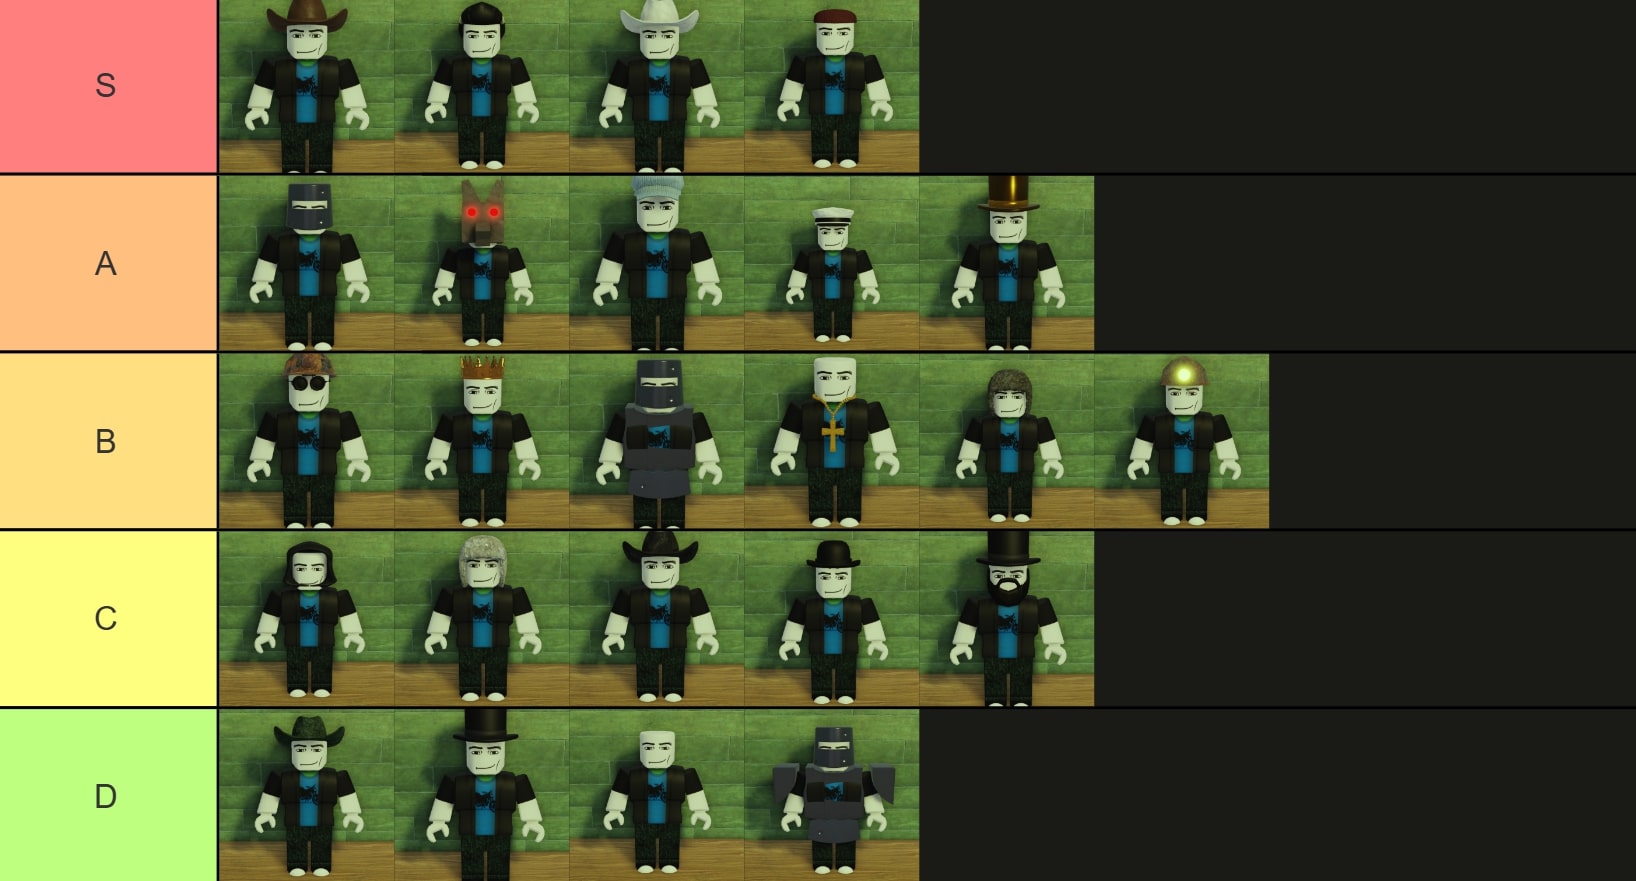
Dead Rails Class Tier List (Updated)
All of the 24 classes in Dead Rails spawn with a few items or have certain buffs or debuffs according to their character. Some of these are really useful while playing in teams or solo, and therefore lie at the very top of the list, the S-Tier. While others might be completely trash, and in my experience, these are not worth spending your hard-earned bonds.
The A-tier classes are good in their own ways, whereas the B-tier classes are really average, and their usability can vary depending on the player using them. Furthermore, the C and D-tier classes are some of the worst ones in the game. However, you may buy them in your beginner stages. That said, check out this table for the rankings of all classes in Dead Rails.
Tier Ranking Classes S Tier Cowboy, Vampire, High Roller, Survivalist A Tier The Alamo, Werewolf, Conductor, Milkman, Tycoon B Tier Demolitionist, King, Knight, Priest, Packmaster, Miner C Tier Necromancer, Hunter, Arsonist, Doctor, President D Tier Zombie, Musician, None, Ironclad

Dead Rails: S-Tier Classes
The S-Tier classes are the best ones available in Dead Rails, providing you with lots of materials and boosts as you start the run. However, they’ll cost you well, so make sure you have enough Treasury Bonds to begin with. Here are the best S-Tier classes in Dead Rails:
| Class Name | Starting Items | Passive Buffs/Debuffs | Cost |
|---|---|---|---|
| Cowboy | 2x Revolver Ammo 1x Saddle 1x Shovel 1x Revolver | None | 50 |
| Vampire | 1x Shovel 1x Vampire Knife | Increased movement speed and melee damage. But damage from direct sunlight | 75 |
| High Roller | 1x Shovel | Sell items at 1.5x price 10x chances of getting struck by lightning | 50 |
| Survivalist | 1 Shovel 1 Tomahawk | The lower your health, the more damage you inflict | 75 |
Out of the Dead Rails classes above, we recommend getting the Cowboy class, as he comes armed with a stack of weapons to fight the undead. The Vampire brings speed and melee damage boosts, and even an ability to steal life. While the High Roller class can help you make more money in the game, the Survivalist class can do massive damage when you are in low health.
Dead Rails: A-Tier Classes
The classes in the A-Tier are also good and can provide you with great starting items and passives. However, compared to the S-Tier, they seem to be lacking when it comes to surviving in the barren lands, and are not flexible enough to be used for solo runs. The Alamo is among the best in the A-Tier and can substantially support your team during the runs.
Other classes like Werewolf can be great for solo runs as you get speed, health, and damage buffs during the night. On the other hand, being a Conductor can help you work in teams since you spawn with extra coal and drive the train fast. Whereas Milkman has greatly increased stats when covered in milk, and Tycoon can help you make more money.
Class Name Starting Items Passive Buffs/Debuffs Cost The Alamo 1x Helmet
3x Metal Sheet
3x Barbed Wire
1x ShovelNone 50 Werewolf 1x Shovel 2x Movement Speed, Damage, and Health at night
0.9x stats during the Day50 Conductor 2x Coal Drives train at a faster speed 50 Milkman 1x Bottle of Milk
1x ShovelThe more you’re covered in milk, the more you have health regeneration, more running speed, and more melee damage 75 Tycoon 1x Shovel Get improved melee and weapon damage
Improved max health75
Dead Rails: B-Tier Classes
Coming to the B-Tier, these classes are average in nature, with both pros that we can’t ignore and cons that are big enough not to include them in higher tiers. The most prominent class in the B-tier is the Miner. With so little cost, you get some efficient passives that can help in both solo and team runs.
The Demolitionist is a good choice since you get lots of ammunition while starting the game, whereas being a Knight can make you spawn with heavy armor, thus making you a tank to absorb the damage and save your teammates. With that said, here are the rest of the classes.
| Class Name | Starting Items | Passive Buffs/Debuffs | Cost |
|---|---|---|---|
| Demolitionist | 1x Shovel 1x Gunpowder Barrel 4x Landmine | Immune to explosive damage | 75 |
| King | 1x Shovel | Gain more health and damage the more teammates play with the Knight class | 75 |
| Knight | 1x Helmet 1x Chestplate 1x Shovel 1x Shovel | None | 75 |
| Priest | 2x Crucifix 2x Holy Water 1x Shovel | Immunity from Lightning Strikes | 75 |
| Packmaster | 1x Shovel | Spawns 3 Wolves at the start Can tame any Wolf that bites you | 35 |
| Miner | 1x Mining Helmet 2x Coal 1x Pickaxe | Mine Ores with 2 hits | 15 |
Dead Rails: C-Tier Classes
In the C-Tier, we have a few beginner-friendly classes like Doctor and Arsonist that might be of some help at the early stages of the game. The Necromancer class can help you in reanimating the enemies when killed, thus making you an army of yourself.
The Hunter spawns with all sorts of efficient tools and traps. However, as you progress further, far better classes are available to unlock in Dead Rails. So, it will be wise to save the bonds now, team up with trustworthy people, and farm the Treasury Bonds.
Class Name Starting Items Passive Buffs/Debuffs Cost Necromancer 1x Shovel 25% to reanimate enemies when killed with Melee weapon
Costs 10 HP for each reincarnation.35 Hunter 2x Bear Trap
1x Shovel
1x Crossbow
1x ArrowsAll wild wolves will be werewolves 75 Arsonist 1x Shovel
4x MolotovDeals 2x Fire Damage 20 Doctor 1x Shovel
2x Bandage
2x Snake OilCan Revive Teammates at the cost of half of your health 15 President 1x Shovel Spawns a powerful soldier on death, but enemies spot you from 2x distance 75
Dead Rails: D-Tier Classes
The D-Tier consists of some of the imperfect classes in the game, including Zombie and Ironclad. A couple of them are expensive to unlock and don’t provide great passives, while others are not worth spending your bonds at all.
For instance, the Musician does nothing but spawn with a banjo that heals other players for a low amount. Even equipping no class at all is better than the Ironclad, since the latter reduces your speed by a huge percentage; hence, your survival is jeopardized.
Class Name Starting Items Passive Buffs/Debuffs Cost Zombie 1x Shovel Can regenerate health by eating dead bodies.
Less detected by enemies.
Cannot use bandages or Snake Oil75 Musician 1x Banjo Can slowly heal your teammates by playing the Banjo 15 None 1x Shovel Nothing Free. Starter Class Ironclad 1x Helmet
1x Chestplate
1x Left Shoulder Armor
1x Right Shoulder Armor
1x Shovel10% Reduced Movement Speed 75
That concludes our Dead Rails classes tier list, where Cowboy and Vampire are the best to pick in the game. Provided you follow the order above, you will have a better idea to spend your Treasury Bonds. So, which Dead Rails class are you unlocking? Let us know in the comments below!