
We all loved the Start Menu from good old Windows days and when Microsoft introduced a new Start Screen in Windows 8, there was a massive uproar. Microsoft has tried to lessen the damage with a new Start Menu in Windows 10, which has got a mixed response so far. Some people love it, some don’t. The Windows 10 Start Menu features “Tiles” from Windows 8 along with the basic Start Menu features we know from Windows 7.
The new Start menu works very well but we can make it better. There are a number of ways to customize the Start Menu on Windows 10 and if that’s not good enough, there are always third party apps to rely on.
Here are the best ways to customize Windows 10 Start Menu:
1. Resize the Start Menu
You can resize the Start Menu in Windows 10 like any other window. You can just hold the corner of the Start Screen and resize it the way you want. When you resize the Start menu, the tiles fit accordingly. For example, if you choose to lessen the width of the Start menu, the tiles will all come below and you can scroll down to find them.
2. Pin and Unpin Tiles


You can pin almost anything to the Start menu in Windows 10. You can pin an app to the Start menu by simply right-clicking on an app icon and hitting the “Pin to Start” option. You can unpin a tile by right-clicking the tile and hitting the “Unpin from Start” option. Along with apps, you can also pin websites, documents, settings and more to the Windows 10 Start menu.


3. Resize the Tiles
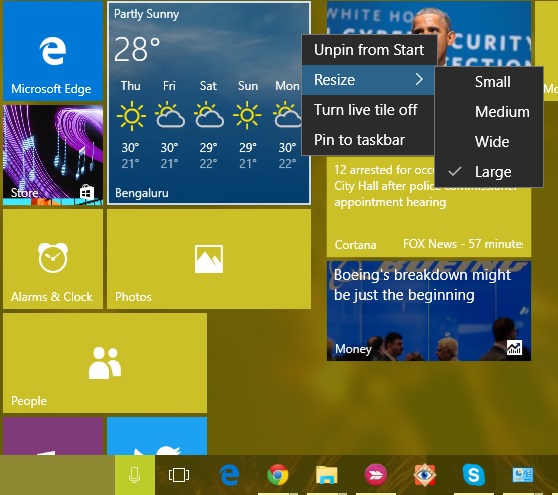
You can resize the tiles according to your needs. Not all the tiles bring you live tile updates, so you can have a “small” size for them while some apps like Mail show you information right on the tile and for that, the size must be at least “medium“. The larger the size of the tiles, more the information they will show. For example, the “Mail” tile shows you a single mail in “Wide” size but in the “Large” size, it shows you three mails.
You can resize a tile by right-clicking on the tile and then, go to “Resize” option, which will show you various sizes the tile is available in.
Note: Keep in mind though that not all tiles support all the sizes.

4. Edit, Create and Move Tile Groups
The Windows 10 Start menu lets you arrange the tiles in groups, depending on their category. You will find two groups by default, “Life at a glance” and “Play and Explore“. You can edit them by just clicking on the group name.


There’s also a provision to create a new group. To create a new tile group, you will have to drag a tile to an empty section in the Start menu. When you do that, a new group will be created and there will be an option above the group to “Name group“.
You can also move a tile group to anywhere by just holding the top of a group and dragging it to wherever you want on the Start menu.


5. Turn On or Off Live Tile Updates
Live tiles are known as “Live tiles” because of the fact that they bring you live information right on the tile but if you don’t have a liking to it, you can always turn it off. Live tile updates do take up your internet data to bring you updates, so if you are on a modest internet plan, you can turn it off. You can turn off live tile updates by simply right-clicking on a tile and hitting “Turn live tile off“. To turn on live tile updates, right-click on the tile and click “Turn live tile on“.


6. Change the color of Start Menu
You can also personalize the way your Start Menu looks. To personalize your Start Menu, go to “Settings“, where you will find a “Personalization” option. Inside Personalization settings, go to “Colors“, where you will find an option to “Automatically pick an accent color from my background“, which you can turn off to choose the accent color manually.


There will also be an option to “Show color on Start, taskbar and Action Center“. If you turn it off, the Start Menu, taskbar and Action Center will be black.


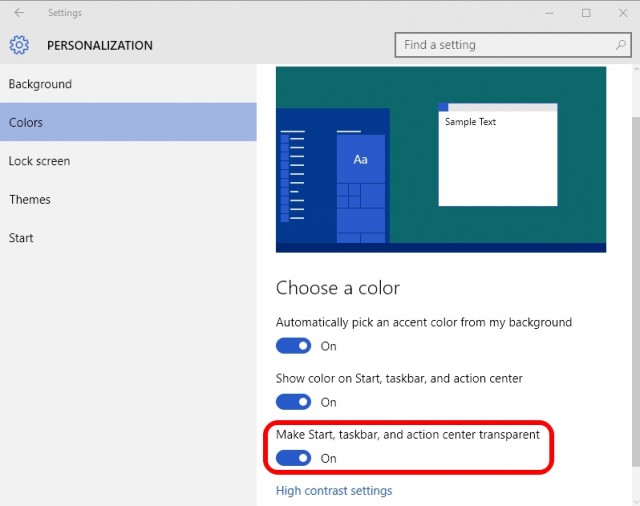
7. Make the Start Menu Transparent
You can choose to make the Start Menu in Windows 10 transparent or non-transparent. In the “Personalization” settings, there’s an option to “Make Start, taskbar and Action Center transparent” in the “Colors” tab, which lets you make the Start Menu transparent or not transparent.

8. Choose which folders appear in the Start Menu
You can choose the folders you want to show on the Start menu. In “Personalization” settings, go to “Start“, which features a highlighted button for “Choose which folders appear on Start“. After you click the button, you will be presented with a list of folders you can have on the Start menu. You can switch a folder to “On” if you want it on the Start Menu and “Off” if you don’t want it. You can choose folders like Documents, Downloads, Music, Videos, Homegroup, Network or you can choose a personal folder.


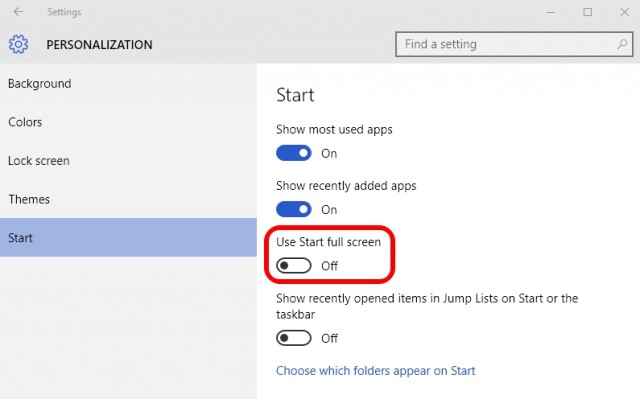
9. Get a full-screen Start like Windows 8
There are people who loved the full Start Screen on Windows 8 / 8.1 and Microsoft has included an option to switch to a full-screen Start Screen in Windows 10. In the “Personalization” settings, you will find an option “Use Start full screen” in the “Start” tab, which will bring a Windows 8 like full-screen Start.
10. Shuffle between Start Screen and Start Menu


Microsoft has included the ability to switch between Start Screen and Start Menu in Windows 10. In the “Action Center“, there’s a toggle “Tablet mode“, which when clicked brings the full-screen Start. You can click it again to return back to the usual Start Menu.


11. Pin Chrome apps to Start Menu
Microsoft not only lets you pin Windows apps but there’s ability to pin Chrome apps to the Start menu. To pin a Chrome app to the Start menu, open the chrome app in Chrome and then click the hamburger menu on the top right. Then, go to “More Tools” and click “Add to taskbar“. After that, don’t forget to tick “Open as window“, as it will allow you to use the app in a separate window. This will add the app in the Start menu.


12. Pin Webpages to Start Menu
Windows 10 allows you to pin websites/webpages from Chrome or Edge to the Start menu. In Chrome, you can add websites to Start menu by following the same steps we mentioned in ‘add chrome apps to start menu’. Just open the webpage you want to pin and click the Chrome hamburger menu, then go to “More tools” and click “Add to taskbar“.
Pinning a website to start menu is way more simple in Microsoft Edge. Just open the webpage you want to pin to the Start menu and then, click the three dot button at the top right and hit the “Pin to Start” button.


13. Use Third-party Apps to customize Start Menu
There are people who still want a Windows 7-esque Start Menu. Well, thanks to various third-party apps, you can get the Windows 7 or even the Windows XP Start menu. There are also some cool apps that let you create attractive tiles for the Windows 10 Start menu.
Start menu alternative apps have gained prominence ever since Windows 8 came without one but not every Start menu app supports Windows 10 yet. So, we are only listing apps that support Windows 10. Here are some third-party apps you should use to customize the Windows 10 Start menu:
-
Classic Shell


Classic Shell is a very popular and feature rich app, which lets you replace the current Windows 10 start menu with the Windows 7/Vista/XP Start menu. The app also packs in a number of customization options. From the looks of the Start menu to the speed at which it opens, the app covers it all. Classic Shell lets you change the controls, behavior, options in the context menu, replace the Start icon with anything custom you’d like and more. Every feature has a detailed settings page, so if you want to customize your Start menu exactly the way you want, Classic Shell should be a good option.
-
Start10


Start10 is another popular Windows Start menu customization app. It not only brings a “Windows 7 style” Start menu, it also offers a cool “Modern style” option along with a highly customizable “Windows 10 style” Start menu. There are a plethora of Start buttons to choose from along with various control and interface features. You can get a free 30-day trial version of the app, which has a few features unlocked. The paid version ($4.99) of the app brings some beautiful Start menu styles and unlock all features. You should definitely give it a try.
-
Start Menu 8


Start Menu 8 is another Windows app that brings new Start menus. As the name suggests, the app has been available since Windows 8 but it does support Windows 10. The app brings some very cool Start menu icons along with two Start menu styles: Flat and Classic Windows 7 style. You can customize everything you want in these two styles. Start Menu 8 is available for free.
-
TileCreator


Not all apps on Windows are optimized for Tiles, which can make the new Start menu looks a little barren at times. Well, TileCreator lets you create custom tiles with images and colors that you desire. You can also set apps to launch for any custom tiles you have created. For example, we created a custom tile named ‘Beebom’ and now we can set any app to launch when the Beebom tile is opened. TileCreator is available for free on the Windows Store. You will also need the TileCreator Proxy to create custom tiles on TileCreator.

SEE ALSO: 12 Great Windows 10 Themes
According to us, these are the best ways to customize Windows 10 Start menu. Which one is your favorite way to customize the Windows 10 Start menu? We would love to hear from you in comments section.


