Windows 11 brings many forward-looking changes over its predecessor, and it includes a revamped UI, native Android app support, a redesigned Start Menu and Settings app, and more. However, users seem to be struggling with the new UI and design elements, with many of them asking how to change the date and time in Microsoft’s new OS. If that’s why you are here, rest assured, we have got you covered. In this article, we will show how to change the date and time settings in Windows 11.
Change Date and Time in Windows 11 (2021)
We have already covered the Windows 11 release in great detail, including its myriad of new features, differences with Windows 10, and how to customize the Start Menu and taskbar on your PC. Today’s guide is a bit more elementary, insofar as everyone using a Windows 11 machine will need to change the date and time setting at some stage. So without further ado, let’s learn how you can change the date and time in Windows 11.
Four Methods to Change Date and Time in Windows 11
With Windows 10, Microsoft introduced a new way to change date and time through the Settings menu, and the method is also available in Windows 11. However, you can also the change date and time in Windows 11 the old-fashioned way – how it used to be in Windows 7/8/8.1 and earlier versions of the OS. We will demonstrate all the methods in this article. We will also show you how to change the date and time formatting in Windows 11.
Method 1: Change Date and Time Through Settings
Changing the date and time through Settings is probably the easiest way to do that in Windows 11. Here’s how:
- Right-click on the clock icon at the bottom-right corner of your taskbar and select ‘Adjust date and time‘.

Note: You can also access the same date and time adjustment option from Settings (Windows key + I) -> Time and Language -> Date and Time.
- In the ‘Date and Time’ settings window, you can either stick with the default setting to set time and date automatically or manually set the date and time on your Windows 11 PC. To opt for the manual option, turn off the toggle for ‘Set time automatically‘. Then, hit the ‘Change‘ button next to ‘Set the date and time manually’.

- In the next window, set the date and time using the drop-down menus, and then click ‘Change’ to confirm.

That’s it. You have successfully changed the date and time settings on your Windows 11 PC.
Change Time and Date Format Through Settings
Alongside the actual date and time, you can also change the date and time format from the Settings panel in Windows 11. Here’s how it works:
- Navigate to ‘Settings > Time and Language‘, as described earlier. Now on the right pane, click on the ‘Language and Region‘ tile.

- On the Language and Region settings page, click on ‘Regional format‘ . Now, on the drop-down panel, hit the ‘Change formats‘ button.

- You will now be able to change the time and date formats. For date, you can choose from dd/mm/yy, mm/dd/yy, and several other options, while for time, you can choose between 12-hour (AM/PM) or 24-hour clock. To change any option, click on the drop-down menu next to it and make your selection.

Method 2: Change Date and Time via Control Panel
Changing the date and time of your PC through the Control Panel is an age-old option in Windows. It is still available in Windows 11, and here’s how you use it:
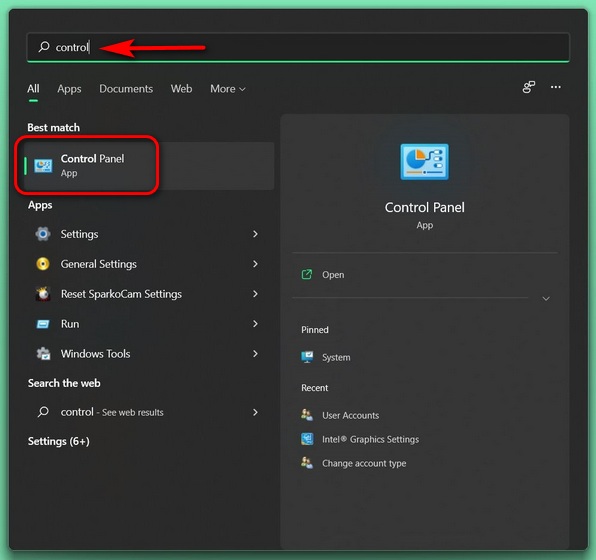
- Firstly, open Control Panel on your Windows 11 computer. To do that, search for ‘control’ (without quotes) in the Windows search bar and select ‘Control Panel‘ from the results.
- In the Control Panel, make sure you use the (small or large) ‘Icons’ view. Then, select ‘Date and Time‘.

- On the pop-up window, click on ‘Change date and time’.

- On the next page, you can change the date by clicking on the correct date, while the time can be changed using the tiny up and down arrows below the analog clock. Hit ‘OK‘ once you are done.

Change Time and Date Format via Control Panel
Before Windows 10, the Settings option was not available in Windows, so pretty much every setting had to be changed through the Control Panel. So, of course, you can also change the date and time format using this method. Here’s how:
- To change the date and time format, move to ‘Control Panel -> Date and Time -> Change date and time‘ as described earlier. Then, click on ‘Change calendar settings‘

- Here, you can use the drop-down menus to select the time format and date format. Once you are done, click ‘Apply‘ or ‘OK‘ to save your changes.

Method 3: Change Time and Date Using PowerShell
One little-known method of changing the date and time in Windows is through PowerShell. It’s not as intuitive as the methods described above, but we feel you should still know how to do that nonetheless. So here’s how you can change the data and time on your Windows 11 PC using Windows PowerShell:
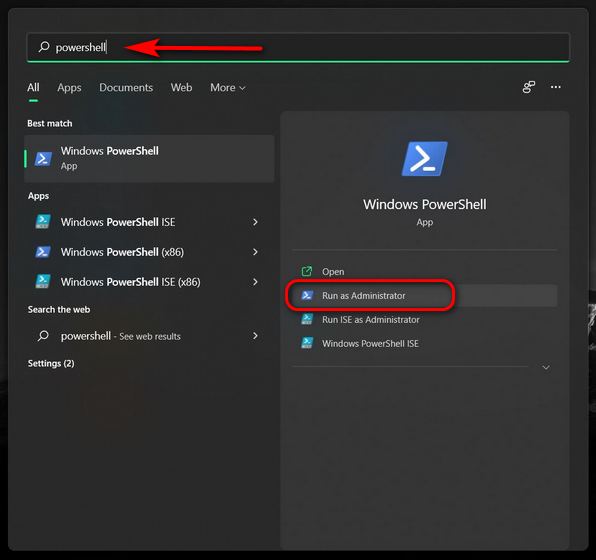
- First, open Windows PowerShell in Admin mode on your PC. To do that, search for ‘powershell’ in the Windows search bar and click Run as Administrator.
- In the PowerShell window, you can use one single command to change both date and time in one go:
Set-Date -Date "dd/mm/yyyy HH:MM AM"orSet-Date -Date "dd/mm/yyyy HH:MM PM"depending on whether it is morning or evening. - For example, we will use the following command to set the date to October 1st, 2021 and the time to 6:00 PM on our Windows 11 PC:
Set-Date -Date "01/10/2021 6:00 PM". For 24-hour format, omit the AM/PM parameter. Instead, use the following syntax:Set-Date -Date "01/10/2021 18:00"

Note: Whether you should use dd/mm/yyyy or mm/dd/yyyy will depend on the format you have already set via Settings or Control Panel.
Method 4: Change Date and Time Using Command Prompt
The final option on our list is the good old Command Prompt. You can use the command line tool to change the date and time in Windows 11. Here’s what the process looks like:
- Open a Command Prompt window in Admin mode. To do that, search for ‘cmd‘ (without quotes) in the Windows search bar and click ‘Run as Administrator‘.

- To set a new date, use the following command:
date dd/mm/yyyy. Again, I’m using dd/mm because my PC is set up that way, but if you are following the mm/dd format, use that in the Command Prompt. You can change it to mm/dd using either of the first two methods described above. For example, to change the date to October 1st, 2021, we use the following command:date 01/10/2021

- To change the time, type the command
time HH:MMin the Command Prompt window and hit Enter. Of course, replace HH and MM with the correct hour and minute, either in the 12-hr or 24-hr format. For example, to change the time to 06:10 AM, we will use the command:time 06:10. To change the time to 6:10 PM, we will use the command:time 18:10ortime 6:10 PM

Sync Your PC With Global Servers to Automatically Adjust Date and Time
To sync the date and time on your Windows 11 PC with Microsoft’s global servers, follow the steps below:
- Go to ‘Control Panel -> Date and Time‘ as described in Method 2. Now, navigate to the ‘Internet Time‘ tab and click the ‘Change settings‘ button.

- On the next pop-up, select your preferred server from the drop-down menu. Finally, click on ‘Update now‘. The time and date will both synchronize within a second or two.

Note: If you want to set the time manually, turn off the check-box next to ‘Synchronize with an internet time server‘ and hit ‘OK‘ to save your setting (see screenshot above).
Easily Change Clock and Calendar Settings on Your PC
You can follow the steps in this tutorial to change the time and date settings in Windows 11 with ease. So go ahead, fix the date and time on your computer, and let us know if you find the methods intuitive enough. Or, do you think Microsoft should make it easier to change the clock settings in the next version of Windows? While you are at it, check out some of our other Windows 11 tutorials, including how to change power mode settings in Windows 11 and change administrator in Windows 11.