
One of the most important features of Windows 10 is its search functionality. It enables you to search not only local files and folders on the computer but also Bing, OneDrive, and more. It is a core component of Microsoft’s desktop operating system, but it has a bad habit of acting up now and then. So if you are facing problems with Windows 10 search (not working, errant results, indexing issues, etc.) and looking for ways to fix them, you’ve come to the right place.
Fix Search Problems in Your Windows 10 Computer
Windows Search is an essential tool that most of us use multiple times each day. So naturally, a dysfunctional search feature can greatly hinder productivity. The good news is, there are several ways to fix the search feature if it’s not working on your Windows 10 computer. In this article, we detail these methods to help you solve any problems with Windows 10 search.
1. Use Windows Troubleshooter to Fix Search Problems
Windows 10 comes with a new built-in troubleshooting tool that can help you address issues with Windows Search. It is the first thing you should do if the search function on your Windows 10 PC stops working. To use the feature, follow these steps:
- Open Settings by pressing Windows key + I simultaneously. Then click on ‘Update and Security‘.


- Here, scroll down and click on ‘Search and Indexing’. You will see a button that reads ‘Run the troubleshooter‘. Click that button to get started.

Note: You can also open the search troubleshooter from Command Prompt using the following command: msdt -ep WindowsHelp id SearchDiagnostic
- Windows 10 will present you with a list of issues it believes you could be facing with the search feature. Select the issue(s) that best describes your problem and click on ‘Next’.


- The next step may not be the same for all users, so try and follow on-screen instructions. Generally speaking, Windows will scan your computer for potential issues and present you with an option to fix them. To do that, hit ‘Try these repairs as an administrator‘.


- Thereafter, Windows will try to repair the errant files and show you a message that says ‘Fixed‘. Click ‘Close’ at the bottom-right corner to close the troubleshooter.


The method described above is the best and most effective way to fix search problems in Windows 10. However, if this doesn’t solve your issue, you can try a host of other methods to see what works in your case.
2. Fix Windows Search Index Settings
The built-in troubleshooter can take care of most issues affecting Search on Windows 10. However, if it doesn’t solve your problem, you can try rebuilding the index database to fix search problems in Windows 10. For that, try the following steps:
- Open Settings (Windows key+I) and click on ‘Search‘.


- Then, go to ‘Searching Windows’ on the left sidebar and select ‘Advanced Search Indexer Settings’ on the right pane.

- On the pop-up window, select ‘Advanced‘.


- On the next pop-up screen, click ‘Rebuild‘. You will get a warning saying that the process will take a long time. Hit ‘OK’ to accept and carry on.


The above method will clear and rebuild the index database. It will take a long time, but once complete, the search function on Windows 10 should start working as usual.
3. Download Indexer Diagnostics on Windows 10
Microsoft also offers a diagnostics tool called ‘Indexer Diagnostics’. It enables users to do additional troubleshooting to detect potential issues affecting the Search Indexer service. “Indexing is the process of looking at files, email messages, and other content on your PC and cataloging their information, such as the words and metadata in them. When you search your PC after indexing, it looks at an index of terms to find results faster”, Microsoft says in its official document on Search Indexing in Windows 10.


Do note that this is a time-consuming process and can take up to two hours to complete the first time you run the utility. After that, it will be relatively faster, given that indexing will run in the background when you use it, only re-indexing updated data. You can download Indexer Diagnostics (Free) from the Microsoft Store to get started. Once you run the app, it will present you with a list of potential issues. Hit the ‘Restart’ button next to the problem that best describes your situation.
4. Restart Windows Search
If none of the steps above help fix your problem, try restarting the Windows search service. Here’s how you do it:
- Open the Run dialog box by hitting ‘Windows key + R’ simultaneously. Then, type-in
services.mscand click OK.


- On the services window, scroll down to locate Windows Search. Now double-click on it to change the default options related to the feature.


- On the popup window, select the ‘General’ tab. Now use the drop-down menu to change the ‘Startup Type’ to Automatic (Delayed Start). Next, click on ‘Start‘ if the Service Status is ‘Stopped’. Finally, click on ‘OK‘ to save your setting.


Note: These are the default options for Windows Search. If the service is working normally, these options will all be automatically enabled.
5. Restart SearchUI.exe to Get Search Working on Windows 10
- Open Task Manager by hitting the Windows 10 keyboard shortcut Ctrl+Shift+Esc on your computer. Go to the ‘Details’ tab at the top. Then, right-click on the SearchUI.exe process, and select ‘End Task’ from the pop-up menu. Confirm your choice when asked.


The SearchUI process will restart automatically within seconds. If it doesn’t, restart your computer. If the search functionality is not working on your Windows 10 PC, that should fix the problem right away.
6. Reset Search on Windows 10 Using PowerShell
If Search is not working on your Windows 10 PC, you can also reset it using PowerShell. However, this method only works on Windows 10 version 1903 or higher. So update your PC to the latest version of Windows 10 to complete the following steps.
- First off, download the ‘Reset Windows Search PowerShell script‘ (Free) from Microsoft’s website.


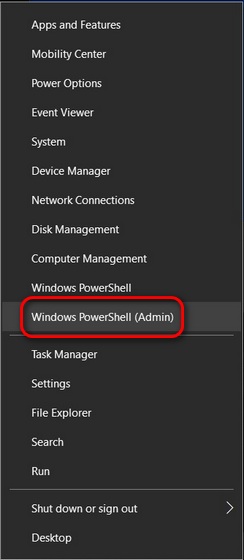
- Next, open Windows Powershell on your PC. To do that, right-click on the Start button and select the Windows PowerShell (Admin) option from the pop-up menu.

- Now run the following command to allow scripts to run on your device:
Set-ExecutionPolicy -Scope CurrentUser -ExecutionPolicy Unrestricted. Type “y” (without quotes) and hit Enter to confirm.


Note: The default execution policy in Windows is ‘Restricted’. However, you can check the current setting using the following command Get-ExecutionPolicy. If it says ‘Unrestricted’ instead of ‘Restricted’, skip the above step and go straight to the step below.
- Now type the following command to run the downloaded script and press Enter:
C:\Users\[account name]\Downloads\ResetWindowssearchBox.ps1. Make sure to replace [account name] with the name of your actual account folder. You will get a warning about scripts, but don’t worry and hit “r” (without quotes) to ignore it and carry on.

- You will get a message saying your Windows Search Box has been reset. Press any key to move to the next step.

- Finally, you should reset the original execution policy with the following command:
Set-ExecutionPolicy -Scope CurrentUser -ExecutionPolicy Restricted.

This should fix any issues with search on your Windows 10 computer, and you should be able to search for files and apps again.
Fix Windows Search in a Few Easy Steps
Now that you know how to fix the Search function on your Windows 10 PC, check out some of our other troubleshooting guides as well. You can learn how to fix network connectivity issues in Windows 10, how to fix slow File Explorer search in Windows 10, and more. Also, if you are facing any battery or performance issues, here are 15 tips to improve the battery life and tips on how you can speed up Windows 10 in a few easy steps. We hope our guide helps you fix the search functionality on your Windows 10 computer. If you run into any issues or have doubts, comment them down below, and we will help you out.

