
While the market is flooded with a plethora of feature-rich messaging apps such as WhatsApp, as well as secure messaging apps like Telegram, and Signal, iMessage remains on the wishlist of many. Apart from being highly secure and seamless, Apple’s messaging app is second to none in terms of spicing up the conversation. If Animoji doesn’t bring a smile to you, Memoji will break the ice. And if bubble effects do not light up the entire conversation, the eye-catching screen effects will make the cut. Whether you are new to the Apple ecosystem or think that you are yet to get the most out of the stock messaging app for iOS, look no further than these 17 best tips to use iMessage on iPhone and iPad like a pro.
Best Tips to Get the Most Out of iMessage on iPhone and iPad (2022)
From unlocking a handful of hidden iMessage features to revealing cool iMessage customization tips, this extensive roster has got you covered. That aside, it also features a few handy tips about managing your messages. Be it bulk deleting messages or keeping them all secure and easily accessible across devices or using quick gestures to take control of conversation threads, this guide can help you discover better ways to keep Apple’s messaging app uncluttered. Now that you have got the sneak-peek about what this post has got in store, let’s get started!
1. Customize iMessage App Drawer
With App Drawer, it’s pretty straightforward to access your favorite apps and games. However, it needs to be managed smartly to keep the clutter away. Thankfully, iOS lets you ideally customize the iMessage app drawer on your iPhone to hide/remove the unwanted items and even rearrange the order of their appearance.
To do so, open iMessage -> a conversation -> swipe towards left from right to access the More button. After that, tap on the Edit button at the top left corner of the screen. Under the Favorites section, you will see the list of all the apps that are included in the drawer. Tap on the red button to the left of each item you no longer want to keep and then hit the Remove from Favorites button.

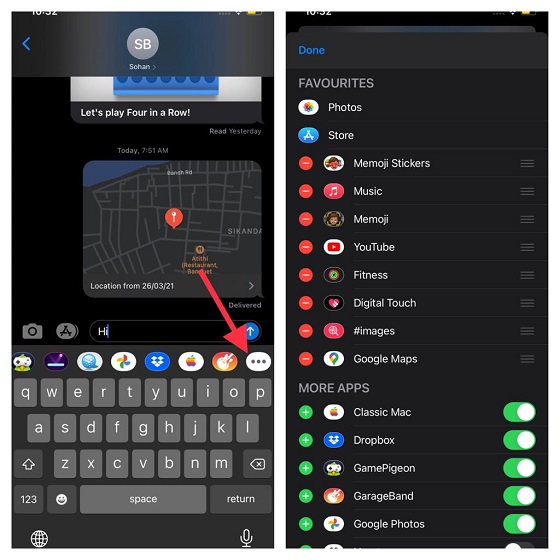
If you want to add any item to the iMessage app drawer, tap on the “+” button to the left of any app/game or sticker. And if you wish to rearrange the order in which the favorites appear, simply touch and hold the three horizontal lines right next to any item and then drag it to the desired spot. In the end, make sure to tap on Done to finish.
2. Set Up Your iMessage Profile
For a personalized messaging experience, I would recommend you to set up your iMessage profile (requires iOS 13 or later). It not only enhances messaging experience but also plays a good part in managing contacts. Interestingly, you can set Memoji as your iMessage profile photo. With a wide range of customization on offer, you can give a custom look to your Memoji and set it up as your profile.
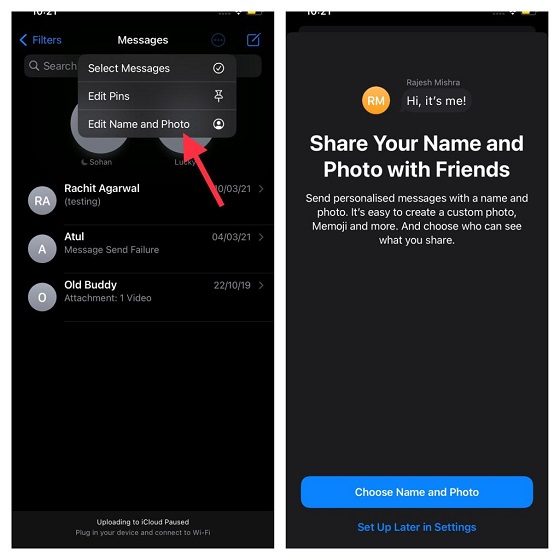
To get going, open the Messages app on your device -> tiny circle button -> Edit Name and Photo -> Choose Name and Photo. After that, set up your profile by following the instructions.
3. Send iMessage with Bubble/Screen Effects
Times when you want to add some fun elements to your iMessaging, bubble and screen effects can have a role to play. Introduced in iOS 10, they have been one of the most loved iMessage features. No wonder, Apple has included these effects in macOS Big Sur as well.
To get going, launch the Messages app -> conversation thread -> enter the text -> touch and hold the “Arrow” button. Now, you should see Bubble and Screen effects tabs at the top center.
To send iMessage with a bubble effect, make sure that the Bubble tab is selected. Then, choose the desired effect like slam, loud, gentle, and invisible link. If you want to offer a bit of privacy to your message, choose the invisible link to keep the text hidden until the receiver taps on it. After you have selected the preferred bubble effect, tap on the arrow button to send the iMessage.
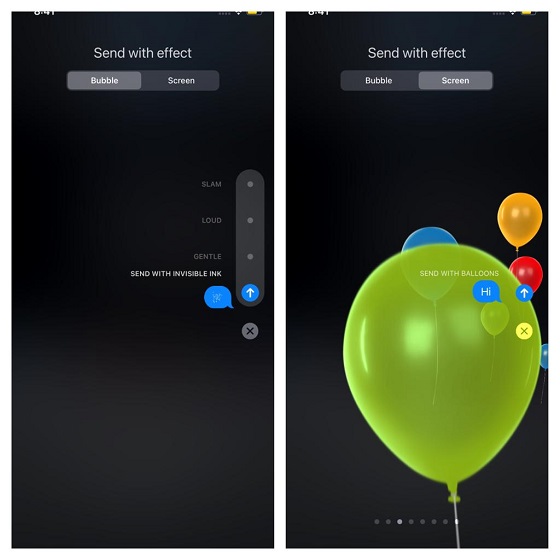
To send iMessage with a screen effect, ensure that the Screen tab is selected. Now, swipe towards the left to switch between screen effects like fireworks, lasers, confetti, balloons, spotlight, echo, and love. Once you have selected the desired screen effect, tap on the arrow button to send the message as usual.
4. Use Smart Filters to Keep Your Messages Organized
Smart filters were one of the most notable additions to the Messages app in iOS 14. It automatically organizes your messages in different categories so that you can access specific types of messages with ease. In a nutshell, you no longer need to hop from one end to the other to track your messages.
Navigate to Messages app -> back button at the top left corner of the screen. Now, you should see multiple filters.

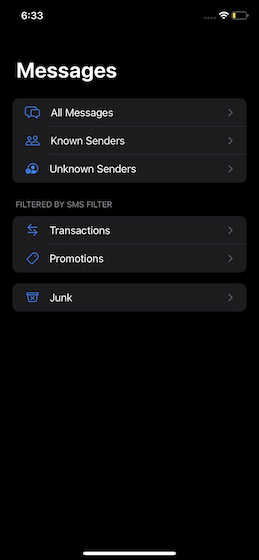
- All Messages: It stores all of your messages.
- Known Senders: It consists of messages from known senders.
- Unknown Senders: It houses messages from unknown senders.
- Transactions: It lets you access your bank transactions.
- Promotions: It allows you to access all the promotional messages.
- Junk: It comprises junk messages.
5. Pin/Unpin Chats
You no longer need to dig into the Messages app to access your favorite chats to communicate. Last year, iOS 14 added the pinning functionality that lets you quickly access the chats which you use more often. All the pinned chats appear right at the top.
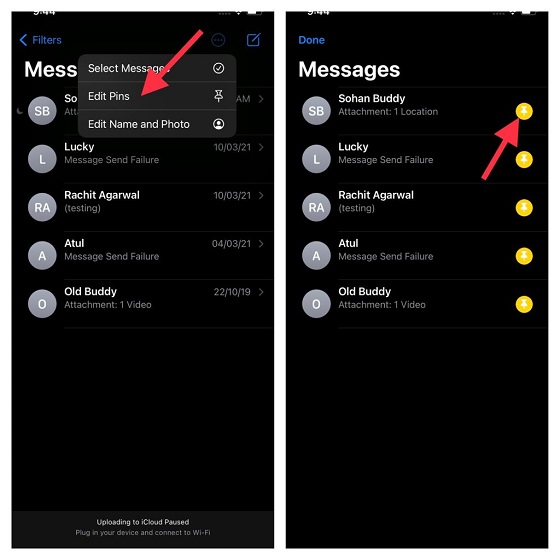
Open the Messages app on your device and then tap on the tiny circle button at the top right corner of the screen. Now, tap on the pin button right next to the chat that you want to pin. In the end, make sure to tap on Done to finish.

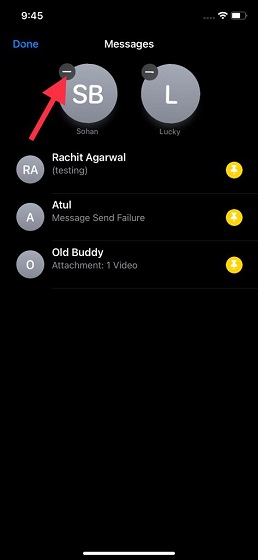
If you ever want to unpin any chat, go to Messages app -> tiny circle button -> Edit Pins. Now, tap on the “-” button on the pinned chat to unpin it. Be sure to tap on Done to finish.
6. Use Two-Fingers to Manage Your Messages
If three-finger gestures make it incredibly easy to cut, copy, and paste, the two-finger tap gestures make the task of managing messages pretty smooth sailing. So, if you find the traditional process of managing messages on iOS a bit tedious affair, you should make the most of this feature to take control of your messages.

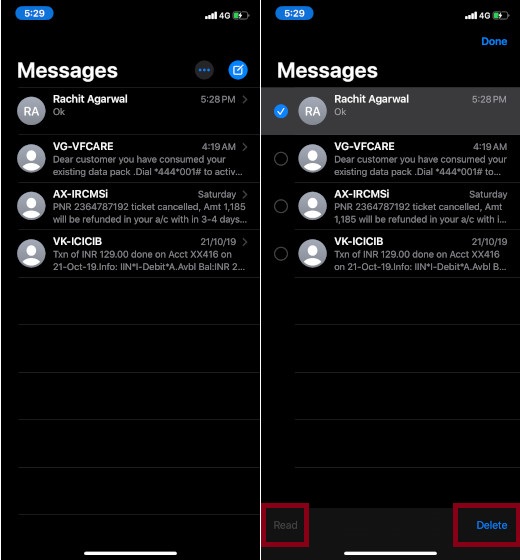
Simply head into the Messages app on your device. Now, use the two-finger tap gesture to select any conversation thread. Then, you can use the two-finger swipe up/down gesture to select more conversation threads. After that, you can mark the conversation thread/s or delete the ones you no longer need. Pretty neat, isn’t it?
7. Use Animoji/Memoji
Animojis and Memojis are among the hottest ingredients of iMessage. So, if you are willing to spice up your conversation, you should never give them a miss. The custom-animated emojis use Apple’s facial recognition system to mirror your facial expressions in real-time. To be more precise, they are quite similar to Snapchat lenses. Keep it in your mind that Animojis/Memojis are available only on the iPhone and iPad equipped with Face ID.
While Animojis turn you into funny avatars like poop, panda, ghost, pig, and more, Memojis are designed to match your personality thanks to a ton of customization. To get going, open the Messages app on your iPhone or iPad -> conversation thread -> choose the Memoji option.
Now, if you want to use Memoji, tap on the “+” button. After that, select Edit. Next, go ahead and customize the skin and hairstyle. Next up, tap on the record button to record the message and send it.
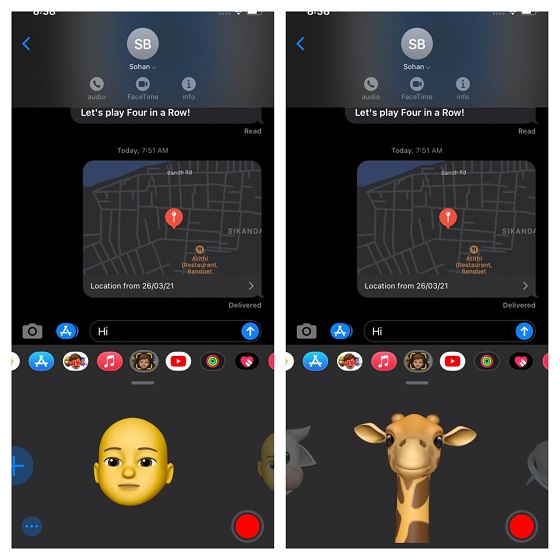
Similarly, you can select an Animoji (there are more than 20 types of Animojis) and then record the message. After that, send it to your friend.
8. Hide Alerts from Specific Conversation Threads
For the folks who always want to shield their private conversations from the prying eyes, the ability to hide alerts from specific conversation threads can prove to be super handy. On the flip side, it can also have a role to play in letting you ignore certain conversation threads, especially the ones that keep on bombarding you with too many alerts.
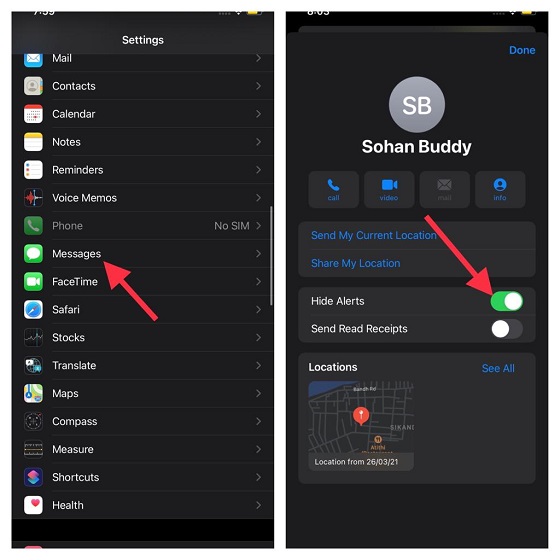
To do it, launch Messages app -> conversation thread -> name -> “i” button. Now, turn off the switch right next to Hide Alerts.
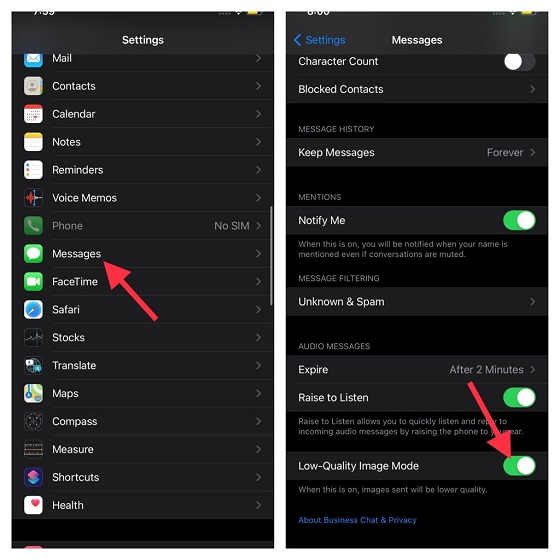
9. Send Low-Quality Images
Especially when I encounter the unexpected battery drain on my iPhone or find my limited bandwidth running out of steam, I prefer to send low-quality images. They not only kill less battery but also help me save some battery. So, the next time you face similar issues, head over to the Settings app -> Messages. Now, scroll down to the bottom and then turn on the switch right next to Low-Quality Images.
10. Share Your Location Using iMessage
There could be all sorts of reasons why you may want to share your location with your friends or loved ones. Maybe you want to let them know your whereabouts or maybe you wish to keep your dear ones in the loop about your arrival at a destination. Whatever could be your personal reason, you can share your location via iMessage with ease.
Go to Messages app on your iOS/iPadOS device -> conversation thread -> name -> “i” button. Now, you have two options:
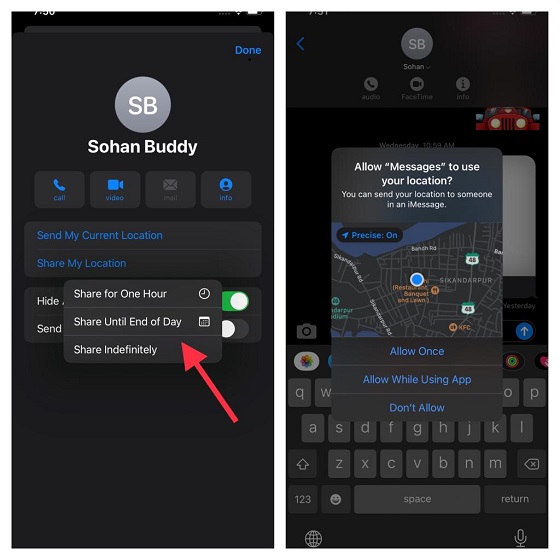
- Share My Current Location: It allows you to share your current location right away.
- Share My Location: It lets you share your location for one hour, until the end of the day or indefinitely.
Choose the preferred location sharing option and you are good to go!
11. Send As SMS When iMessage is Unavailable
Imagine a situation where you are trying to send an iMessage to your friend but unfortunately iMessage is unavailable on your friend’s device. Wouldn’t you appreciate it if iMessage sends that message as SMS so that your communication doesn’t stop? Most probably, you would.
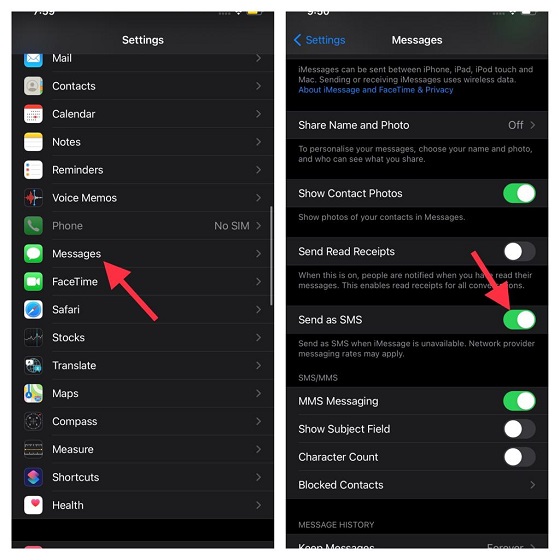
Head over to the Settings app on your device -> Messages and then turn on the switch right next to Send as SMS. Do note that the network provider’s messaging rates may apply.
12. Delete Audio Messages at Your Own Will
For smart storage management, iOS automatically removes an audio message once you have sent/listened to it. While this feature is quite helpful, some of you might want to delete the audio message at your own convenience. Personally, I prefer to delete the audio messages manually. It offers me the flexibility to listen to audio messages multiple times.

Open Messages app on your iOS device -> Messages -> Expire (located under Audio Messages section). Now, select Never.
13. Enable/Disable Mentions
With mentions, it becomes a tad easier to keep a track of the conversation that matters to you. So, make sure to enable it so that you don’t miss out on an important message. When the “Notify Me” feature is turned on, you will be alerted when your name is mentioned even if you have muted the conversation.
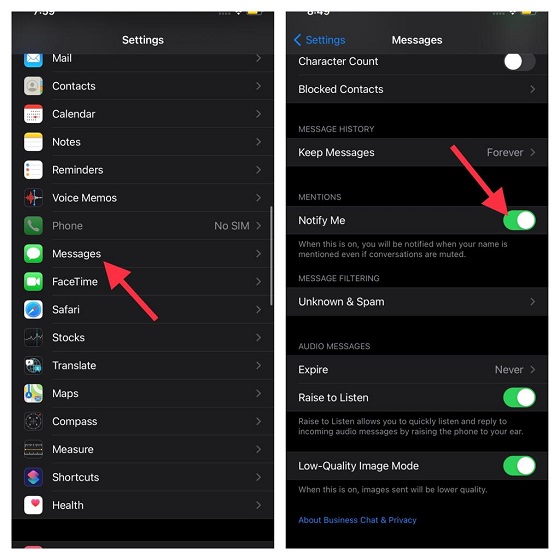
Go to the Settings app on your device -> Messages. Now, ensure that the toggle for Notify Me is turned on.
14. Enable Read Receipts for Individual Chats
Read Receipts is like a double-edged sword. While there is no denying the fact it’s pretty helpful in letting you know that the receiver has read your message, it has the tendency of exposing your privacy. Especially if you are trying to ignore the conversation. And in that case, you might end up infuriating the sender.
Apple Messages app offers you the option to enable/disable read receipts for individual messages. So, you can choose to keep it turned on for the messages that matter to you and disable it for the ones that do not rank highly on your list.
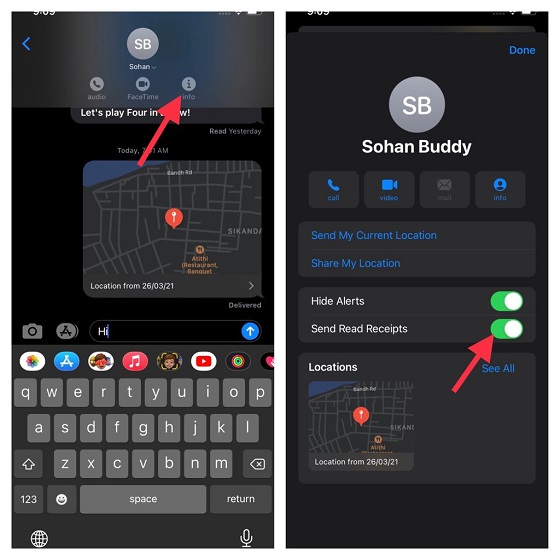
Navigate to Messages app on your device -> conversation thread -> name -> “i” button. Now, turn on the toggle right next to Read Receipts.
15. Save Your Messages in iCloud
When it comes to offering reliable performance, iOS ranks right up there. However, the operating system does run into serious issues once in a while. So, if you don’t want to lose your memorable/important messages due to unexpected issues, you should enable iCloud backup for your messages.
Bear in mind that Apple offers only 5GB of free cloud storage. So, make sure you have enough storage to accommodate the messages. If your iCloud storage is full, you can upgrade it (50GB for $0.99/month or 200GB for $2.99/month, or 2TB for $9.99/month) to have enough storage for your messages.
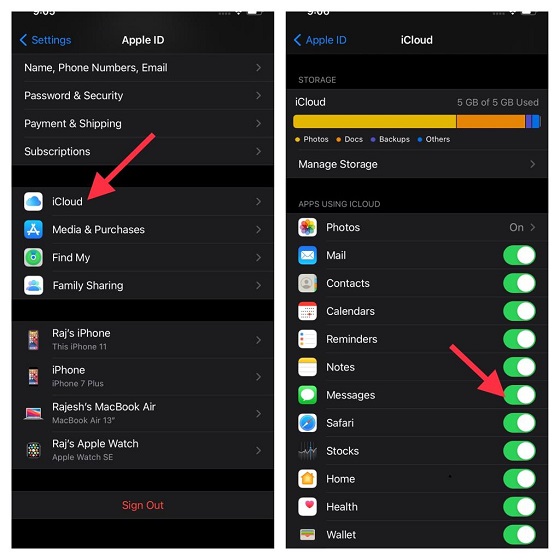
Navigate to Settings app -> profile -> iCloud. Now, make sure the switch for Messages is turned on.
16. Keep Your Messages App Uncluttered
It’s always recommended to delete attachments and useless messages from time to time to keep the clutter at bay. But what if removing the redundant attachments/messages is not one of your virtues or you find the process quite tedious? Well, there is a quick way to track down all the attachments/top conversations and bulk delete them.
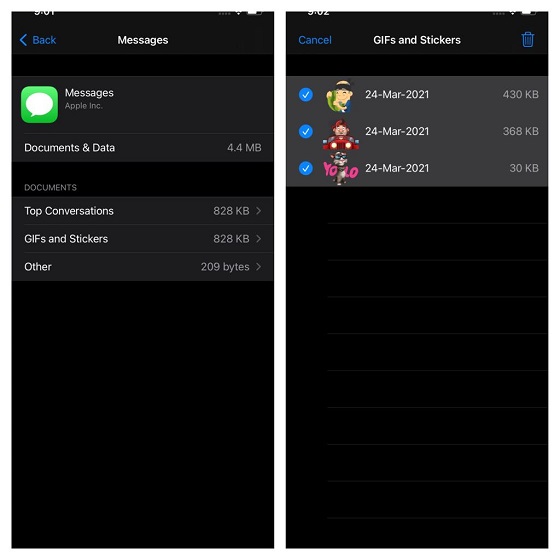
Navigate to the Settings app -> General -> iPhone/iPad Storage -> Messages. Now, you should see the total storage captured by the messaging app. Under the Documents section, tap on respective categories -> Edit. After that, select all the unwanted items and delete them all at once.
17. Automatically Delete Messages After 30 Days
Unlike WhatsApp, Signal, and Telegram, Apple Messages lacks a more efficient auto-delete functionality. Though the Messages app does let you auto-delete messages, you have only two options to choose from – 30 days and One Year. Besides, it doesn’t let you control the auto-deletion of specific chats.
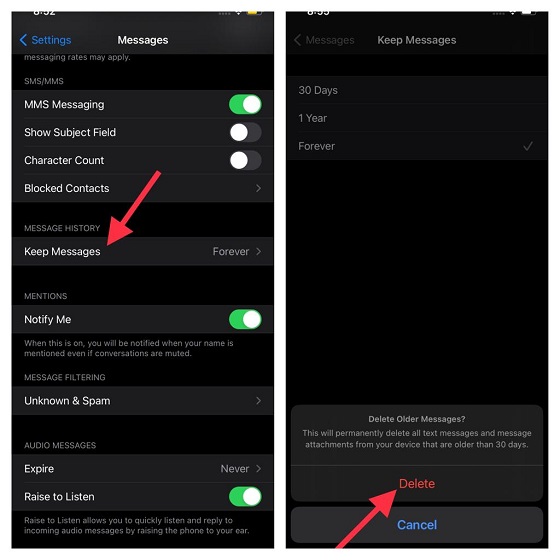
If you don’t want to keep messages forever on your device, go to the Settings app -> Messages -> Keep Messages. Now, select 30 days. Next, a popup will appear from the bottom saying “This will permanently delete all text messages and message attachments from your device that are older than 30 days.” Tap on Delete to confirm.
Tips to Get the Most Out of iMessage on iOS and iPadOS
There you go! So, these are the best tips and tricks to use iMessage like a pro. From customizing iMessage to keeping the messages safeguarded against unexpected loss, the roster consists of a variety of tips. So, I’m pretty sure that they can let you unlock the full potential of the Apple messaging app.
Have I missed any major iMessage features? If yes, do not forget to let me know about them in the comments section below.


