
If you’re already an iOS user and have just bought a shiny new iPhone or inherited an older model, you should know how to transfer data from iPhone to iPhone. It will help you transfer photos, apps, files, and contacts from your old iPhone to a new iPhone. Apple lets you easily move data from one iPhone to another iPhone while setting up the new device. In this article, we’ll walk you through possible methods on how to transfer data from iPhone to iPhone. So, let’s get right into it.
Transfer Data Using Quick Start (Easiest Way)
Quick Start is one of the easiest and best ways to transfer data from an old iPhone to a new iPhone. It is Apple’s own iPhone-to-iPhone data transfer system that’s free of cost and lets you transfer everything from an old iPhone to a new device without any backup. We definitely recommend this method to anyone who wants to transfer data from iPhone to iPhone without iCloud. You can also use Quick Start to move data from your iPad to your iPhone.
Prerequisites to transfer data using Quick Start
- You’ll need both the iPhones, placed side by side. Both devices should be connected to a power source.
- Your older iPhone should be connected to Wi-Fi and Bluetooth turned ON.
- Quick Start requires iOS 11 or higher. We recommend upgrading your iPhones to the latest iOS version.
- If you’ve already set up your new iPhone or want to transfer data between your existing iPhones (not a new iPhone), you’ll have to factory reset the iPhone to which you want to transfer data.
Once you’re ready, follow the below steps to set up a new iPhone and transfer data to it from an old iPhone.
1. Turn ON your new iPhone and place it near your old iPhone.
2. You’ll immediately see the “Set up New iPhone” prompt on your older iPhone, tap Continue. If you don’t see this option, follow the on-screen instructions on your new device. When prompted, connect your device to a Wi-Fi network or cellular data. Go along the setup process until you see Quick Start.

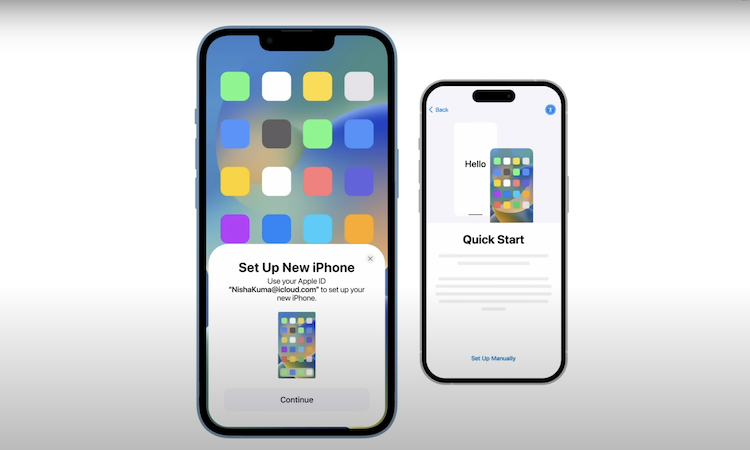
3. You should then see an animation on your new iPhone. Open the camera on your old iPhone and scan this animation. This will connect the two iPhones.
4. When you see a message saying, “Finish on New iPhone”, enter the passcode of your old iPhone on your new iPhone and follow the set-up instructions.
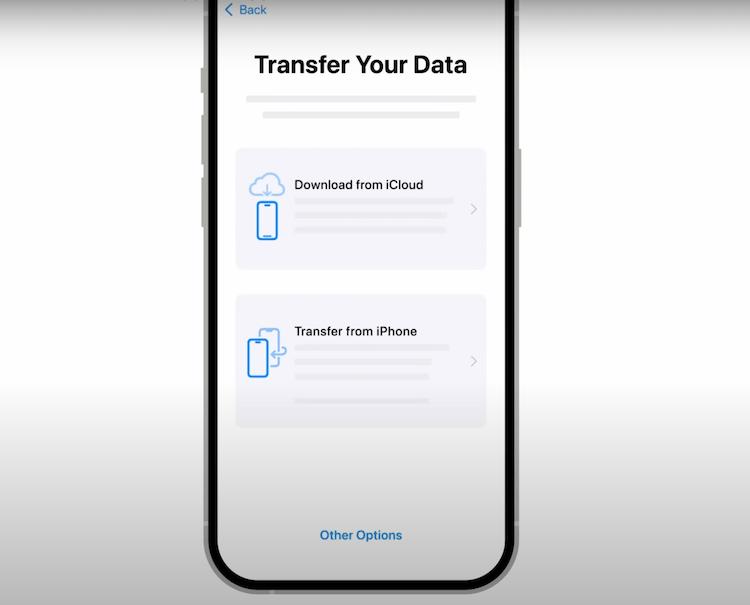
5. Choose Transfer from iPhone on the next screen if you don’t want to restore any data from a backup and tap “Continue“.

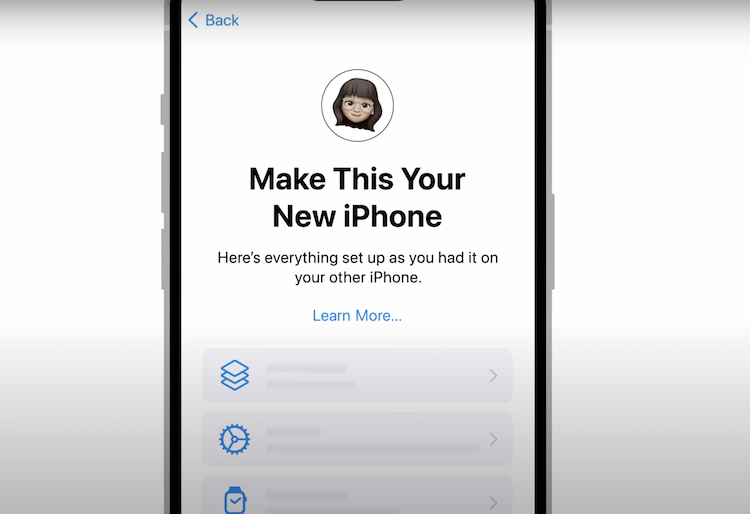
6. On the “Make This Your new iPhone” page, you can select the items you want to transfer from iPhone to iPhone. Make sure to keep the iPhones close to each other and plugged into power until the transfer completes.

Note: The data transfer time depends upon the amount of data being transferred and the internet speeds. Please be patient during the process.
Transfer Data Using iCloud
While setting up your new iPhone, you can also transfer data from an old iPhone to a new iPhone using iCloud. For this, you first need to back up your iPhone data to iCloud.
Apple’s iCloud offers 5GB of free storage which, honestly speaking, is not enough. However, you can use the Prepare for new iPhone feature without worrying. Introduced with iOS 15, this feature offers free temporary storage for up to 21 days, allowing you to move data from your old iPhone to your new iPhone using iCloud for free. If 21 days aren’t enough, you can also request for additional 21 days. I think it’s a pretty good option.
Here’s how to enable the feature. If you don’t have a huge data library and have already taken an iCloud backup, you can jump to step 4.
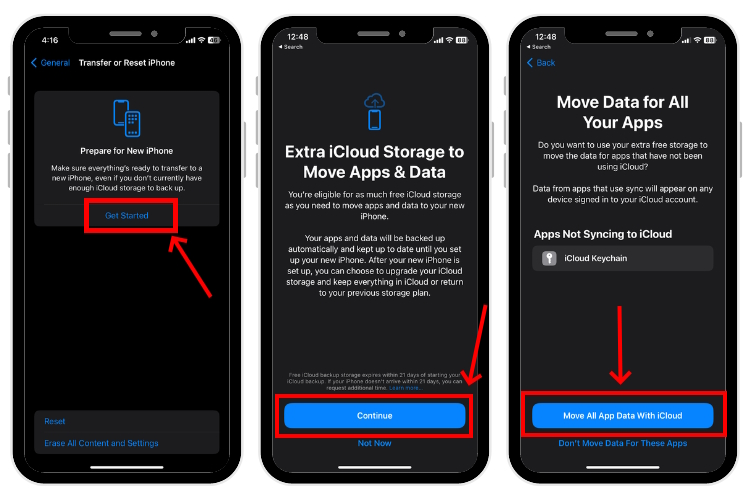
1. On your old iPhone, open Settings > General > Transfer or Reset iPhone.
2. Under “Prepare for New iPhone”, tap “Get Started”. Next, tap Continue.
3. If asked, tap Turn On Backup to Transfer, then choose Move All App data with iCloud to create a backup and tap Done. The process will take some time depending on the size of your backup.

4. Once the backup is completed, turn on your new iPhone, input your Language and Region. When you see the Quick Start page, tap Set up Manually, choose a Wi-Fi network, and allow your iPhone to activate.
5. Then, follow the setup process. When you see Apps & Data screen, choose Restore from iCloud Backup.

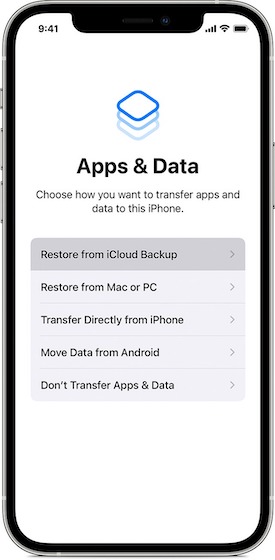
6. Enter your Apple ID & Password and choose a backup you want to restore. You can either tap Continue to restore entire data from the iCloud backup or select specific apps and settings.
7. Follow on-screen instructions to move photos, contacts, apps, and other data from the old iPhone to the new iPhone. Once completed, your iPhone will restart automatically.
Transfer Data Using Mac
You can also use a Mac to transfer data from iPhone to iPhone. First, backup your old iPhone to Mac, and then restore that backup on your new iPhone.
1. Once you’re done with the backup, turn ON your new iPhone or the one that’s erased & reset, and proceed with the setup process.
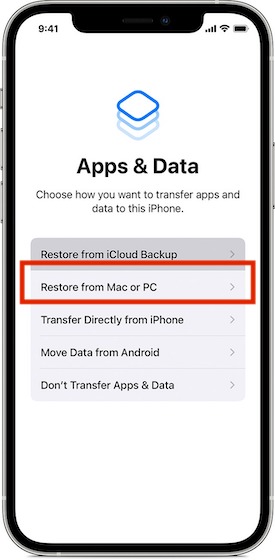
2. In the Apps & Data page, select “Restore from Mac or PC” and plug your iPhone into the Mac.
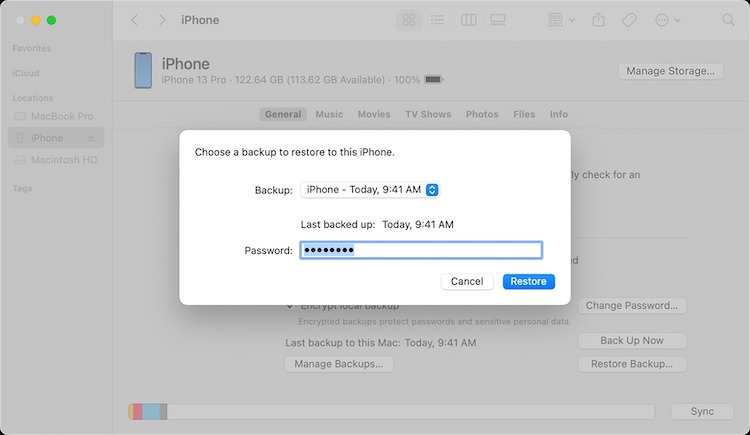
3. On your Mac, open Finder and locate your iPhone from the top-left corner. Then, click Restore Backup and choose the backup version. Wait until the process is completed.

Transfer Data Using iTunes
You can also transfer everything from an old iPhone to a new iPhone using a Windows PC. The overall process is quite similar. You first need to create a backup of your old iPhone to iTunes and then restore the backed-up data to the new iPhone. Once you’ve backed up the data to iTunes, go through the below steps:
1. Turn ON your new iPhone (or the one to which you transfer data to) and start with the setup process.
2. From the Transfer Apps & Data screen, select “From Mac or PC” and plug your iPhone into the computer.
3. On your Windows PC, open the iTunes app and click the iPhone icon from the top-left corner.
4. Then, you’ll see the “Welcome to Your New iPhone” screen. By default, the “Restore from this backup” option should be selected. If not, select this option.
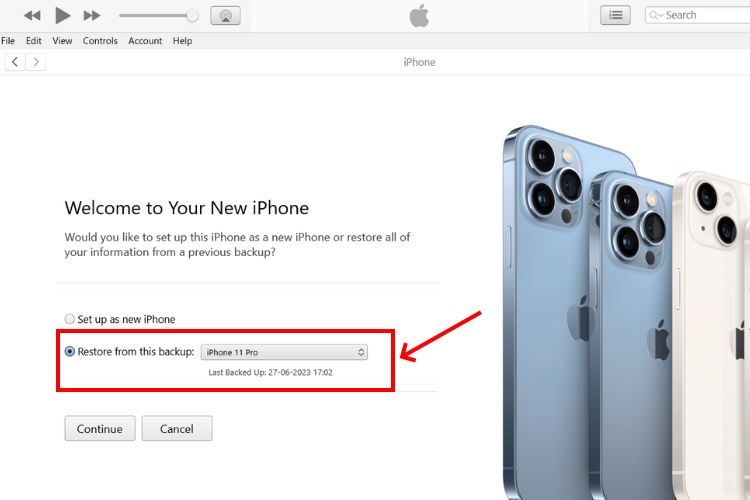
5. Then, choose the backup version and click “Continue”. The restore process would begin automatically.
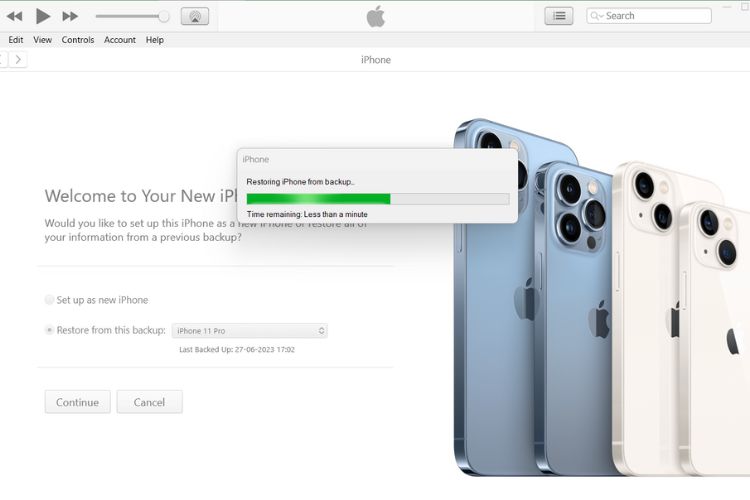
6. Your iPhone will restart on its own and appear on iTunes. Keep your iPhone connected to the computer until you see Restore Completed on the iPhone. Then, follow the on-screen prompts to finish the setup process.
Transfer Data Using AirDrop
If you want to transfer data from iPhone to iPhone after setup, you can do it using AirDrop. Frankly speaking, this isn’t the best option. It’s time-consuming and requires a lot of manual effort. That said, it’s still a doable option when you need your existing data on a new device. Also, you can transfer anything that’s shareable, including photos, files, contacts, apps, documents, audio files, and more. So, you should know how to transfer data between iPhones after setup using AirDrop.
1. Bring your iPhones close to each other.
2. Connect to a Wi-Fi network and turn ON Bluetooth on both iPhones. To avoid any issues, choose Everyone for 10 Minutes from the AirDrop settings. For this, head to the Control Center, long-press the Wi-Fi icon (or anywhere in the Network block), tap AirDrop, and select “Everyone for 10 Minutes”.
3. Then, select photos, files, apps, or contacts that you wish to transfer from iPhone to iPhone. Tap the share icon, choose AirDrop, and select your new iPhone from the available options.
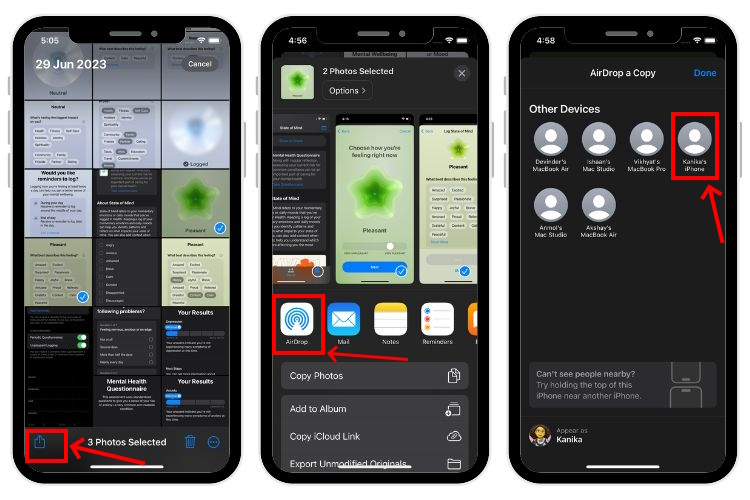
4. You’ll see an AirDrop notification on your new iPhone, tap Accept and you’re done.
5. You can repeat steps 3 and 4 to transfer more data.
If you’re facing AirDrop issues, head over to our complete troubleshooting guide to fix AirDrop not working.

