
- There are three prominent and easy methods to disable Windows Security on Windows 11.
- Users can disable it through the Windows Security app, but it will turn itself on after each reboot.
- The two ways to permanently disable Windows Security are through the Registry and Group Policy Editor.
Microsoft has been shipping Windows Defender (now rebranded to Windows Security) on Windows PCs for a while now. The tool has quickly evolved into a definitive suite for basic virus protection on Windows machines. The internet is full of bad stuff, and you wouldn’t want your data to be hijacked. But if you’re left with no choice, here’s how to disable Microsoft Defender in Windows 11.
When Can You Disable Windows Defender?
Windows Security is good to have and we don’t recommend disabling it if everything on your PC works well. But sometimes users aren’t left with any choice but to eliminate programs that take up system resources and make their PC painfully slow.
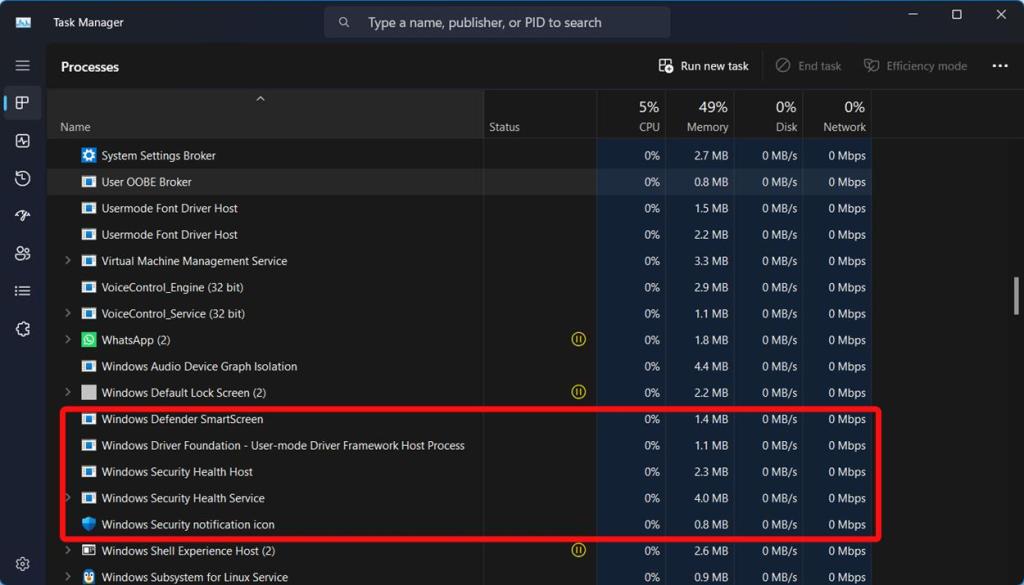
Users with low-end hardware might find that Windows Defender takes up a chunk of their limited system resources. Whether you are trying to reduce system workload, speed up Windows 11, or just want to get rid of Microsoft’s security solution, here’s how to disable Defender in Windows 11.

There are three ways to disable Windows Defender (Windows Security) in Windows 11. While the easiest way is through Settings, it is a temporary measure, and Microsoft will automatically enable Windows Security after a reboot. If you wish to permanently disable Windows Security, check the instructions involving Group Policy Editor and Registry Editor.
Disable Defender via Windows 11 Security App (Temporary)
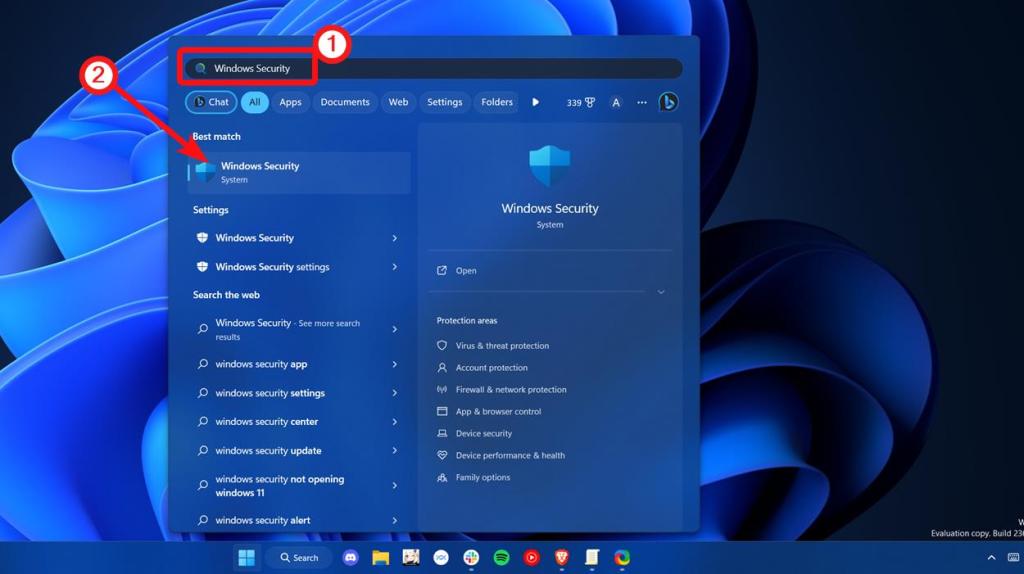
1. Open the Start menu and type Windows Security in the search bar.
2. Click the first search result and launch the Windows Security app.

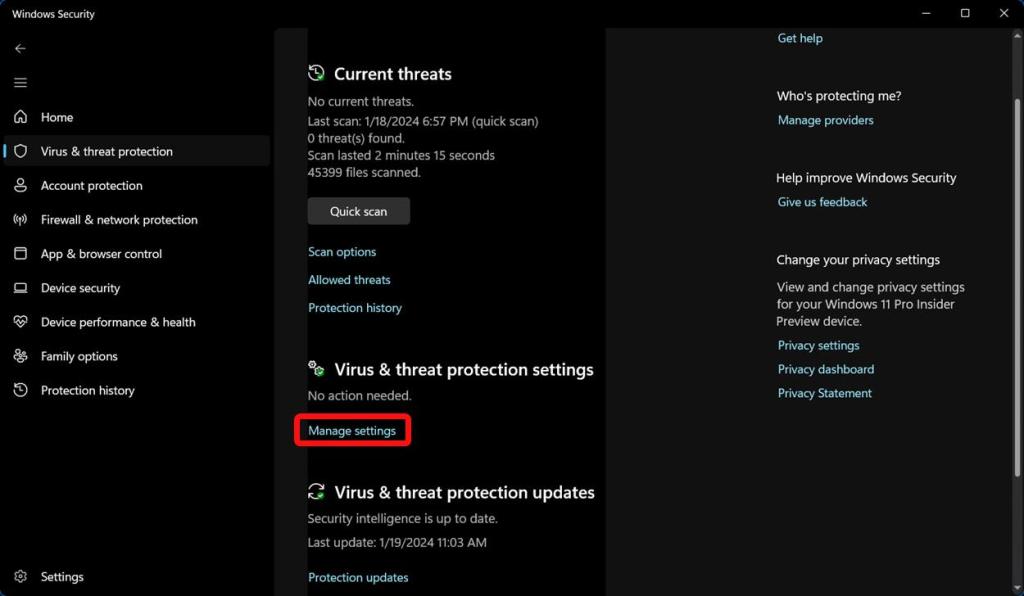
3. Once launched, click Virus and threat protection.


4. Next, click Manage settings in the right pane.
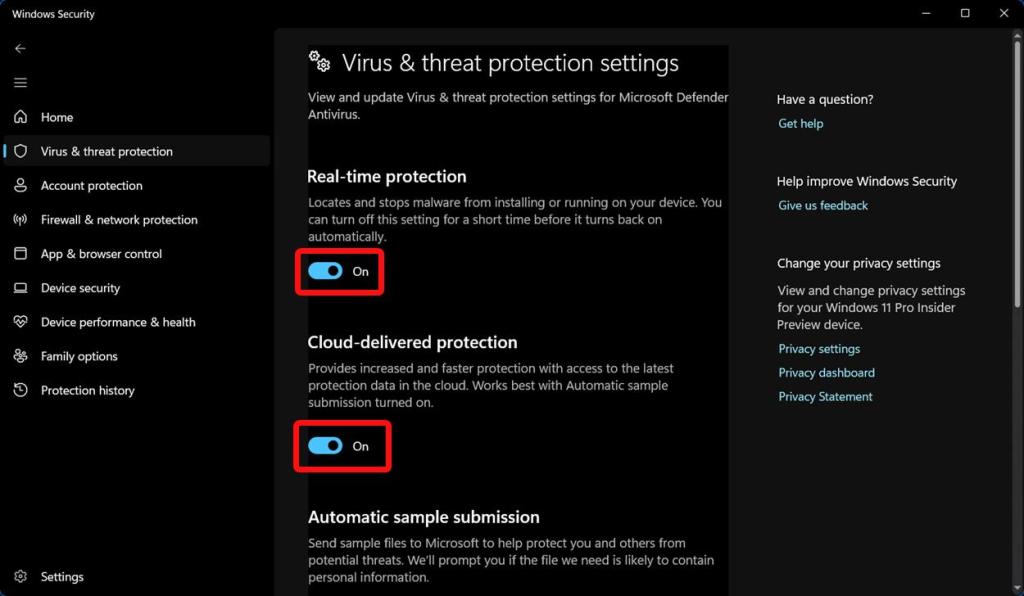
5. Turn off all the toggles on this settings page. This includes Realtime Protection, Cloud-delivered protection, Automatic Sample Submission, and Tamper Protection.
And voila! You have now temporarily disabled Windows Defender or Windows Security on your Windows 11 PC or laptop.
Disable Defender via Group Policy Editor (Permanent)
Repeating the same thing every time you boot into Windows could be tedious. Hence, you may use the Group Policy Editor to permanently disable Microsoft Defender on Windows 11.
The problem with Policy Editor is it isn’t available on Windows 11 Home, and if you are on a Home installation, check our linked guide to get Group Policy Editor on Windows 11 Home.
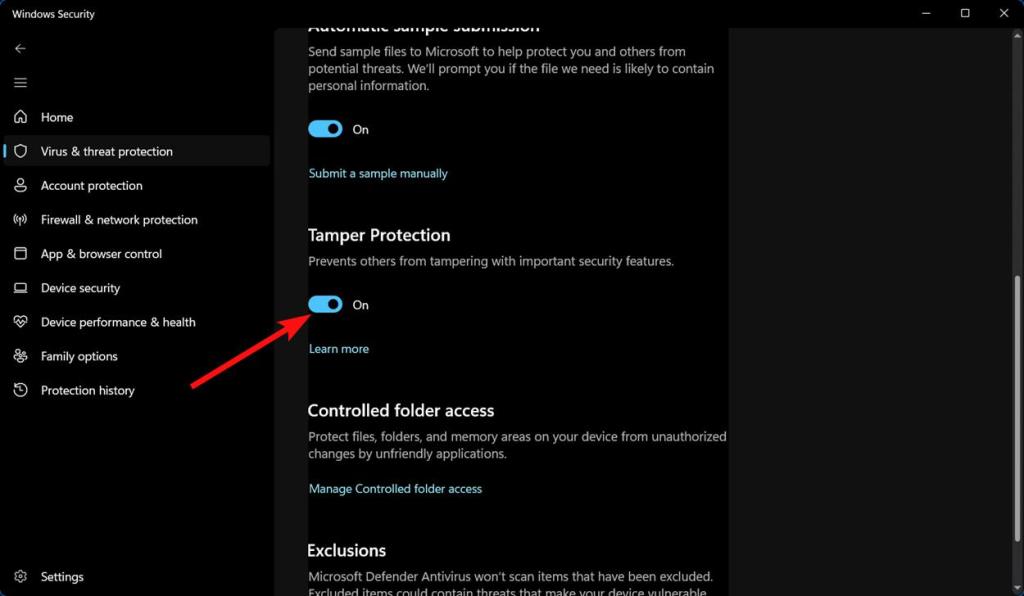
1. Before starting, you are required to disable “Tamper Protection” in the Windows Security app. To do the same, follow the steps outlined above to reach this toggle. To recall, you will find this toggle under Windows Security -> Virus & Threat Protection ->Manage settings.
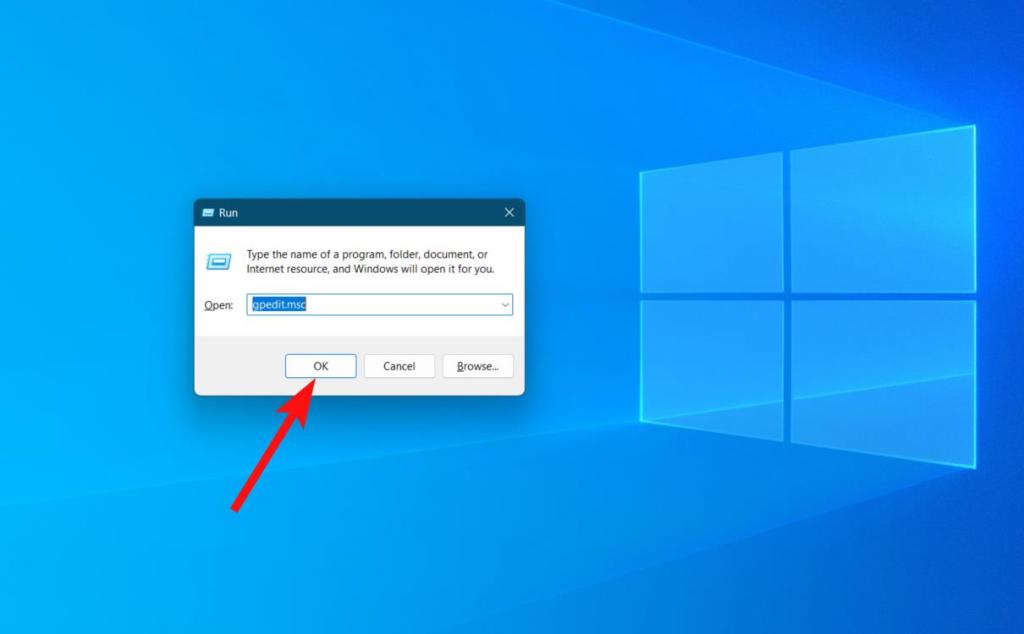
2. Now that you’ve disabled tamper protection, open Run using the Windows 11 keyboard shortcut “Win+R” and type “gpedit.msc” to open the Group Policy Editor.

3. Navigate to Computer Configuration -> Administrative Templates -> Windows Components -> Microsoft Defender Antivirus.

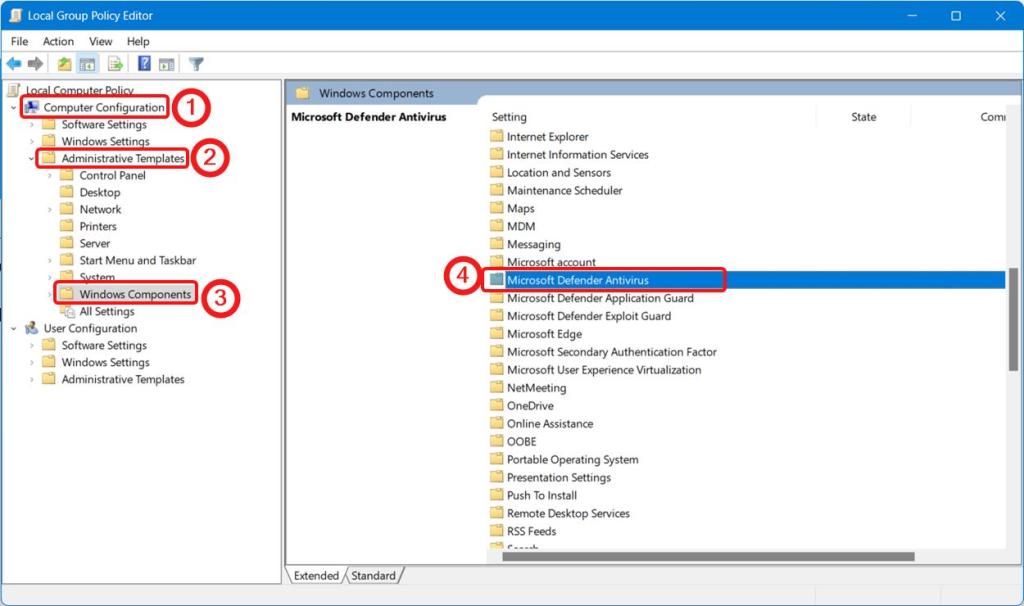
4. Double-click on “Turn off Microsoft Defender Antivirus” in the right pane.

5. In the window that pops up, select “Enabled” and click “Apply” and “OK” to save the changes. Once done, restart your Windows 11 PC.
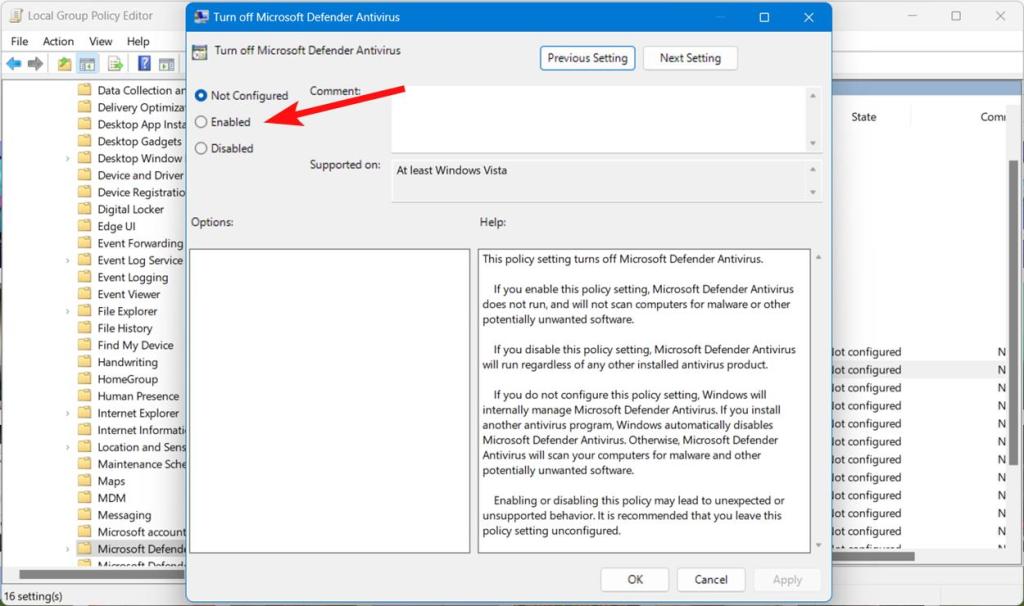
Windows Defender will no longer run after the system restart. To re-enable the Defender through Group Policy Editor, you should choose “Disabled” and hit OK.
Disable Defender using Registry Editor on Windows 11 (Permanent)
Another way of disabling Windows Defender is through the Registry Editor. Follow the steps below to get rid of Windows Defender on your Windows 11 machine.
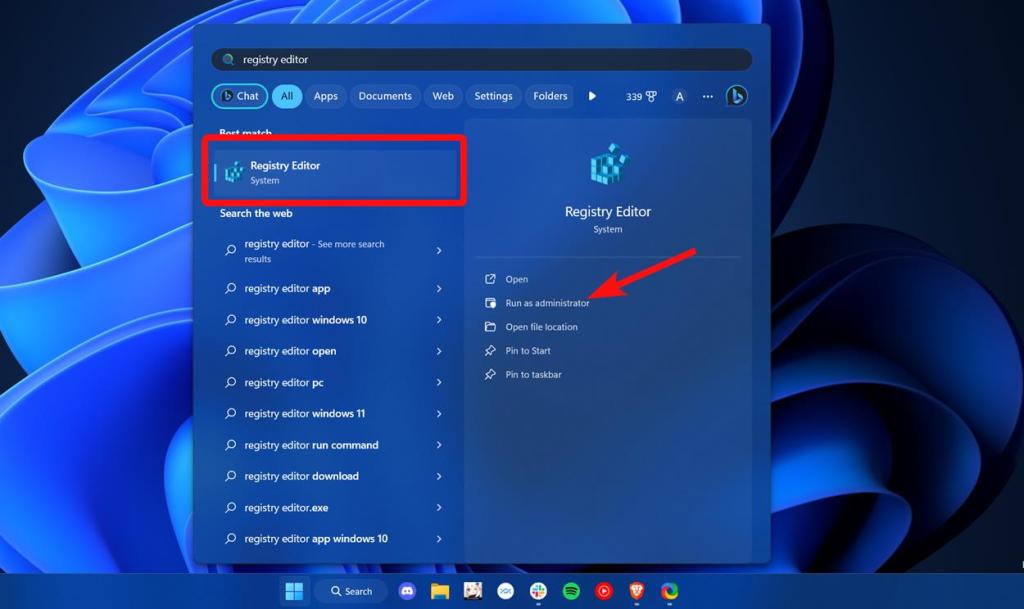
1. Press the Windows key once, type “Registry Editor”, and choose “Run as administrator” to open the program with elevated privileges.

2. Navigate to the following path in the Registry Editor:
HKEY_LOCAL_MACHINE\SOFTWARE\Policies\Microsoft\Windows Defender3. Right-click Windows Defender in the left sidebar, and click New -> DWORD (32-bit) Value. Name it DisableAntiSpyware.


4. Double-click “DisableAntiSpyware” and set its value data to 1. Once you are done, press OK.

5. Similarly, you should create new DWORD values for the following items in their respective locations.
[HKEY_LOCAL_MACHINE\SOFTWARE\Policies\Microsoft\Windows Defender]
"DisableAntiSpyware" dword:1
"DisableRealtimeMonitoring" dword:1
"DisableAntiVirus" dword:1
"DisableSpecialRunningModes" dword:1
"DisableRoutinelyTakingAction" dword:1
"ServiceKeepAlive" dword:0

[HKEY_LOCAL_MACHINE\SOFTWARE\Policies\Microsoft\Windows Defender\Real-Time Protection]
"DisableBehaviorMonitoring" dword:1
"DisableOnAccessProtection"dword:1
"DisableScanOnRealtimeEnable" dword:1
"DisableRealtimeMonitoring" dword:1

[HKEY_LOCAL_MACHINE\SOFTWARE\Policies\Microsoft\Windows Defender\Signature Updates]
"ForceUpdateFromMU"dword:0

[HKEY_LOCAL_MACHINE\SOFTWARE\Policies\Microsoft\Windows Defender\Spynet]
"DisableBlockAtFirstSeen" dword:1
6. In case you are wondering how you can create new folders within the Registry editor, all you have to do is right-click the parent “Windows Defender” directory and choose New -> Key.
7. You can then name the key based on the path given above. For example, if you named the folder Real-Time Protection, you should create the following DWORD values in the folder:
DisableBehaviorMonitoring,
DisableOnAccessProtection,
DisableScanOnRealtimeEnable, and
DisableRealtimeMonitoring
How to Re-enable Defender on Windows 11
If you have a change of mind, here’s how to re-enable Microsoft Defender on your Windows 11 computer:
1. Open the “Windows Security” app from the Start Menu.
2. Go to the “Virus & Threat Protection” section.
3. Under the “Virus & threat protection settings” section, click on Manage settings.
4. Now, enable the “Real-time protection” toggle alongside other toggles on this page to get Windows Defender’s protection back on your Windows 11 PC.
So that’s how you can remove Windows Defender from Windows 11 for good. We won’t recommend you disable Defender unless you have other antivirus software or malware removal tools installed on your Windows 11 PC. In case you don’t have one, go through our linked guide and pick one that suits your needs. While you’re at it, you could consider debloating Windows 11 to improve performance.

