
There is no denying the fact that Apple AirPods are considered the best when it comes to true wireless earbuds. And while connecting the AirPods to your iPhone is a breeze, it requires some extra steps when connecting them to your Mac if you are not already using them with your iPhone. Keep reading to learn how to connect AirPods to your MacBook or Mac device in easy steps.
Prerequisites to Connect AirPods to Your Mac
- For AirPods Pro 2nd Generation: at least macOS Mojave 10.14.4 or later installed on your Mac.
- For AirPods 1st Generation: at least macOS Catalina 10.15.1 or later installed on your Mac.
- For AirPods 3rd Generation: at least macOS Monterey or later installed on your Mac.
How to Connect Your AirPods to Mac or MacBook
By connecting AirPods or AirPods Pro to your Mac, you can enhance your audio experience while working, listening to music, or engaging in video calls. Here’s how it works:
1. Put both AirPods in the charging case and keep the lid open.
2. Press and hold the setup button at the back of the charging case until you see the status light flashing white.
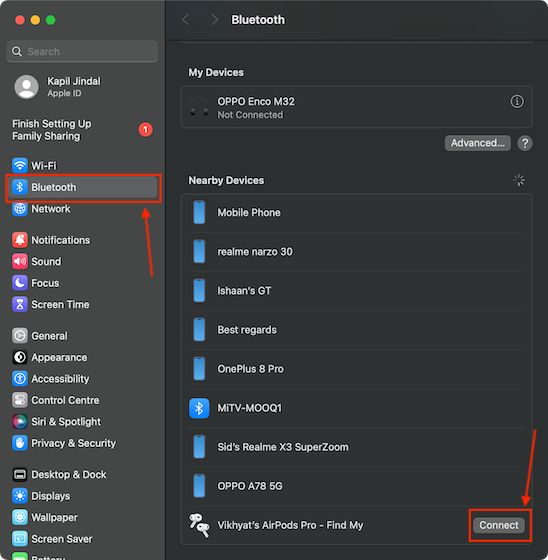
3. Open the Bluetooth settings on your Mac by visiting the System Settings/ System Preferences.
4. Now, locate your AirPods under the Nearby Devices section in the Bluetooth settings, and click the Connect button.

And that’s it. You have successfully connected the AirPods to your MacBook or Mac device. While you are here, also check out how to reset Apple AirPods.
How to Connect AirPods to Mac After Connecting to iPhone
The Apple ecosystem has an edge over its competitors, and AirPods are also a part of it. That being said, Apple has designed the AirPods in a way that they automatically get connected to a Mac if you are already using them with an iPhone that’s signed in with the same Apple ID. Here’s how you connect AirPods to your Mac, MacBook Air, or MacBook Pro if you’re already using them on your iPhone:
1. Open the lid of your AirPods case.
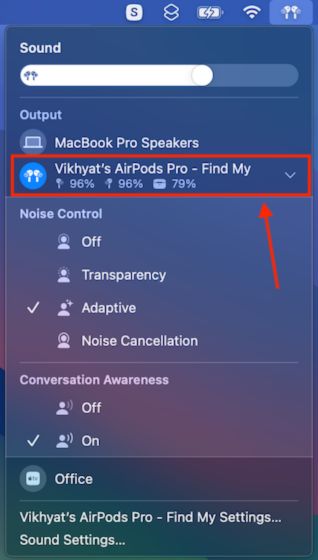
2. Click the Volume Control icon in the menu bar on your MacBook or Mac.

3. Now locate and click on your AirPods under the “Output” section in the drop-down menu.

How to Turn Off AirPods Auto-Switching on iPhone & Mac
Thanks to the Apple ecosystem, the AirPods (2nd and 3rd Gen) can automatically switch between your iPhone and Mac when signed in with the same Apple ID. While this is an excellent feature in terms of usability, it can also be troublesome in certain situations, such as when you simply don’t want your AirPods to switch to your Mac from your iPhone. If that’s the case with you, here’s how you can turn off AirPods auto-switching to Mac:
Turn off AirPods Auto-Switching on Mac
1. Place the AirPods connected to your Macbook in your ear.
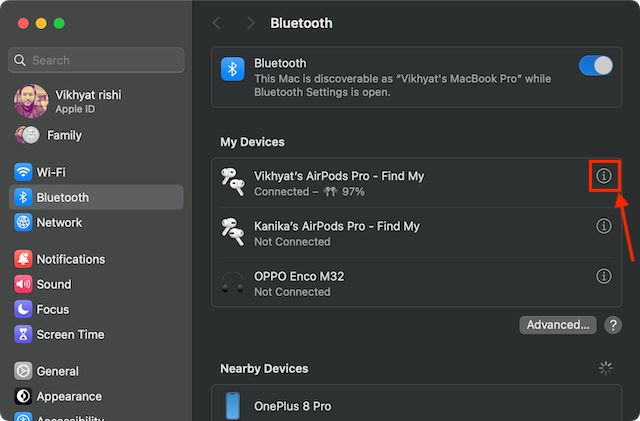
2. Go to the Bluetooth settings on your MacBook or Mac device.
3. Click the “i” (information icon) next to your AirPods under the “My Devices” section.

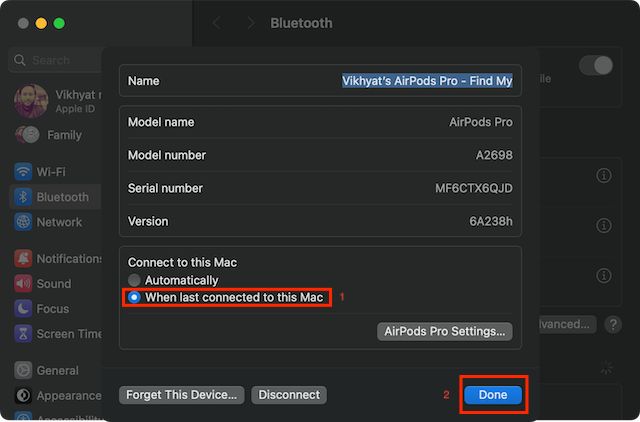
4. Now, select “When last connected to this Mac” under the Connect to this Mac section, and click Done.

Turn off AirPods Auto-Switching on iPhone
1. Connect your AirPods to your iPhone and wear them.
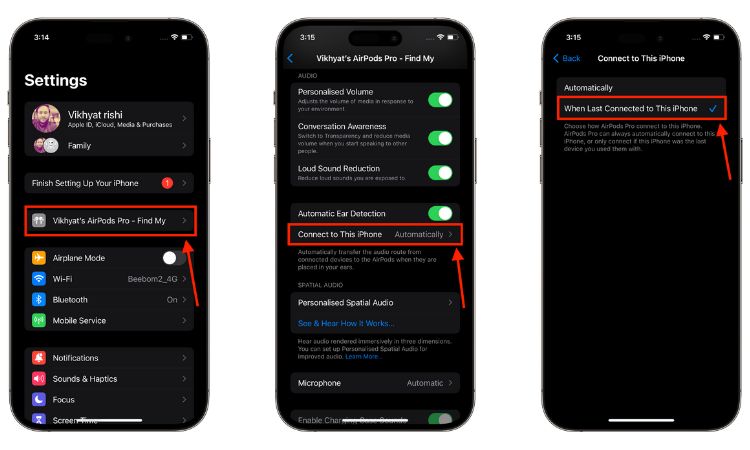
2. Now, open the Settings app on your iPhone and tap your AirPods name.
3. Scroll down until you find the “Connect to This iPhone“ option and tap it.
4. Now, select the “When Last Connected to This iPhone” option.

Well, this is how you can turn off AirPods automatic switching on your Mac and iPhone. If you have any doubts about connecting AirPods to your MacBook, let us know in the comments below.
There can be many reasons why your AirPods can’t connect to your Mac, including but not limited to –
1. Bluetooth is turned off on your Mac.
2. Missing compatible macOS installed on Mac.
3. AirPods are already connected to some other Apple device.
If both your Mac and iPhone are signed in with the same Apple ID, you won’t need to switch your AirPods between Mac and iPhone manually except for 1st generation AirPods.

