


These days, smart assistants are taking the tech world by storm. Amazon’s Alexa and Google’s Assistant are now being embedded within every device, be it car devices, showers, or practically almost everything that was unveiled at CES 2018. But despite all that, the most selling devices sporting these assistants are the company’s own products, that is, the Amazon Echo and the Google Home.
While both the smart speakers are great by themselves, wouldn’t it be great to have the power of them both on one device? Well, now you can. We, at Beebom, have created our own guide of how to create your own smart speaker having the capabilities of both Google Assistant and Amazon Alexa. So without any further ado, let’s get right into it.
Note: The following project has been created with the help of a GitHub project.
Things You Need:
- Raspberry Pi 3 (link)
- microSD Card 32GB (link)
- USB Wall Charger (link)
- 3-port USB Hub (link)
- USB-A to microUSB Cable (link)
- USB Microphone (link)
- Portable Speaker with AUX input (link)
- Keyboard and Mouse (link)
- Display with HDMI port (link)
- HDMI Cable (link)


Steps to Build Smart Speaker:
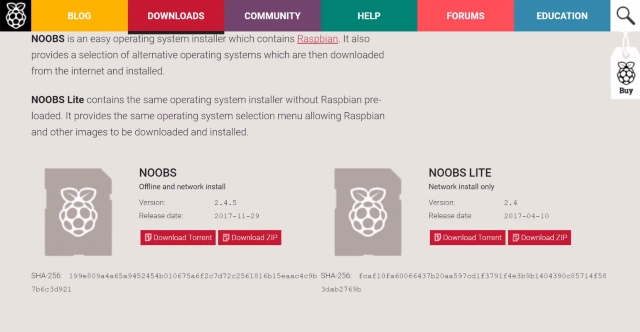
1. To start off, you’ll first need to set up your Raspberry Pi. To do so, simply download the NOOBS package, extract it to your microSD card and plug it into your Raspberry Pi. Hook up the USB Keyboard, Mouse, Mic and the Speaker to the Pi and turn it on. You will now get a first time setup. Simply select Debian and install to start the installation of Debian on your Raspberry Pi.

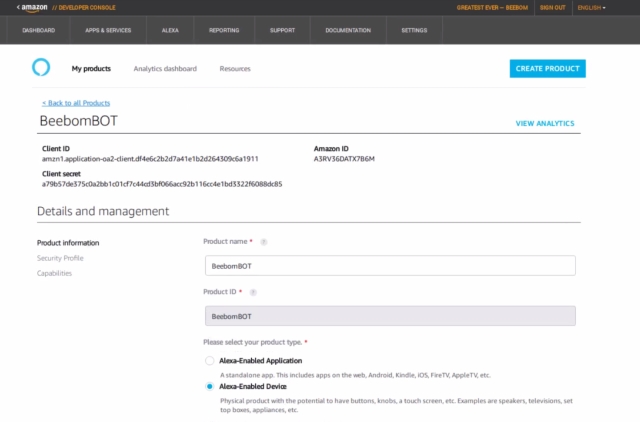
2. Now, you need to create your Amazon Developer Account and create a security profile. You can follow the GitHub project instructions as well. Once done, note down your Amazon account’s credentials.

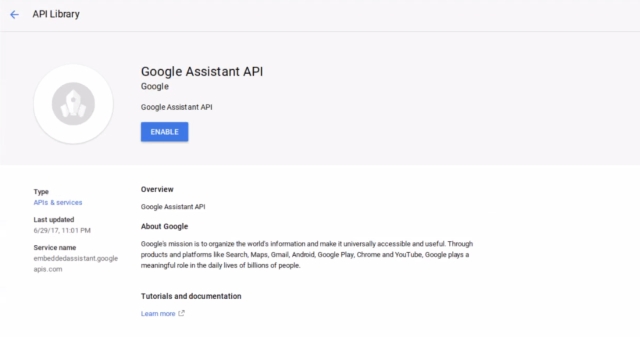
Next up, create a Google Developer Account and enable the Google Assistant API. Once you’re through with that, download the credentials.json file of your Google Product to /home/pi and rename it to assistant.json.

3. Now, run the following commands one by one to clone the GitHub project and make the installer files executable:
git clone https://github.com/shivasiddharth/Assistants-Pi
sudo chmod +x /home/pi/Assistants-Pi/prep-system.sh
sudo chmod +x /home/pi/Assistants-Pi/audio-test.sh
sudo chmod +x /home/pi/Assistants-Pi/installer.sh
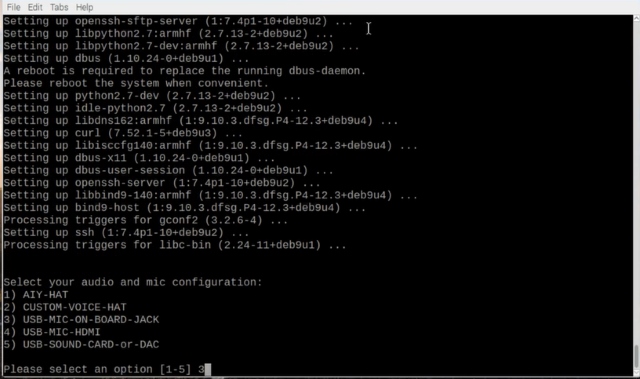
sudo /home/pi/Assistants-Pi/prep-system.sh
First, OS will be updated and upgraded. Thereafter, you will be prompted to select the audio setup. Select “3” from the options. Now, restart the Raspberry Pi.

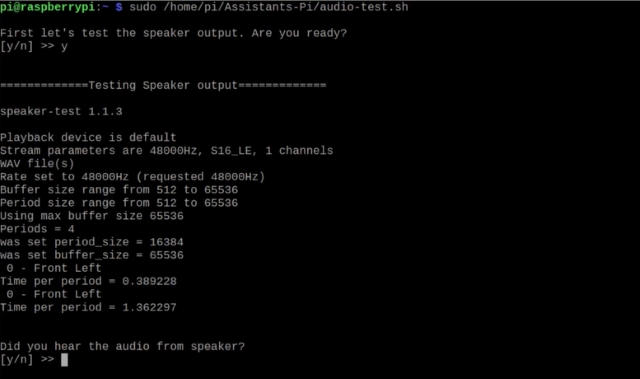
4. Upon reboot, first, check your audio setup by
sudo /home/pi/Assistants-Pi/audio-test.shThe script is interactive, just press “y” if you hear the audio, or “n” if you don’t. In case you don’t hear the audio, you need to check the wires.
5. Now that your system is ready, run the following command to start the installer:
sudo /home/pi/Assistants-Pi/installer.sh
The script will now execute. It is a pretty straightforward script, simply follow the on-screen instructions.

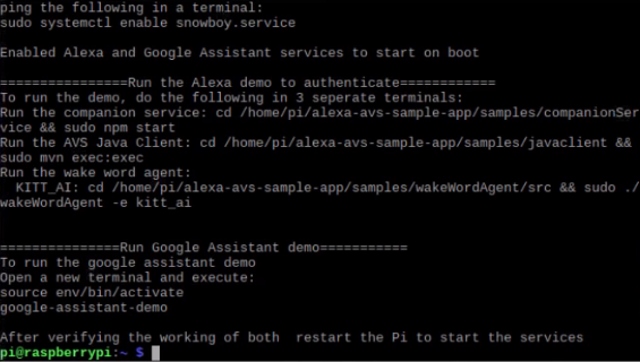
6. Once both the assistants have been installed, you’ll be shown a screen as below. Run the commands one by one to authenticate Alexa. Once you’re through with that, make the changes in the README file located at /home/pi/Assistants-Pi to start the assistants on boot.

And that’s it. Your 2-in-1 smart speaker is ready. Also, while you can use the entire setup barebones, we decided to wrap things up inside a nice little cardboard box and apply a black chart paper while Beebom-ify-ing things up. You can also check out our video of the same below, to see our speaker in action:

SEE ALSO: Google Home vs Amazon Echo: Google Assistant Takes on Alexa
The DIY Smart Speaker: Best of Both Worlds
Well, I know that you can buy your own Amazon Echo Dot and the Google Home Mini, but you might also be aware that those products aren’t available everywhere. What’s more is that with the above guide, you can create a speaker that gives you the power of both the voice assistants combined into a single device. Oh, and aren’t DIY projects always fun? I know I enjoyed a lot making my own smart speaker, and the end result was more than satisfactory. But what about you? Do share with us your experience of building your own smart speaker in the comments down below.


I am in grade 9. Can you please explain to me how to do the assistant with the laptop Dell intel core i5?
If the beebom is the best, then beebom will explain me briefly
Your question is a little unclear, but from what I can make out, it seems as if you’re trying to ask how to set up the assistant using just your laptop. If that is the case, while you can use the laptop for installing Debian on the Raspberry Pi 3 using the NOOBS package as mentioned in the tutorial above, you’ll still need a USB Keyboard, Mouse, and HDMI compatible screen to continue the setup on the Raspberry Pi.
Hope that helps. Do feel free to comment back in order to allow us to assist you better.
What are the changes to be done in Read me file please answer.
Thanks for all the help you have been providing. I have successfully created a Alexa powered smart speaker and it is working exceedingly well and got connected to the Alexa app too. But when I ask it to play some music, it says that Amazon music is not supported on this device and says the same for Saavn too. I can just play through TuneIn. How to resolve this issue?
In the Alexa app, there should be a way to log in via Spotify. Alternatively, you can purchase a membership for Amazon Music and play songs locally as well.
There isn’t one in mine and doesn’t give me the option to activate prime music either.It says it is not supported on this device
How can i connect the assistant to a Bluetooth speaker or any speaker by an aux cable
Plz reply
Connection to Bluetooth speakers is not possible at the moment. You can, however, connect any speaker via the aux cable into the 3.5mm jack on the Raspberry Pi.
when i run the audio test and i m unable to hear the sound and it is asking to check soundconf and .asoundrc files . plzz hlp me
bro , i want to connect a home theater to that instead of a portable speaker , so definitely i will have to power that to a switch board ,now the issue is:
if there is a power cut in my house will the program in the raspberry pi run again automatically once the power comes or should i do any thing to start it again.
Just make sure you are able to carry out the installation and setup process without any power cuts. Once you’re through with that, Alexa and Google Assistant will be set-up in order to start automatically at the time of booting. So even in the case of a power failure, whenever the power comes back on and the Raspberry Pi boots up, Alexa and Google Assistant will start simultaneously without fail.
I just setup my speaker for Alexa and not for Google assistant. How to make Alexa bootup automatically on start?
In the README file, you’ll find a couple of commands that need to be added to the Raspbian’s system in order to make Alexa’s script executable on boot.
what is it ? plss helpp meee
Can I directly use my laptop instead of keyboard, mouse and monitor?? If no then can I use my T.V. with HDMI port instead of monitor??
You cannot use your laptop. However, you can easily use your TV via HDMI as a monitor alternative.
Why do we need a usb hub
Reply
A USB Hub is used simply to supply power to both the speaker and the Raspberry Pi at the same time. If you want, you can choose to use separate wall chargers for both.
Thank you
Can i use a bluetooth speaker having an in-built microphone instead of using wireless mic as you have done?
Bluetooth speakers are currently not supported by both Alexa and Google Assistant, and neither would you get an option for it within the script. You’ll have to rely on a wired 3.5mm speaker for it.
then can I output audio through the 3.5mm port to headphones and for audio input use a speaker having mike (connect it to the USB port)?
What about Bixby. Can we add Bixby somehow to this??
Bixby, Cortana, and Siri are all closed AIs, so as of now there is no way to add either of them.
Google and Amazon provide open-source APIs for Assistant and Alexa respectively, hence this project includes both of them.
Will this work on a Raspberry Pi 2 or a raspberry Pi 0W ?
For Pi 2, you’ll have to buy a WiFi Adapter to connect it to the internet. Other than that, it’ll work just fine.
Hey, what changes do I have to make according to the readme file? It says enter project id and model ID but I am confused which of the following: client id, client secret and product ID do I have to enter there. Also, can I use the mic inbuilt in my speaker?Please reply
the ” client id, client secret and product ID” are related to your Amazon account.
on the other hand, “project id and model ID” are you google account details.
Basically, your project id = What you named your product as while creating it in the google page
the model id = your raspberry Pi’s model, ie, Pi3
But I just setup my speaker for Alexa and not for Google assistant. How to make Alexa bootup automatically on start?
Hey, what changes do I have to make according to the readme file? It says enter project id and model ID but I am confused which of the following: client id, client secret and product ID do I have to enter there. Also, can I use the mic inbuilt in my speaker?
Do i need the display after setting up the raspberry pi
No
How it is connected to the Internet?
Once you’ve installed Debian on your pi using the NOOBS Package, you can connect it to the WiFI during the first run.
Cam u plz send the picture of the wiring
a.chiraanth@gmail.com
Can any speaker work with the pi?
Any speaker that can be connected via the 3.5mm jack.
is we use it for home automation?
by linking it to a server ?
You can use it for home automation the same way you would use the standard Amazon Echo or the Google Home, by simply pairing them up with the smart device.
After making the device how should you connect it to the app
If not how to interact with it
For Alexa, download the Alexa app on Android/iOS and login with your Amazon Developer Account.
For Google, download the Google Home app on Android/iOS and login with your Google Account.
While the speaker should automatically show up within the Alexa app, you’ll be required to search for the speaker using the nearby feature in the Google Home app.
Can I use a bluetooth mouse and speaker connected to my laptop
A bluetooth mouse might work if the manufacturer of your mouse supports Linux distros, since Raspbian is based on Debian which is a Linux distro.
As for the speaker, you’ll be required to make use of a wired 3.5mm speaker only. As you can see in the screenshot of Step 3, the script currently does not support bluetooth speakers or mics.
Wat ABT a bluetooth keyboard
Will a Bluetooth mouse “Logitech M170 ” work?
What about building a smart android tv box using raspberry pi 3 that would be an amazing project and I request all of you awesome guys to put a tutorial on it.
No plz answer my question
I love this project
Can u giv a tutorial for that also
Can I do this without a pc. I mean, I’ve Android phone. Can we do this on my phone?
You can run the commands using JuiceSSH on your Android phone. However, you’d still be needing a PC for setting up the microSD card for the Raspberry Pi in the first place.
Can i use a usb sound card & a headphone instead of usb mic…
Yes, you can. In the audio setup, press “5” instead of 3 as described in the above method.
Instead of keyboard, mouse and monitor can we use a pc or computer? ??? Plz rply
You’ll need the keyboard, mouse and monitor for the initial setup. Later on, you can simply run the scripts using SSH or VNC.
Alternatively, you can also install Raspbian on your Raspberry Pi in CUI (console) mode, and then connect it using SSH. However, you’ll still be requiring a PC for setting up the microSD card in the first place.
once everything is setup, would we need to keep the keyboard monitor and mouse plugged in?
Nope, no need for that.
What if i want to use a speaker with inbuilt mic and bluetooth? I’m specifically talking about jbl flip 3. Please help which option to choose to get the mic working with the raspberry.
the mic won’t work in that case. the reason for that is that the 3.5mm jack on the Raspberry Pi is for output only and not input. Furthermore, Bluetooth can’t be used as a mode of communication for this. You’ll have to rely on a speaker that connects with the 3.5mm jack and a USB Mic.