
Older versions of Windows already offered you the option to limit the space used by the Recycle Bin. However, with Windows 10, you can also automatically empty the trash on a schedule. Of course, the earlier version of Windows also lets you empty the Recycle Bin on-demand, and that hasn’t changed with Windows 10. However, if you hate having to empty the Recycle Bin manually, we have just the solution for you. Today, we will show you how to automatically empty the Windows Recycle Bin and delete all Recycle Bin files on a schedule in Windows 10.
Automatically Empty Recycle Bin on Windows 10
This tutorial will demonstrate how to utilize the Windows 10 Storage Sense feature to periodically delete trash from the Recycle Bin. It will not only help you gain additional storage space for apps and games but also keep your PC clutter-free. We will also show you how to configure your Windows 10 PC to directly remove deleted content instead of moving them to the Recycle Bin first. So let’s get started right away.
Directly Delete Files Without Moving Them to Recycle Bin
When you delete files on your computer, you’re not deleting them for good. Instead, Windows 10 only moves them to the Recycle Bin, which means the files continue to take up valuable space on the hard drive. The major advantage here is that you can restore them any time you want, but it is hardly the most space-efficient solution. So here’s how you can save valuable storage space by deleting your files directly without moving them to the Recycle Bin:
- Right-click on the Recycle Bin icon on your desktop and hit Properties.


- On the Properties window, select the drive for which you want to change the setting. Then select the option that says, “Don’t move files to the Recycle Bin. Remove files immediately when deleted“. Finally, hit Apply to save your setting.
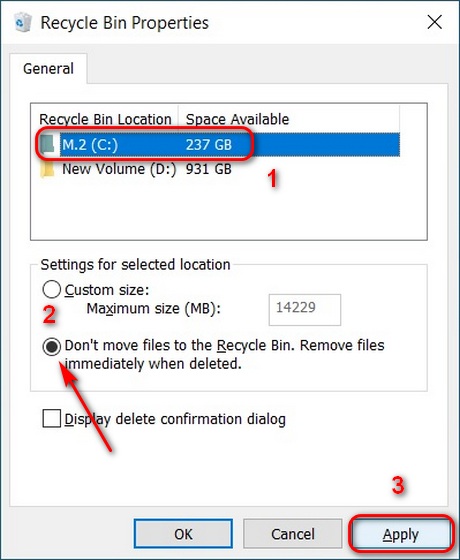

- Repeat the process for the other drives on your Windows 10 PC. Once you’re done, hit OK to save your new configuration and close the window.

Once you change this setting, you have to be careful about deleting files because they are permanently removed and you cannot restore them.
Automatically Empty Recycle Bin on Schedule in Windows 10
The easiest way to empty the Recycle Bin automatically on a schedule is through a Windows feature called Storage Sense. Here’s how you activate it:
- Open Settings (Windows Key + I) and click on System.


- On the left pane, select Storage and then turn on Storage Sense. Now click on “Configure Storage Sense or run it now.” Here, you can choose how often you want Windows 10 to empty the Recycle Bin automatically.


- Next, move to the drop-down menu below “Delete files in my recycle bin if they have been there for over” under Temporary Files. Here, you can specify how often you want Windows 10 to delete Recycle Bin files automatically on your PC.

- As you can see, options range from 1 day to 60 days. Pick one that suits your needs. You can also select ‘Never’ if you want to restore any deleted file from the Recycle Bin at any time.

That’s it! All Recycle Bin files and folders on your Windows 10 computer will now delete automatically depending on your chosen time-frame.
Reclaim Storage Space by Automatically Clearing Out Recycle Bin
Now that you know how to automatically delete Recycle Bin files, we hope you can reclaim some storage space on your Windows 10 computer. To reclaim even more space, check out our detailed guide on how to delete temporary files in Windows 10. Additionally, also check out how you can speed up your Windows 10 PC so that it never feels slow or laggy. Finally, if you need additional storage space, check out the best budget SSDs you can buy right now.

