
Do you know you can specify how much RAM you want a particular app to use on your Windows 10 computer? Whether it’s your browser that starts lagging with dozens of open tabs or a game that just won’t work with streaming music or other programs running in the background, it’s a problem that most of us have faced over the years. So today, we will show you how to allocate more RAM to specific apps in Windows 10 to optimize memory usage in your computer. You will also learn how to increase or reduce RAM cache in Google Chrome and Mozilla Firefox.
Allocate More RAM to Specific Apps in Windows 10
Typically, Windows does a decent job of deciding how much memory to allocate to each app. However, you can override the default system settings manually and prioritize RAM allocation for specific apps in Windows 10. Here’s how you do it:
Method 1: Using Task Manager
The easiest way to allocate additional memory to any specific application in Windows is by elevating its priority. You can do it easily from the Task Manager by following the steps detailed below:
- Open Task Manager (Ctrl+Shift+Esc) and click on the ‘Details’ tab.


- Now right-click on the executable for your target application. Hover over ‘Set Priority’ and choose ‘High’ or ‘Above Normal’ based on how much of a priority that program is for you.


- Confirm by clicking on ‘Change Priority’ in the confirmation box.


This would ensure that your computer gives higher priority to that program over other applications that may be running simultaneously.
Method 2: Using Windows Context Menu
You can also specify the amount of RAM for each program by using the next method. It works for most apps, but here, we will show you how to set (increase or reduce) RAM cache in Google Chrome.
- Right-click on the Chrome shortcut on your desktop if available. Now select ‘Properties’.


Note: If there’s no Chrome shortcut on the desktop, right-click on Google Chrome in the Start Menu and select ‘More > Open File Location’. Now right-click on the shortcut in the opened folder and select ‘Properties’.
- Now in the ‘Shortcut’ tab, find the ‘Target’ field and copy+paste
–disk-cache-size=1073741824at the end of the existing entry. Click on ‘OK’.


The above action would allocate up to 1073741824 bytes (1GB) of RAM cache to Google Chrome. I chose 1GB for demo purposes. You can select any value of your choice (depending on available memory in your computer) to increase or reduce RAM cache in Google Chrome.
Method 3: Using App Settings
The best way to allocate additional RAM to a program (or reduce memory allocation) is to specify the amount from within that app’s settings. However, this method does not work for all apps, and even when it does, the process varies from one program to another. Here, we will show you how to set (increase or reduce) RAM cache in Mozilla Firefox.
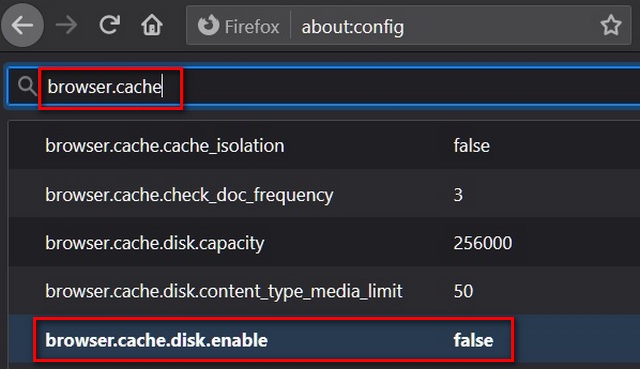
- To manually set RAM cache in Mozilla Firefox, first type-in
about:configin your browser address bar and press Enter. If you get a warning, dismiss it to access advanced options.


- Now search for
browser.cachein the about:config search field. From the results, findbrowser.cache.disk.enableand double-click on it to change its value to ‘false’.

- Now find
browser.cache.memory.enable. It should be ‘true’ by default. This means that disk cache is now turned off and memory cache is turned on.


- Now find
browser.cache.memory.capacity. The default value for this entry is “-1”. Hit the ‘Edit’ button (pen icon) to change its value.


- Enter your desired value to increase or reduce RAM cache in Mozilla Firefox. Finally, click on the blue tick mark on the right to save your settings.


Note: The memory cache you enter must be in kilobytes. So to allocate 1GB, the entry should be 1048576. The default value of “-1” lets Firefox choose the size of its cache depending on your computer’s installed RAM capacity.
Risks of Allocating Wrong Amount of RAM
You are unlikely to damage your PC by specifying too much (or too little) RAM to any app. However, it can cause a program to crash or become unusable under certain conditions. The reason for that is what’s called a ‘stack overflow error‘, which happens when the call stack memory is exceeded. Also worth noting is that some applications are coded to use a specific amount of RAM. So you might not see a massive improvement by allocating more memory to those programs.
Allocate More RAM to Specific Apps to Improve System Performance in Windows 10
With consumer PCs starting to ship with insane amounts of RAM, you may not always notice any significant slowdown in performance while using multiple programs and applications at once. However, you must have felt the need to optimize memory usage if you’re using an older computer or an entry-level machine with limited memory.
Using our tutorial above, you should be able to easily allocate more RAM to specific apps to speed up your Windows 10 computer. If you liked this article, check out our linked guides explaining the best windows 10 tips and tricks and the steps you can take to improve battery life on your Windows PC.

