GTA 6 feels vastly different from past entries, and even seasoned veterans may be overwhelmed by its settings. Rockstar has introduced the deepest controller customization options in the series yet, so tweaking them can make a big difference. Here’s our guide to the best controller settings for GTA 6 on PS5 and Xbox.
Early GTA 6 Controller Settings to Change First
If you want to get into the action of GTA 6 right away with the initial default settings, we’ve got a list of these seven early settings that you can tinker with in under a minute. Of course, these are part and parcel of the best beginner tips to play GTA 6, but we offer you an in-depth look at all of them.
Changing these controller and gameplay settings in GTA 6 can make your movement, driving, and gunplay feel sharper and smoother.
Setting Menu Path Recommended Setting Why Change Right Away Control Scheme Settings → Control Scheme Classic (or keep Default) Moves Run/Sprint back to X/A if clicking L3 feels awkward after years of GTA 5 Movement Speed Settings → Gameplay → Movement Jog (or Run) Stops Jason and Lucia from defaulting to a slow walk every time you push the stick Stand & Sprint Settings → Gameplay → Movement Off Prevents accidental sprint presses from popping you out of stealth crouch Look & Aim Sensitivity Settings → Controller 8 to 9 Look / 7 to 8 Aim Speeds up sluggish 180-degree turns while keeping your reticle steady during ADS Stick Deadzones Settings → Controller (DualSense) 2 to 3 (check for drift) Eliminates sluggish center-stick lag without causing camera creep Fishing & Nitrous Settings → Gameplay → Accessibility Hold (Fishing) / Press (Nitrous) Saves your analog sticks from wear during fishing and makes vehicle boosts instant Motion Blur & Camera Shake Settings → Camera / Display 0 or 1 Blur / Shake Off Keeps fast camera turns crisp and readable on 30 FPS console builds
While these settings are recommended to begin GTA 6 with if you’re on a time crunch, you don’t need to overhaul every single slider in the controller menu at once. Start with the above-recommended settings first, play for 15 minutes, and then dial up your sensitivity, input curve, and DualSense settings we have listed for you below to play GTA 6.

Recommended GTA 6 Controller Settings to Use
To access controller settings in GTA 6, head to the Pause Menu → Settings → Controller, and you’ll open the most expansive controller customization you’ve ever seen in a Rockstar title. However, if you mess up any setting, fret not; you can always set every setting back to default with a button press, since it’s easier than using a GTA 6 cheat code.
Look, Aim Sensitivity, Acceleration, and Response Curve
GTA 6 provides players with acceleration sliders for its separate camera movement and ADS cam. Several players like these parked at their default 7 value, but I like to go a bit experimental with them; that is far more balanced than the sluggish default approach.
Setting Default Value Recommended Value Advantage Horizontal Look Sensitivity 7 8 to 9 Lets you check alleys and spin around quickly in firefights Vertical Look Sensitivity 7 7 to 8 Keeps vertical movement controlled without flinging the camera at the sky Horizontal Aim Sensitivity 7 7 to 8 (1 step below Look) Stops your crosshair from overshooting moving targets Vertical Aim Sensitivity 7 6 to 7 Makes micro-adjustments for headshots much easier to land Look Acceleration 7 6 to 7 Keeps full-tilt camera turns smooth and predictable Aim Acceleration 7 5 to 6 Lowering this prevents sudden speed spikes when tracking strafing enemies Aim Response Curve Standard Linear (or Precision) Gives finer control near the center of the stick with fast turns at the edges
Choosing the right Aim Response Curve makes a bigger difference in GTA 6 than cranking up raw sensitivity. Standard baseline gives your stick movement a gradual ramp-up from the center to the edge. If you only want a slow and light speed boost, then stick with this.
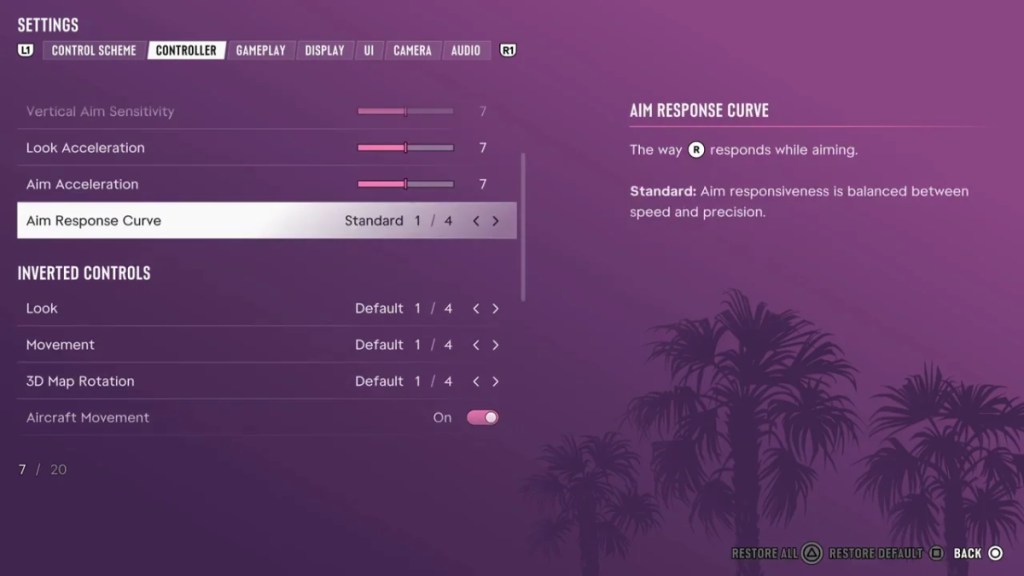
However, if you want more fast-paced action and want raw 1-to-1 muscle memory like when you play competitive shooters, go for Linear, as it maps stick tilt directly to camera speed with zero artificial smoothing.
But since GTA 6’s gunfights are more precision-based, choose Precision as it slows down small inputs near the center of the analog stick, while ramping up fast at the outer edges.
Important Tip:
Change your sensitivity first, get comfortable with it, and only then swap your response curve. Changing every setting at the same time may make it tough to understand which one helped you.
Vibration, Haptics, Deadzone, and Adaptive Triggers
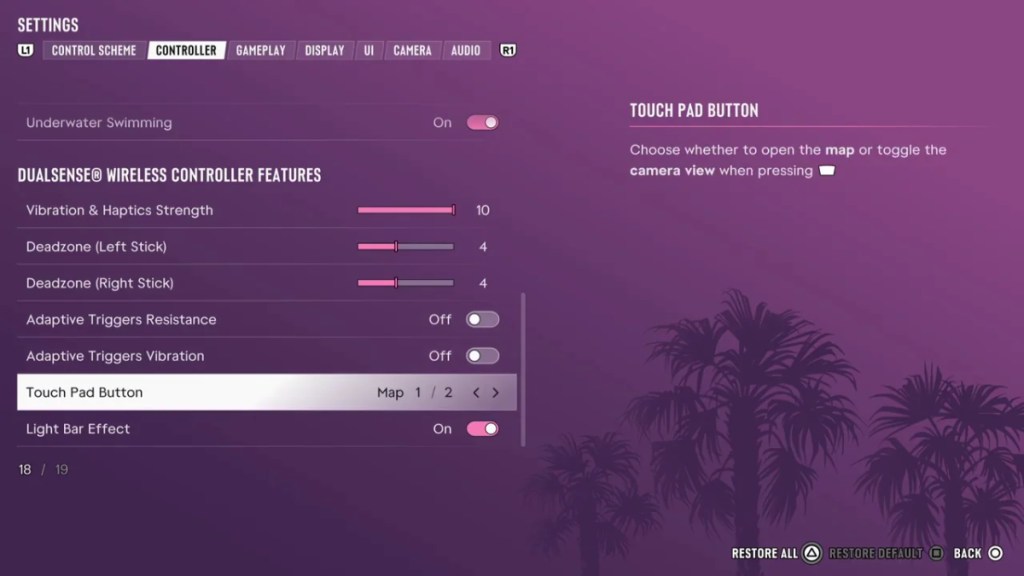
When you scroll to the bottom of the controller tab in GTA 6 on your PS5, you’ll find a dedicated DualSense Wireless Controller Features section. Rockstar has packed GTA 6 with a surprising amount of detail here, including stick dead zones and a brand-new driving trigger option.
Setting Default Value Recommended Value Advantage Vibration & Haptics Strength 10 7 to 8 (or 10 for immersion) Preserves road texture and weapon recoil without fatiguing your hands over multi-hour sessions Deadzone (Left Stick) 4 2 to 3 Makes character movement kick in faster on light stick pushes Deadzone (Right Stick) 4 2 to 3 Removes dead center play so small aim corrections register right away Adaptive Triggers Resistance On Off (combat/races) or On (story) Turning this off makes L2 and R2 crisp and prevents finger fatigue during long chases Adaptive Triggers Vibration On Off (pair with Resistance Off) Controlled separately from resistance, so turn both off if you want plain triggers Adaptive Speed Limiter On Off (races) or On (cruising) Creates a soft resistance stop on R2 for matching traffic speed, though it gets in the way at full throttle Light-Bar Effect On Personal Preference Flashes red and blue during police chases, though turning it off saves a bit of battery Touch Pad / View Button Map Map Keeps instant one-press access to the Leonida map active
Do not blindly go with a zero deadzone setting. If you’ve just bought a DualSense, your old one still may have a significant amount of stick drift. Drop both deadzones down to 2, take your thumbs off the sticks, and watch the screen for a few seconds and notice if the camera moves. If it does, keep bumping up the deadzone setting by 1 until it stops.
You can also check out our guide on how to fix stick drift on your controller if you’re plagued by it while playing as Jason or Lucia in GTA 6.
Inverted Controls (Look, Movement, 3D Map Rotation and Aircraft)
Right above the DualSense section, GTA 6 splits inversion into four separate toggles: Look, Movement, 3D Map Rotation, and Aircraft Movement. Leave the first three on Default unless you always play inverted.
Pay special attention to Aircraft Movement, which defaults to On independently of your normal camera settings. If you hop into a helicopter or plane for the first time and immediately nose-dive into Leonida Keys, open this menu and flip Aircraft Movement to Off.
Best GTA 6 Combat and Targeting Settings on Controller
Now that you’re done with the controller settings, it’s time to head to the Gameplay tab to set some must-have settings to play GTA 6. Head to Pause Menu → Settings → Gameplay to access these settings.
Since Rockstar gives you full control over how aggressively the game helps your aim, leaving everything on full Lock-On may feel heavily assisted even on casual runs. So you need to switch to these recommended GTA 6 controller combat and targeting settings:
Setting Default Value Recommended Value Advantage Targeting Partial Partial (or Lock-On for casual play) Nudges your crosshair onto nearby enemies without taking over your camera completely Aim Assist Strength 4 4 (scale of 0 to 5) Keeps mid-range and long-range firefights smooth at 30 FPS Lock-On Time 4 4 Gives you enough time to snap and follow through before assistance fades Lock-On Target Switch Off On (for Lock-On) / Off (for Partial) Lets you flick the right stick to cycle targets during chaotic shootouts Shooting Assist On On (turn Off for pure Free Aim) Smooths out bullet magnetism and tracking during sustained fire Drive-By Assist On On (turn Off for pure Free Aim) Makes shooting from moving cars and bikes far more manageable on thumbsticks Quick Draw On On Lets you fire rapidly without waiting on a full aim-down-sights animation Cover Selection Camera & Movement Movement Only (if snapping feels off) Stops camera swings from accidentally sticking your character to the wrong wall Holster in Vehicle Automatic Automatic Automatically tucks weapons away when entering cars so you stay clean around cops
Important Tip: Switching Targeting to Free Aim does not automatically shut off every assist. Make sure you manually toggle Shooting Assist and Drive-By Assist to Off to, otherwise close-range tracking will still kick-in during combat.
Best GTA 6 Movement and Accessibility Settings on Controller
In GTA 6, thanks to its default control scheme, sprint in movement is now mapped to L3 instead of repeated taps. So, under the Gameplay → Movement setting, certain tweaks completely change how Leonida feels. Also, under the Gameplay → Accessibility settings, Rockstar has hidden some massive quality-of-life upgrades in GTA 6, so it’s worth taking a look too:
Setting Default Recommended Advantage Run & Sprint (Movement) Hold Toggle (Default scheme) / Hold (Classic) Toggle saves your left thumb from holding L3 or LS, while Hold feels more natural with X or A on Classic Movement Speed (Movement) Walk Jog or Run A full stick push moves Jason and Lucia at a brisk pace automatically without clicking sprint, while a light tilt still lets you walk Combat Movement Speed (Movement) Fast Walk Fast Walk or Run Keeps you nimble when repositioning between cover during gunfights Stand & Sprint (Movement) Off Off Prevents accidental sprint presses from standing you straight up out of stealth crouch Tap Assist (Accessibility) Off Off (or Hold to Tap for Classic) Classic players can turn this on to hold X or A instead of mashing it to sprint Hold Delay (Accessibility) Off Off Keeps hold prompts responsive with zero extra input lag Hold Assist (Accessibility) Off 2x Cuts down on sluggish hold-circle prompts when looting or interacting Focus (Accessibility) L3 + R3 L3 + R3 (or Alternate) Keeps Jason and Lucia’s Focus ability mapped cleanly to both sticks D-Pad Actions, Aiming, Interact & Loadout (Accessibility) Hold Hold Keeps inputs deliberate so you do not accidentally trigger menus or actions mid-fight Fishing (Accessibility) Rotate Hold Replaces aggressive right-stick spinning with a simple hold, protecting your controller from stick drift Nitrous (Accessibility) Hold Press Fires nitrous instantly on a single click instead of forcing you to hold L3 or LS while steering Auto Drive (Accessibility) Restricted Restricted Keeps autopilot available on clear stretches without taking over in tight city traffic Auto Equip Helmet (Accessibility) Off On (optional) Automatically puts on a helmet when hopping onto motorcycles Simplified Mini Games & Accessible Combat (Accessibility) Off Off Leave these off for the standard balance unless a specific mini-game or shootout is slowing you down
Best GTA 6 Camera Settings to Improve Controller Aim
Since GTA 6 targets 30 FPS on consoles, excess screen shake or motion blur can make your aim feel heavier and gameplay a bit choppy. So jump into your Camera and Display tabs to improve controller aim while using GTA 6 weapons:
| Setting | Recommended | Advantage |
|---|---|---|
| Camera Height (On Foot) | High | Opens up your field of view over cover and helps you spot flanking enemies sooner |
| Camera Height (All Vehicles) | 3 (High) | Gives you a much clearer look over the roof of cars and trucks at high speeds |
| Camera Shake | Off | Keeps your crosshair steady during explosions and heavy gunfire |
| Camera Bob | 5 or Lower | Cuts down on vertical screen bounce while sprinting through interiors |
| Motion Blur Strength | 0 or 1 | Removes smear during quick right-stick turns so targets stay sharp |
Default vs. Classic Control Scheme in GTA 6 (Which Should You Pick?)
Now that you’ve set your best GTA 6 controller settings, it’s time to understand whether you should pick the Default or Classic Control scheme. To put it into perspective, the Default control scheme brings new and modern controls to the GTA franchise; however, Classic maintains the control scheme from GTA 5.
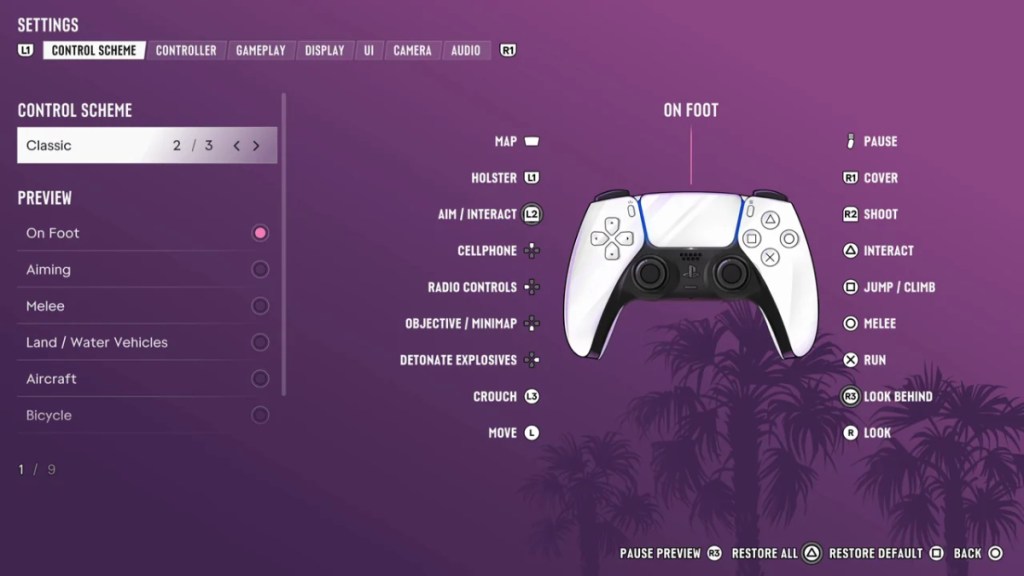
So if you’ve not played GTA 5, you can stick with the default scheme; on the other hand, if you have a decade of GTA 5 and Red Dead Redemption 2 muscle memory locked into your fingers, switch to Classic immediately and pair it with Tap Assist if you want to skip button mashing.
Here are four core On-Foot changes between the Default and Classic control schemes on PS5 and Xbox Series X|S:
On-Foot Action Default Scheme Classic Scheme Run / Sprint L3 / Left Stick X / A Jump / Climb X / A Square / X Crouch / Rest (Hold) Circle / B L3 / Left Stick Melee Square / X Circle / B
Complete GTA 6 Classic Control Scheme (PS5 and Xbox Series X|S)
General and Menu Controls
| Action | PS5 (DualSense) | Xbox Series X|S |
|---|---|---|
| Map | Touch Pad | View Button |
| Pause Menu | Options / Menu | Menu Button |
| Holster / Loadout (Hold) | L1 | LB |
| Cellphone / WAiNK App (Hold) | D-Pad Up | D-Pad Up |
| Radio Controls / Radio Menu (Hold) | D-Pad Left | D-Pad Left |
| Detonate Explosives / Partner Menu (Hold) | D-Pad Right | D-Pad Right |
| Objective & Minimap / Quick Nav (Hold) | D-Pad Down | D-Pad Down |
| Switch Character (Jason / Lucia) | Hold D-Pad Down + Right Stick | Hold D-Pad Down + Right Stick |
| Focus (Slow Time / Highlight Items / Track) | L3 + R3 | LS + RS |
On-Foot and Aiming Controls
| Action | PS5 (DualSense) | Xbox Series X|S |
|---|---|---|
| Move | Left Stick | Left Stick |
| Look | Right Stick | Right Stick |
| Run / Sprint (Classic Swap) | X | A |
| Jump / Climb (Classic Swap) | Square | X |
| Crouch / Rest (Hold) (Classic Swap) | L3 | LS |
| Melee (Classic Swap) | Circle | B |
| Interact (Doors / Items / Vehicles) | Triangle | Y |
| Aim / Interact with People (Hold) | L2 | LT |
| Shoot | R2 | RT |
| Cover / Quick Throw While Aiming (Hold) | R1 | RB |
| Look Behind (Hold) / Zoom & Throw Path | R3 | RS |
| Switch Shoulder (While Aiming) | D-Pad Left | D-Pad Left |
| Zoom Scope In / Out (While Aiming) | D-Pad Up / D-Pad Down | D-Pad Up / D-Pad Down |
| Quick Swap Weapon (While Aiming) | Triangle | Y |
Melee Combat Controls
| Action | PS5 (DualSense) | Xbox Series X|S |
|---|---|---|
| Lock-On / Strafe (Hold) | L2 | LT |
| Grapple | R2 | RT |
| Punch / Kick (Classic Swap) | Circle | B |
| Block / Dodge (Classic Swap) | Square | X |
Land and Water Vehicle Controls
| Action | PS5 (DualSense) | Xbox Series X|S |
|---|---|---|
| Turn | Left Stick | Left Stick |
| Look | Right Stick | Right Stick |
| Accelerate | R2 | RT |
| Brake / Reverse | L2 | LT |
| Shoot (Drive-By) | R1 | RB |
| Handbrake | X | A |
| Headlights / Duck (Hold) (Classic Swap) | Square | X |
| Melee / Door Kick (Classic Swap) | Circle | B |
| Exit Vehicle (Double Tap to Jump Out) | Triangle | Y |
| Horn / Nitrous | L3 | LS |
| Look Behind (Hold) | R3 | RS |
| Indicate Left / Vehicle Menu (Hold) | D-Pad Left | D-Pad Left |
| Indicate Right / Partner Menu (Hold) | D-Pad Right | D-Pad Right |
Aircraft, Bicycle, Swimming and Parachute Controls
Switching to Classic also changes a few inputs on GTA 6 Bicycles and while Swimming, which catches a lot of players off guard:
Vehicle and Action PS5 (DualSense) Xbox Series X|S Aircraft: Pitch / Roll Left Stick Left Stick Aircraft: Throttle Up / Down R2 / L2 RT / LT Aircraft: Yaw Left / Right Square / Circle X / B Aircraft: Undercarriage L3 LS Aircraft: Shoot / Exit R1 / Triangle RB / Y Bicycle: Pedal / Sprint (Classic Swap) X A Bicycle: Front Brake / Rear Brake (Classic Swap) R2 / L2 RT / LT Bicycle: Bunnyhop / Melee (Classic Swap) Square / Circle X / B Bicycle: Bell / Shoot / Dismount L3 / R1 / Triangle LS / RB / Y Swimming: Swim Faster (Classic Swap) X A Swimming: Surface / Melee (Classic Swap) Square / Circle X / B Swimming: Dive / Aim & Strafe / Shoot R1 / L2 (Hold) / R2 RB / LT (Hold) / RT Parachute: Open / Detach X / Triangle A / Y Parachute: Brake Left / Brake Right L2 / R2 LT / RT Parachute: Shoot R1 RB
These are the GTA 6 controller settings I’m using, and I’ve recommended a control scheme you must use to cruise around Leonida and be Hot Together with Lucia.
Tell us your preferred controller settings for GTA 6 on PS5 and Xbox Series X|S if you’ve got any.
Open the Pause Menu, go to Settings -> Control Scheme, and switch from Default to Classic. This changes the sprint back to X or A from L3 in GTA 6.
No, sadly, you cannot remap individual controller buttons in GTA 6.