
With over 1.5 billion active iPad devices, it’s no surprise that Apple’s tablet computer is extremely popular across the world. From being used for watching movies together on Facetime to playing the best offline games, there are several use cases for the iPad. If you are as careful as us, you most likely have a passcode set for your iPad. However, we are all humans, and we often tend to forget things. And if you have unfortunately found yourself on the error screen, which reads “iPad is disabled, connect to iTunes,” there’s no need to worry. Well, your iPad is not beyond saving as we will teach you how to fix the “iPad is disabled” error and restore your disabled iPad in this article.
“iPad Is Disabled, Connect to iTunes” Error [SOLVED]
This article will cover the entire process of restoring a disabled iPad, including how to remove the passcode and restore your backup data. If you would like to directly move to the steps involved, use the table below and skip to that section.
What Happens When Your iPad Is Disabled
More likely than not, you have ended up on this screen because you failed to enter the correct passcode for your iPad multiple times. While Apple is pretty forgiving and gives users ample chances to enter the code, your iPad is disabled when you exceed the total number of tries. It is then you will see the “iPad is disabled. Connect to iTunes” error.


A disabled iPad is essentially is one that has been locked to protect the owner’s data and the rest of the content. If your device has reached this stage, then the only way to get access back to it is by connecting the iPad to iTunes and attempt a restore process. Keep reading as we have detailed this process below.
Can I Fix My Disabled iPad Without Losing Data?
Users whose iPads have only been disabled until the 1-hour timeout can still unlock it, provided they enter the correct passcode when the timer ends. However, if your iPad is disabled, then, unfortunately, you will indeed lose all your data unless you created a backup before the error.
You might think that if you take it to Apple, the executives there can unlock it for you. However, as per the knowledge available, even Apple support can’t restore a disabled iPad without wiping it first. This is no doubt a part of the strict privacy practices Apple enforces. So if you are a user looking to fix a disabled iPad, learn how to restore it below.
Things You Need Before You Proceed
Before we begin the process to restore a disabled iPad, we will need a few things ready. Make sure you have this list ticked off before you proceed.
1. A Working Mac or Windows PC
If you are trying to restore a disabled iPad, this is the one thing you absolutely need. A working Windows PC or a Mac will allow you to connect the iPad and begin the recovery process. However, it doesn’t have to be your computer. So if you find yourself without a PC, borrow your friend’s laptop or Macbook, and get to work.
If neither of the two is possible, you should reach out to an Apple Retail Store for more help.
2. iTunes or Finder
The next thing you will need is either iTunes or Finder to solve the “iPad is disabled, Connect to iTunes” error. We will connect the iPad to the PC or Mac and then use iTunes to restore the device. Windows users can download iTunes from either the Microsoft Store (Free) or Apple’s website. Mac users with macOS Catalina or later can use Finder for the same process. However, if you want to use iTunes, make sure to update it using the built-in App Store. Check out this link for more help.
3. Optional – iCloud Backup
This one is only applicable if you don’t already have automatic iCloud backup enabled or haven’t backed up your iPad in a long time. As mentioned above, if you haven’t made a backup of your iPad before, you won’t be able to retrieve your data.
Remove the Passcode from Your Disabled iPad
Since we are trying to restore a disabled iPad after you failed to enter the passcode, it’s only natural that we will need to remove it before we proceed. We will do this through a simple process that will put your iPad into DFU or Recovery mode, which will allow us to connect the iPad to iTunes. However, before you begin, connect your iPad’s lightning to USB cable to your PC with the lightning end ready to connect to the iPad when we say so. Depending on your iPad model, follow the steps below:
Removing Passcode from iPad with Face ID
1. Make sure your iPad isn’t connected to the computer yet.
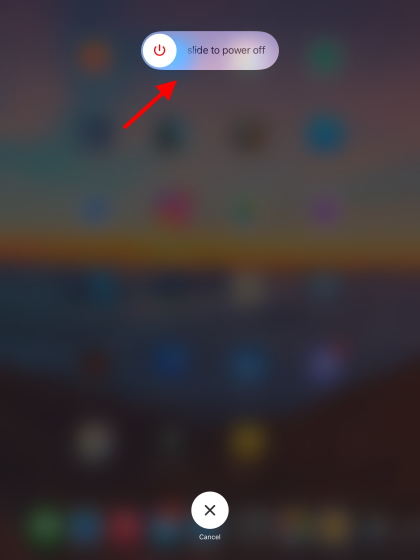
2. Press and hold the Top button and volume up or down button until the power slider appears. Drag it to the right to turn off your iPad.

3. Next, press and hold the Top button while connecting your iPad to your computer. That means it’s time to plug in the lightning cable. Keep holding the Top button until you see the iPad’s recovery mode screen.


Your iPad’s passcode has now been removed, and it is connected to your computer. Keep reading to know what to do next.
Removing Passcode from iPad with Home Button
1. Make sure your iPad isn’t connected to the computer yet.
2. Press and hold the Top button until the power slider appears. Drag it to the right to turn off your iPad.
3. Press and hold the Home button while connecting your iPad to your computer. Keep holding the Home button until you see your iPad’s recovery mode screen.

Your iPad’s passcode has now been removed, and the device is connected to your Mac or Windows PC. Keep reading to know what to do next.
Steps to Fix “iPad is Disabled, Connect to iTunes” Error
Now that your iPad is connected to either iTunes or Finder, you will likely receive a pop-up showing you that there’s a problem with your device. However, if that doesn’t happen, we can easily locate your iPad and start the process to restore your disabled iPad. Depending on the software you are using, follow the steps below:
Locate your Disabled iPad in iTunes
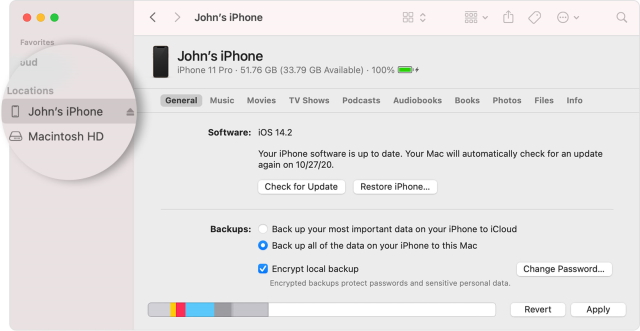
Once your iPad is connected to the computer, you will see it in the upper-left corner of the iTunes window. Click on it to get a pop-up regarding the disabled iPad. If you do not see a device icon, try reconnecting the iPad or updating your OS and iTunes.
![]()

Locate your Disabled iPad in Finder
If you are a Mac user running macOS Catalina or later, you can find your iPad in the Finder’s sidebar. Simply click on it to see your iPad’s information.

Fix Your Disabled iPad and Get It Working Again!
Once your iPad is connected to your PC or Mac, you will see the message shown in the screenshot below. The pop-up will give you the option to “Update your iPad” to fix the issue, but since we got here by an incorrect passcode, we will click the Restore button.


Click and confirm any confirmation boxes that appear, and you are all set! The iPad will now begin the restoration process, and iTunes or Finder will download the necessary software on your iPad. Restoring a disabled iPad is a quick process and should be done in about 15 minutes if you have a decent internet connection. If your iPad exits the recovery mode before it’s fixed, follow the steps to remove the passcode and start again.
Once done, you will be met by the iPad’s hello screen, where you will need to set up your device to use it.
Restore Your Disabled iPad in a Few Easy Steps!
That’s pretty much it. Following the above step-by-step process will ensure the “iPad is disabled, connect to iTunes” error is fixed without any problems. Once you restore your disabled iPad and start fresh, we suggest you load it up with these best iPad games to have a fun time. And if you are in the mood to test new iPadOS 15 features, like Quick Note or the new Multitasking features on your iPad, read our guide on how to install the iPadOS 15 public beta on your device.

