Apple’s HomePod mini is a pretty good smart speaker. And though it doesn’t compare with the smarts and the tricks of the Google Assistant, Siri is good enough at most things, and the HomePod mini does offer better sound. Setting up the HomePod mini is a breeze, and though it works really well, there are times when you might face an unresponsive HomePod mini. It’s happened to me, and if you’re facing the same issue, we’ve got you covered. Here are 9 ways to fix a HomePod mini that’s not responding.
Best Solutions to Fix an Unresponsive HomePod mini
Though an unresponsive HomePod mini can cause you to panic, the problem is usually not that big. We are going to cover all the ways you can fix a HomePod mini that’s not responding, starting from the easiest solutions, to more extreme ones. While we recommend you go through this list step by step, trying the solutions in the order we’ve mentioned them, you can use the table of contents below to skip ahead to any solution that you wish to try.
1. Make Sure Your HomePod is Turned On
First and foremost, ensure that your HomePod mini or HomePod is turned on. Ensure your smart speaker is plugged into power. After that, touch the top of the HomePod mini. If you hear music, your speaker is turned on. Besides, you can also say “Hey Siri.” If the virtual assistant responds, the speaker is turned on.
Pro-tip: If the HomePod mini is turned on, but Hey Siri isn’t working, touch and hold the top of your HomePod mini and say “turn on Hey Siri”
2. Check Your Wi-Fi Connection
If your HomePod mini is still not responding, you should next check if it’s connected to WiFi properly. The HomePod connects to the same WiFi network as your iPhone automatically. However, if you recently changed your WiFi password, or got a new WiFi connection, there is a possibility that your HomePod mini is not connected to the new WiFi. Fortunately, you can easily change the WiFi network on your HomePod mini.
This will automatically switch your HomePod mini to the same WiFi connection as your iPhone.
3. Ensure That Listen for Hey Siri is Enabled
If your HomePod is connected to Wi-Fi but still can’t respond to “Hey Siri”, make sure Listen for “Hey Siri” is turned on.
Enable ‘Hey Siri’ on HomePod mini using iPhone
- Open the Home app and press and hold the HomePod tile. Scroll down and tap on the settings cog icon.
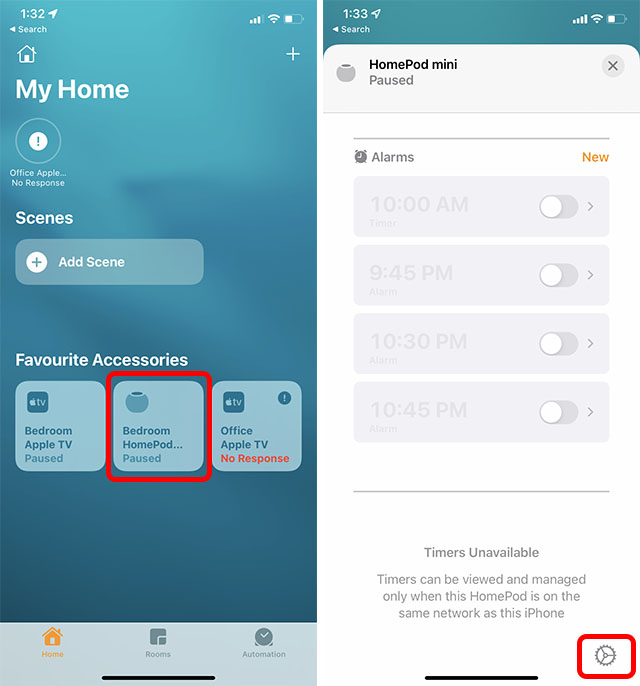
- Here, enable the toggle next to ‘Listen for “Hey Siri”‘ to enable the feature on your HomePod.

Enable ‘Hey Siri’ on HomePod using Mac
- Launch the Home app on your Mac and double-click the HomePod icon.

- Click on the settings cog icon, or swipe down.

- Enable the toggle next to ‘Listen for “Hey Siri”‘ to enable the feature on your HomePod.

Now, try saying “Hey Siri” and see if your HomePod responds. Hopefully, this should have fixed the issue. If not, read on to see the other troubleshooting steps for HomePod mini.
4. Check for Alerts in the Home App
When the HomePod is unable to access your Apple ID, can’t connect to your home Wi-Fi network, or faces any other issues, an alert appears in the Home app with details about the issue. So, go to the Home app on your device and then press and hold/double-click the HomePod icon to see more information about the alert.

5. Restart Your HomePod
If you’re still unable to use your HomePod mini, a restart might help solve the problem as well.
Restart HomePod mini from iPhone
Open the Home app and then the long-press HomePod tile. Here, tap on Reset HomePod and then tap on Restart HomePod.
Restart HomePod mini from Mac
Launch the Home app and then double-click the HomePod icon. Next, scroll down and click Reset HomePod. Finally, click Restart HomePod to reboot the speaker.
6. Remove and Re-Pair the HomePod Using Home App
If the HomePods is still not responding, try removing and re-pairing your HomePod using the Home app. You can do this using the Home app on your iPhone, iPad, or Mac.
Remove HomePod mini using iPhone
- On iPhone or iPad: Open the Home app -> long-press the HomePod icon -> Reset HomePod -> Remove Accessory.
Remove HomePod mini using Mac
- On Mac: Launch the Home app > double-click the HomePod icon -> Reset HomePod and click on Remove Accessory.
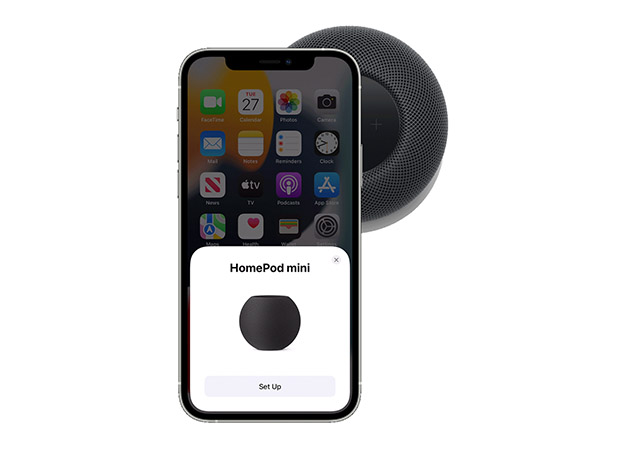
Set up HomePod mini Again
Setting up the HomePod mini is simple. Just plug it into power and unlock your iPhone. You will see a prompt on your iPhone. Simply tap on ‘Set Up’ and follow the steps on the screen.
7. Update your HomePod mini
Apple frequently releases updates for the HomePod mini. Normally, your HomePod will automatically install updates. However, if you’re facing issues with your HomePod, chances are there is a pending update that hasn’t been installed. Fortunately, you can manually update your HomePod mini pretty easily.
8. Reset HomePod or HomePod mini
No solution as yet? Bother not as we still have a nuclear solution. And with the nuclear fix, I mean resetting the HomePod to factory default. Times when the Siri-enabled speaker faces persistent issues, this solution comes in handy. Notably, there are multiple ways to reset HomePod.
Use Home App to Reset HomePod
- On iPhone and iPad: Open the Home app -> press and hold the HomePod icon -> Remove Accessory -> Remove.
- On Mac: Go to the Home app -> double-click the HomePod icon -> Remove Accessory -> Remove.
Press the top of HomePod to Reset It
- Disconnect the HomePod mini from power. Wait for 10 seconds, and then plug it back in.
- Wait for another 10 seconds, then touch and hold the top of the HomePod mini.
- The white light on top of the HomePod mini will turn red. Keep your finger pressed.
- Siri will then inform you that your HomePod mini is about to be reset. Keep your finger pressed until you hear three beeps, which confirm that HomePod mini has been reset successfully.
Restore HomePod mini with a Mac or PC
1. First off, plug your HomePod mini into your computer using the USB-C cable and then open Finder on macOS or iTunes on Windows 11 or Windows 10.
2. Select your HomePod when it shows on your computer and click on Restore HomePod.

Your computer will start to restore the software on your HomePod mini. While this happens, you will see an orange light flashing on the top of the HomePod mini. Once the light stops flashing, it means your HomePod mini has finished restoring, and you can safely disconnect it from your Mac or Pc.
9. If Nothing Works, Contact Apple Support
Lastly, if nothing has worked, your only option is to contact Apple Support. More often than not, they will be able to solve any issue that your HomePod mini is facing.
Frequently Asked Questions about HomePod mini Not Responding
Q. Does HomePod mini work when not plugged in?
HomePod mini doesn’t work when not plugged in. You will have to connect the speaker to a power source in order to use it. That said, there are third-party accessories that can power your HomePod mini so you can take it with you wherever you go.
Q. Can I reset HomePod mini?
You can reset the HomePod mini from the Home app on your iPhone, iPad, or Mac using the steps mentioned above. If you’re unable to do so, you can press and hold the top of the HomePod mini to reset it.
Q. Why is my HomePod blinking white?
A white blinking light on your HomePod mini signifies that the speaker is ready to be set up.
Easily Fix an Unresponsive HomePod mini
Well those are the methods to fix a HomePod mini that’s not responding. Hopefully, you were able to fix your unresponsive HomePod mini using these solutions. Do let us know which fix worked for you, and if there are any other methods that you think should be mentioned on this article.