
Despite the cut-throat competition from the likes of Apple Music and YouTube Music, Spotify remains by far one of the best music-streaming app with over 350 million active users. Apart from boasting one of the largest libraries of tracks (over 70 million), the app is feature-packed and offers ton-of customization for a fully personalized music listening experience. Whether you are new to the music app or hunting for the best Spotify tips and tricks to get the most out of it, this in-depth guide has got you covered.
Best Spotify Tips and Tricks You Should Know
To offer up some sneak-peek, Spotify has got a wide range of tricks up its sleeve. Thus, it’s really fun to unravel those cool Spotify hacks and bring them into action for enhanced control as well as a much-improved music listening experience.
If the ability to listen to Spotify songs anonymously sounds spot-on for privacy-conscious folks, the option to show all the recently played tracks on the profile is fascinating; especially if you love to let your followers know what sort of songs have caught your attention recently. That’s not all, hiding unwanted songs from a playlist/album is no less intriguing if you don’t want some specific tracks to dampen your mood. With that in mind, let’s explore the top Spotify tips and tricks in 2021!
1. Control Playback on Other Devices
One of the best and my favorite features of Spotify is that it syncs your current listening session to the cloud, giving you the power of cross-device playback control. Dubbed as Spotify Connect, this feature enables you to play music and control it from any of your devices. You could be listening to music on your laptop or speaker, but the mobile device can be used as a remote.
As you can see in the screenshot above, I’m listening to songs on my computer but the Spotify app on my Android device displays what song I’m listening to and play, pause or stop playback. You can effortlessly switch between devices by tapping the ‘Spotify Connect’ icon at the bottom of the player.
2. Powerful Search
While searching for music using the artist, album or song title on Spotify is common, the music streaming giant also enables you to perform advanced searches via operators like AND/OR/NOT, as well as narrow your search results to the year, genre, and more.
You can also combine these advanced search techniques, like Pink Floyd year:1965-1995 NOT year:1990 for tastefully precise results. This makes it much simpler for me to search for Queens of the Stone Age discovery. Here are all the advanced search terms a Spotify user should know:
- year: Will display music from a particular year. You can also enter a range of years as well.
- genre: Will display music from a particular genre.
- label: Will display music released by the label
- isrc: Will display tracks matching ID number according to the International Standard Recording Code.
- upc: Will display albums matching the ID number according to the Universal Product Code.
3. Find Explicit/Remix Tracks
Spotify is designed for use by everyone. While some users are more comfortable with a clean version of the track, there are others who would pick the explicit or remix of their favorite track. The search shows the most popular version of the track and it might not necessarily be what you like, however, searching for its alternative version is no chore.
At the end of an album, the streaming giant offers an option to check out the alternate versions of a track or album via the ‘X More Releases’ option. Not every track or album sports this option on the desktop or web app.
4. Collaborative Playlists
If you and your friend have an almost identical taste in music, the collaborative playlists feature could be super fun to check out. Spotify allows you to create playlists that you can share with your friends and they can edit the same – add or remove songs from the playlist. Collaborative playlists are marked by a hollow circle next to their name.
To create a collaborative playlist, you’ll first need to create a simple playlist and then tap the ‘three dots’ icon and choose the ‘Collaborative Playlist’ option from the menu in your Spotify desktop or mobile app.
If you want to turn an existing playlist into a collaborative one on the Spotify mobile app, then go to “Your Library > Playlists” and tap the ‘three dots’ icon next to the playlist and select the Make Collaborative option. All that’s left to do now is sharing the playlist’s link with friends, making this feature super handy at parties where anyone can add music to the playlist.
5. Transfer Playlist from Other Services
Spotify being super late to the music streaming scene in India means that there’s a high probability that you’ve been using some other streaming service for your music needs. I myself had stuck to Google Play Music and accumulated a lot of artists, liked tracks, and obviously a myriad of playlists on there.
Your collection on a certain music streaming service could be a primary reason for you being wary of making the switch, but don’t fret as you can bring all that over to Spotify pretty easily with the help of a third-party service called Soundiiz. It allows you to bring your collections from a number of streaming platforms and move them to other ones in minutes.
6. Maintain a Detailed Spotify History
Spotify maintains a record of all the tracks you’ve played recently and you can check the same by clicking the ‘Queue’ button from the bottom bar and navigating to the ‘History’ tab. However, it isn’t really exhaustive and doesn’t offer any insights into your tastes or listening pattern.
Well, this is where Last.fm comes to the rescue. I bet a lot of you must have heard of it since the service has been around for quite some time, but it’s still relevant and popular today as well. You can set up Spotify Scrobbling in Last.fm to get a detailed Spotify playback history log, weekly reports with insight into your music tastes.
To be able to maintain a detailed history log, simply follow the steps defined below:
1. Navigate to the Last.fm website via this link. Tap the profile icon at the top right and select the Settings option once you’ve logged in.
2. In the Settings menu, head to the ‘Applications’ tab and connect your Spotify account next to the ‘Spotify Scrobbling’ feature. Note: Scrobbling, for those unaware, means the name of the track you listen to on a streaming platform is sent to another website for safe-keeping.
7. Add Local Library to Spotify
Unfortunately, Spotify’s catalog is currently lacking a number of artists, all because of its failure to secure a partnership with Warner Music in India. But you don’t need to worry if you don’t find a song or album that you’re looking for because you can yourself add it to the streaming service from your personal offline collection.
This feature is limited just to Spotify’s desktop app, so tap the downwards arrow next to your username to open the Settings and scroll down to the ‘Local Files’ section. Here you can add the folders where your music is stored on your computer via the “Add a Source” button.
You cannot add solo tracks to Spotify’s local file catalog, only folders from where the app will scan and bring in every track. You can check out my local library below, which surely packs all of Twenty One Pilots’ tracks due to their lack in India:
8. Share Links With Timestamps
If you’ve been using Spotify for some time, you would already know that sharing songs is super easy as there’s a dedicated option available for the same next to each track, album, and playlist. However, it’s also possible to share specific parts of the track too.
There are times you simply want your friends to check out that guitar breakdown or bass drops in a track. It’s possible to share the exact minute and seconds you want a friend to start listening to a song from and here are the steps on how you can do just that:
1. Open the Spotify desktop app, navigate to the track you want to share, and tap on the ‘three-dots icon next to the track to see the Share option.
2. From the share menu, you’ll need to select the ‘Copy Spotify URI’ option, and then comes the most important part – adding the timestamp to this code. The URI code looks something like this (spotify:track:2EtDBM1HREttw143IwZvJ0) and now you need to add the timestamp (suppose 2 minute and 9 seconds) after a hashtag at the end of the URI code:
Note: The URI codes are available in the Spotify desktop app. Neither the web nor mobile apps allow you to share or play the same.
3. You can now copy and share this time-stamped Spotify URI code with friends, who can then paste it into their desktop app to listen to the track from that instant. The URI code doesn’t work with Spotify’s mobile and web apps, showing a ‘no results found’ error.
9. Share Songs to Instagram Stories
As someone who likes to share my favorite songs with friends and followers, I find the option to share songs, albums, or playlists to Instagram Stories quite interesting. If you are also fond of sharing songs, chances are this nifty feature would win you over as well.
To do so, you will first need to first tap on the ‘three-dots icon’ menu right next to the song you wish to share from the Now Playing screen.

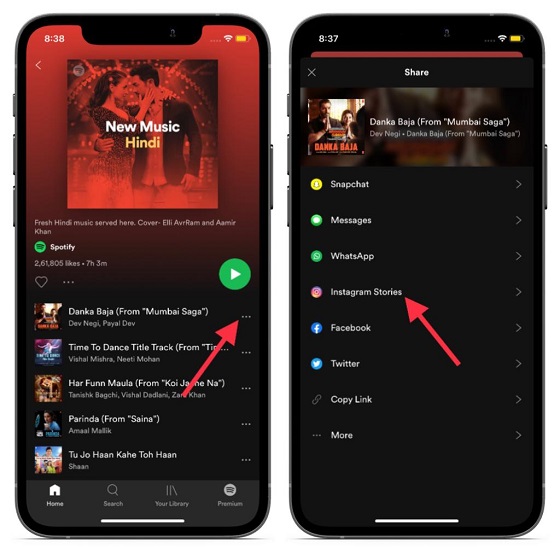
You would then see the Instagram Stories option in the Share menu, which on tapping redirects you to the Stories creation screen and shows the artwork of the song, album, or playlist you’re about to share. Simply jazz up this story with stickers or a caption and hit ‘Your Story’ for all to see.
10. Connect Spotify to Google Maps
While Spotify is the best music-streaming app, Google Maps stands out as the most popular navigation app. And if you use both these apps, you would be glad to know that the Swedish-based music app lets you integrate with Google Maps. Thus, you can enjoy your favorite tracks during navigation.
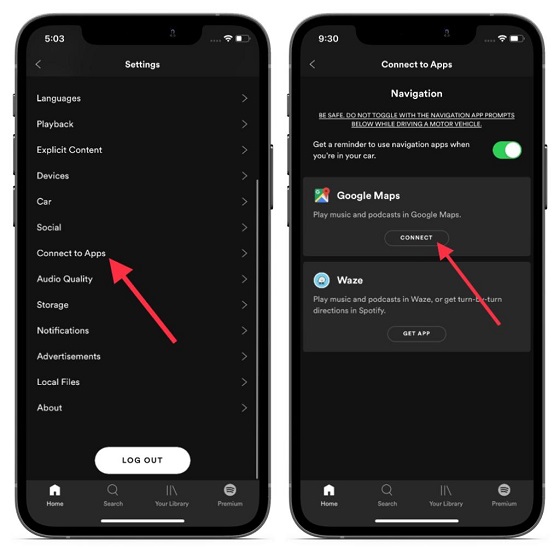
To get started, open the Spotify app on your iPhone or Android device -> Settings icon -> Connect to Apps. Now, tap on the Connect button and then tap on Agree to authorize the music app.
11. Control Spotify in Google Maps
Music is an integral piece of road trips or long drives and Google knows it too. The tech giant has integrated the option to control Spotify (and Apple Music as well) with its mapping app. Thus, you can take control of the popular music app right from Google Maps.
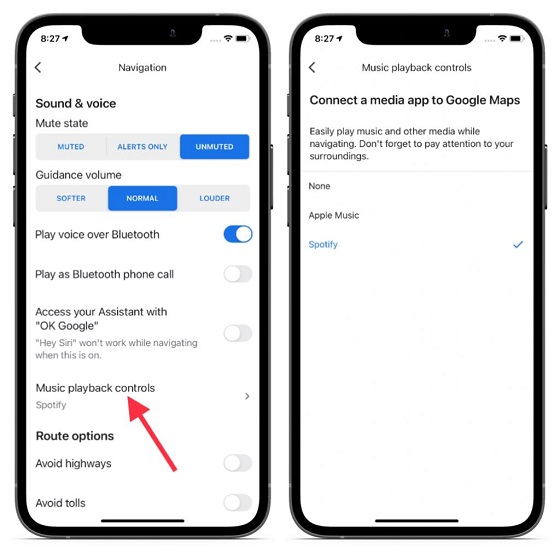
Open Google Maps on your device and tap on your profile at the top right corner of the screen. Next, choose Settings -> Navigation Settings/Navigation (on iOS). Next up, select Music playback controls. After that, choose Spotify.
12. Wake Up to Your Favorite Track
My favorite Spotify integration will most definitely have to be this, with the Google Clock app. If you have the Spotify app installed on your Android device, you can now pick the song you would like to wake up to.
As for how to select a track from Spotify as your alarm tune, well, tap the ‘alarm sound’ option while setting up an alarm and you will see a new ‘Spotify’ tab here. You’ll see all of your recently played tracks under this tab. You can tap to listen to the same and select your alarm tune via the streaming service.
13. Archive Discover Weekly Playlist
Spotify probably has the best discovery algorithms among all streaming services and it shows off the same by compiling a ‘Discover Weekly’ playlist with new artists and tracks – every week. This playlist refreshes every Monday and if you don’t save a track that you liked, then it might vanish the next week.
So, here’s a nifty trick to automatically save tracks from the ‘Discover Weekly’ playlist. All you need is to link your Spotify account to IFTTT (Free, Android, and iOS), search for all Spotify recipes, and activate the ‘Archive Spotify Discover Weekly tracks’ recipe.
All of the tracks recommended in this playlist are saved in another Spotify playlist, so no worries if you didn’t save some of the tracks you liked. Just go to the Discover Weekly Archive playlist, which is regularly updated through IFTTT, and find that sweet melody again.
14. Link Shazam to Spotify Instead of Apple Music
It’s no secret that Shazam and Apple Music are designed to play nice with each other thanks to the deep integration. Whenever you identify any songs being played in the background, the music discovery app shows the Apple Music link to let you start streaming the song right away.
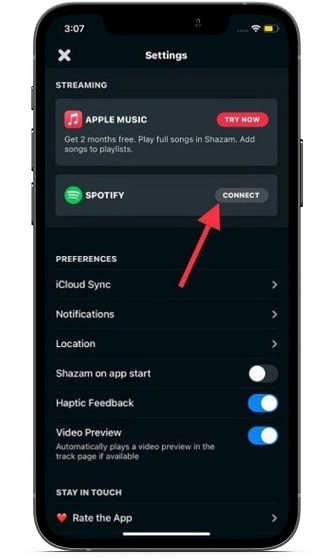
As an Apple Music user, you would appreciate this integration. But what if you are using Spotify and want the music-streaming app to display the link? Well, this is where this nifty hack comes into play. To get it done, open Shazam on your iPhone -> Settings icon -> Connect to Spotify -> Agree. Henceforth, Shazam will always show Spotify link after you have identified any song.

15. Enable Data Saver
For the folks who don’t want their limited bandwidth to run out of steam due to music streaming, Spotify offers a super handy feature called “Data Saver”. When it’s enabled, the music-streaming app allows you to stream low-quality music (equivalent to 24 bit/s) and disable artist canvases. Moreover, the data saver also lets you enable audio-only podcasts to save only the audio when downloading video podcasts.
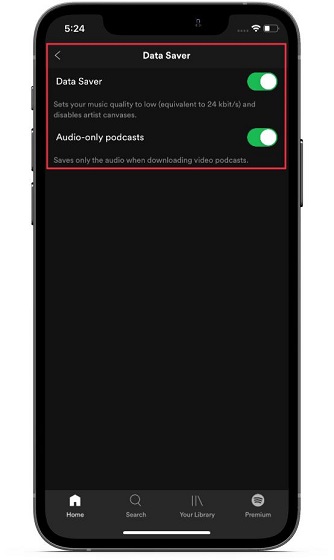
To enable Data Saver for Spotify, launch the music streaming app -> Settings icon -> Data Saver. Now, turn on the toggles for Data Saver and Audio-only podcasts.
16. Customize Audio Quality for Wi-Fi/Cellular Streaming
Another notable feature that can go a long way in ensuring your limited bandwidth doesn’t end abruptly is the ability to customize audio quality for cellular/Wi-Fi streaming. So, depending on your needs, you can fine-tune the audio quality to help extend your plan.
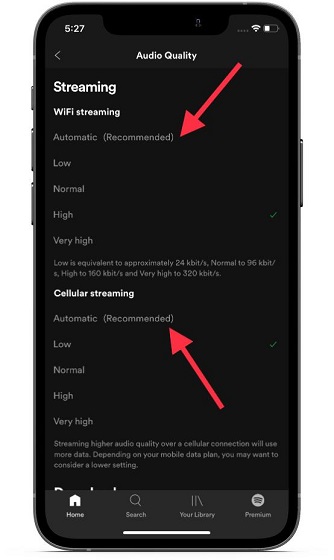
Go to Spotify -> Settings icon -> Audio Quality. Now, you have five options to choose from: Automatic, Low (equivalent to approximately 24 kbit/s) Normal (equivalent to approximately 96 kbit/s), High (160 kbit/s), and Very high (320 kbit/s) for both Wi-Fi and cellular streaming.
17. Customize Spotify Download Quality
If you have the habit of downloading a ton of Spotify songs for listening to them offline, make sure to customize the download quality. The music-streaming app allows you to download low, normal, high, or very high-quality music. If you wish to manage your device storage smartly, make the most of this handy storage management feature.
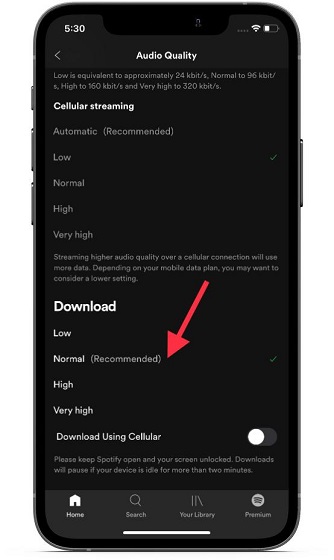
Navigate to Spotify -> Settings icon -> Download section (choose Audio Quality -> Download on iOS). Now, select the preferred download quality as per your needs.
It’s worth pointing out that you can also choose to download Spotify songs using cellular if you don’t have cellular data constrain. To get it done, turn on the toggle for Download Using Cellular.
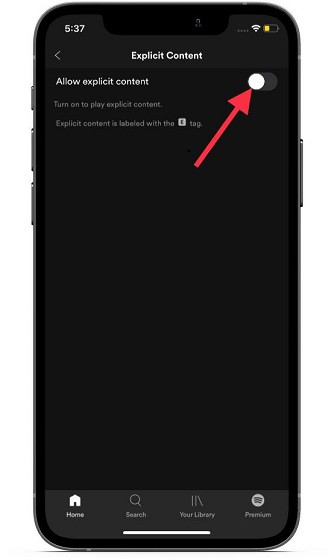
18. Disallow Explicit Content
Spotify labels “Explicit” content with an “E” tag so that you can easily spot it and decide to view/skip it. But what if you wish to keep all the explicit content away for any personal reason? Well, there is a quick way to disable explicit content on Spotify. To get it done, all you need to do is head over to Spotify -> Settings icon -> Explicit Content and then turn off the toggle.
19. Customize Spotify Notifications
While I prefer to stay away from the incessant bombarding of unnecessary alerts, I like to keep a track of the things that matter or that hold relevance. And that’s what makes me appreciate Spotify for offering the desired freedom to customize notifications.

The music streaming app lets you fine-tune alerts based on your taste to keep the unwanted notifications at bay and keep a tab on the things that interest you. Go to Spotify -> Spotify icon -> Notifications. On this screen, you should see a host of options such as the ability to enable/disable alerts for playlist updates, concert notifications, new music, artist updates, and more.
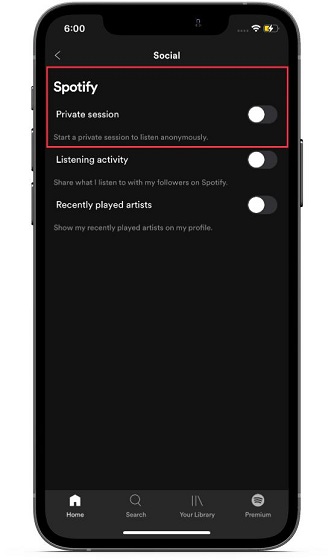
20. Enable Private Session to Listen Anonymously
Though it’s always cool to let your friends, followers, and loved ones know what sort of tracks you love to catch up with, there are times where you may want to keep the privacy about what you listen to. Especially when you wish to relish some offbeat music or something that many won’t find nice. Whatever could be your personal reason, you can head over to Spotify -> Settings icon -> Social and then turn on the toggle for the Private session.
21. Delete Spotify Cache
It’s always better to remove the app cache from time to time. It not only keeps the app uncluttered but also ensures it runs smoothly. So, whether Spotify seems to be rather sluggish or crashes unexpectedly, chances are pretty high that the music-streaming app is cluttered.
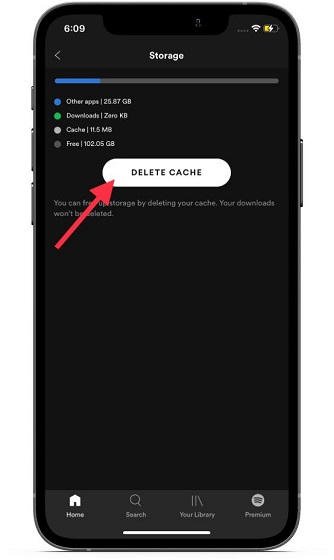
Navigate to the Spotify -> Settings icon -> Storage. Now, tap on Delete cache to get rid of all the cache and recover some precious storage on your iPhone or Android device. Don’t worry it only wipes out the app cache and not your downloads.
22. Don’t Share What You Listen to with Your Followers
Spotify automatically lets you share what you listen to with your followers. While this social sharing of music is great, I don’t think everyone would prefer to go this way. If that’s you, there is a way you can stop sharing what you listen to with your followers.
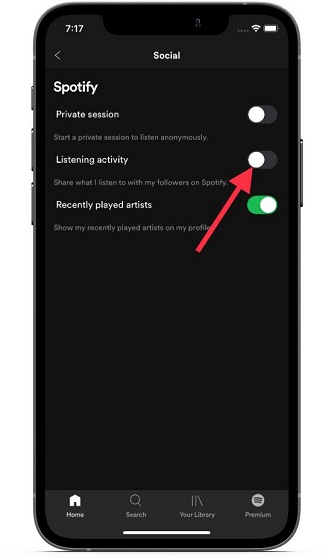
Head over to Spotify -> Settings icon -> Social. Now, turn off the switch right next to the Listening activity option. Going forward Spotify won’t share what you listen to with your followers. Of course, if you ever wished to change your mind, you can go back to the same setting and toggle on the switch for Listening activity.
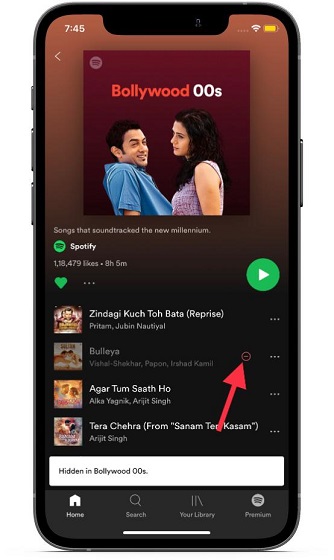
23. Hide a Song from an Album/Playlist
If you don’t find a particular song interesting, you can choose to hide it from the album or playlist. Simply head over to the playlist which tracks you want to hide. Then, tap on the tiny three-dots right next to a specific track and choose Hide song/Hide this song. You can repeat these steps to hide more songs. From now onwards, a “-” hidden button will appear next to the song/s.
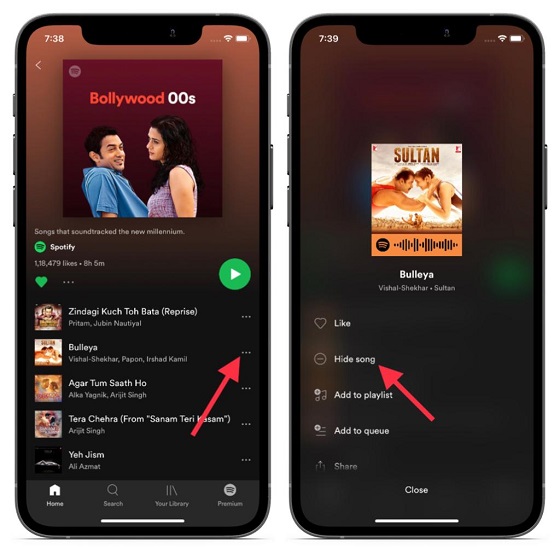
Later if you wished to unhide the songs, go back to the same album/playlist and tap on the “-” hidden button right next to the song.
24. Get the Most Out of Equalizer
Spotify comes with a built-in equalizer so that you can fine-tune your music in line with your preference. From classical to dance to electronic to the evergreen hip-hop, the equalizer has got a solid collection of over 20 audio presets to let you mix and match at will.
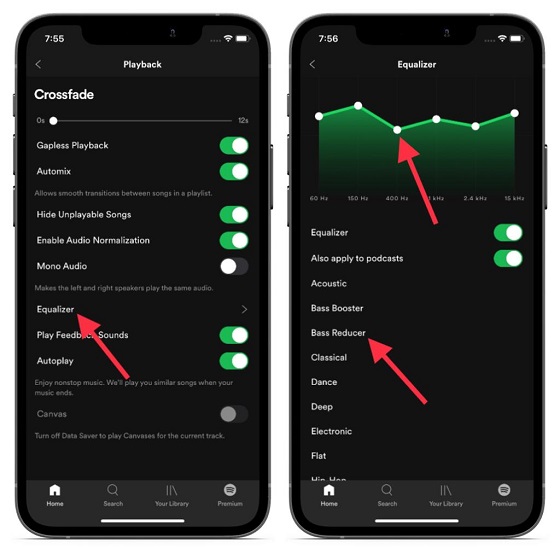
Open Spotify app on your device -> Settings icon -> Playback -> Equalizer. Now, choose the desired equalizer. It’s worth mentioning that you can also adjust the preset depending on your preference. Simply use the tiny handle to fine-tune each aspect.
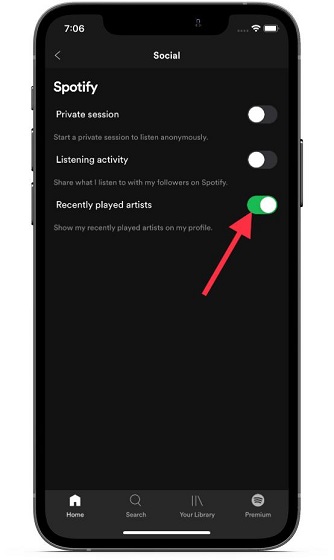
25. Show/Hide Recently Played Artists on Your Profile
For those who never seem to get enough of their top picks, the ability to show the recently played artists on a profile is fascinating. If this cool feature appeals to your taste as well, you can navigate to the Spotify app -> Settings icon -> Social. Then, turn on the toggle for Recently played artists. From now onwards, your recently played artists will begin to appear on your profile.
Super Cool Spotify Tips and Tricks Lined Up for You
So, these are the top Spotify tips and tricks, which can go a long way in enhancing your music-listening experience. To me, what sets the Swedish-based music-streaming app apart from the rest is the pretty intuitive user-interface. Couple that with a wide range of customization tools as well as personalized recommendations and it becomes really hard to beat.
By the way, which one of these Spotify tips did you find the best? Also, think we missed out on a nifty trick that should have definitely been on this list, then let us know in the comments down below.


