Apple just released the final version of the company’s iOS 11 mobile operating system to the general public, after being in the beta stage for about 3 months. As long as you have an iOS device that was at least released in late 2013, you’ll be able to update and enjoy using the latest version of the operating system. iOS 11 brings a lot of new features and functionalities to the table, but there are a lot of hidden features and options as well in the latest iOS update. Well, if you’re interested already, let’s take a look at 15 cool iOS 11 tricks you should know:
iOS 11 Tips and Tricks You Should Know
Note: I tried these iOS 11 tricks on my iPhone 7 Plus and iPhone 6s but they should work on older iPhones as well as the new iPhone 8, 8 Plus and iPhone X.
1. Hidden Dark Mode
Dark mode is a feature that has been hugely awaited since the iOS 10.3 update. Although we didn’t exactly get the dark mode that we were looking for, iOS 11 offers the closest experience so far. It’s called “Smart Invert” mode and it can be easily enabled by simply following the steps below:
- Head over to Settings -> General -> Accessibility and tap on “Display Accomodations”. Now, tap again on “Invert Colors”.

- Once you’re in the Invert Colors menu, you’ll notice the “Smart Invert” toggle that can be used to easily enable/disable the feature. Now, once you scroll through most of the menu sections within iOS, you’ll have a completely dark theme rather than a boring light one.

Although we enjoyed using the “Smart Invert” dark mode, it’s far from perfect due to the fact that pictures, third-party applications and icons appear as if they’re in negative color mode rather than a true dark mode. Hopefully, Apple improves upon this new feature in the near future.
2. Customize Control Center
The revamped Control Center is one of the standout features of iOS 11. It has received a visual overhaul and now brings a lot more functionalities for the end user. It can be easily brought up by swiping from the bottom of your screen. Well, you can even add or remove whatever you want from the Control Center as per your preference. In order to do this, simply head over to Settings -> Control Center -> Customize Controls and add or remove all the available controls in the menu. For example, Screen Recording and Do Not Disturb While Driving were the two controls I personally added to my iPhone’s Control Center.

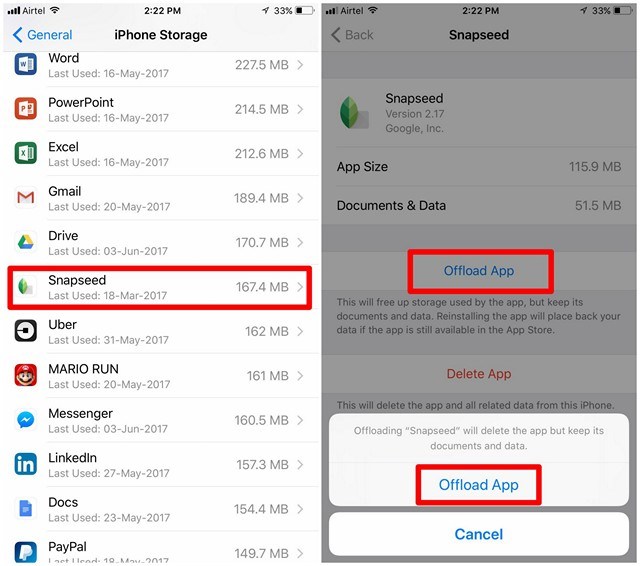
3. Offload Apps
Offloading is a new feature implemented by Apple to conserve storage space on your iOS devices, especially the ones having a limited space of 64 GB or lower. Well, by offloading an app, users are basically uninstalling an app while keeping all the data intact, so that they can continue from where they left, if they choose to reinstall the app again. In order to offload any app on your iOS device, head over to Settings and simply follow the steps below:
- Go to General -> iPhone Storage within the Settings application on your iOS device.

- In the next menu, scroll down and choose the particular app that you want to offload, and tap on “Offload App”. Once the device asks you to confirm, tap “Offload App” again.
4. Type to Siri
Siri is the personal voice assistant that’s available across iOS devices. We usually make use of voice commands to ask away all our queries, but with iOS 11, you can type away your queries as well. This is especially useful if you’re in a crowded environment where Siri is not picking up your voice accurately, or if you’re in a situation that you have to remain silent at any cost. Well, first you need to enable the feature within settings. However, it’s worth noting that, as long as you have “Type to Siri” enabled, you won’t be able to control Siri with your voice. Without further ado, simply follow the steps below to enable “Type to Siri”:
- Go to Settings -> Accessibility and head over to the Siri section. Here, you’ll notice the option to enable/disable “Type to Siri”.

- Now, simply activate Siri as you normally would, by long-pressing the home button. Well, what are you waiting for? Start typing your queries right away using the onscreen keyboard.

5. Screen Recording
Apple now lets you record your device’s screen with iOS 11, and this is extremely helpful if you want to record short tutorial videos for others. It’s a much easier way than taking and sending multiple screenshots, which might only create confusion. The feature is built right into the iOS 11’s Control Center, but it’s not enabled by default. That’s right, you need to add the toggle to the Control Center first, and then you’ll be able to start or stop recording your screen at the tap of a button. So, simply follow the steps below to get this done in a jiffy:
- Go to Settings -> Control Center and once you’re in this section, scroll down a little bit and find the “Screen Recording” option. Tap on it to add the toggle to your Control Center.

- Now, once you bring up the Control Center by swiping up from the bottom of your screen, you’ll notice the “Screen Recording” toggle at the very bottom. You can tap once on it to start recording and tap it again to stop recording your scren. It cannot get any more easier than this.

6. Send Live Photos as GIFs
Live Photos, a feature that was introduced along with the iPhone 6S and iPhone 6S Plus back in 2015, was considered as a gimmick by many users, as people needed an iOS device with 3D touch functionality to take advantage of it and view these photos. These are nothing but very short clips that lasts just about 3 seconds. It’s automatically recorded by the iPhone before and after a picture has been shot. With iOS 11, you can send these Live Photos as GIFs to other people right from Apple’s Mail app. Since it’s sent as GIF, almost everyone can view it without any particular hardware requirement. Simply follow the steps below to send live photos as GIFs within seconds:
- Once you’ve shot a Live Photo using your iPhone’s camera, head over to the Photos app to view the picture and simply swipe upwards on the screen. A new menu will show up on the screen which can be used to change the effect for the Live Photo that you just shot. Select either “Loop” or “Bounce” as the effect and tap on the “Share” option at the bottom-left of your screen. Now, you’ll be able to choose Apple’s “Mail” app for sharing this Live Photo.

- Now, you’ll be taken to the Mail app where you can directly send the Photo as a GIF to the recipient. Users can choose either small file size or the actual size before sending the GIF. If you don’t want to compress the GIF, actual file size will pretty much be the better choice here.

7. Disable High Efficiency Image Format
Apple’s iOS 11 follows a new image compression technique called HEIF (High Efficiency Image Format) and it’s used across all the photos that are captured on your iOS devices powered by the Apple A9 chip or higher. This is done to reduce the size taken up by your photos and conserve the precious non-expandable storage space of your device. Although it’s a welcome feature and the compression technique involves almost no image quality loss at all, there are concerns regarding the compatibility of this file format. Well, third-party applications like Discord doesn’t recognize this relatively new format once the pictures are uploaded, and therefore, they’re rendered as an unknown file, rather than an image file. In order to avoid such compatibility issues, users might be interested in disabling this feature. So, simply follow the steps below to disable HEIF within a matter of seconds:
- Go to General -> Camera and tap on the “Formats” option under the Camera section.

- Choose “Most Compatible” to be the preferred format that should be used by iOS to handle all the photos that are captured using your iOS device. Well, that’s pretty much the whole process. From now on, you don’t even have to worry about image compatibility issues.

8. Scan QR Codes
Once you update your device to iOS 11, you’ll be able to use the default Camera app to scan any QR code that you could possibly come across. There’s no setting that you need to fiddle around with. Simply point the camera at the QR code and let your device do the job for you. The link behind the particular code will be displayed as a banner at the top of your screen.

9. Shut Down iOS Device Without Pressing A Button
As you might all know, almost all the iOS devices have a dedicated sleep/wake button to turn it on and off. However, that’s not the case with the new iPhone X. Although there’s a sleep/wake button to lock and unlock your phone, long pressing the button will activate Siri, rather than giving you the option to turn the device off. Well, there’s nothing much to worry about, as you’ll be able to make use of this trick to turn it off. It’s also pretty useful if you managed to damage the power button and it’s no longer functioning.
In order to shut down your iOS device without having to press the power button, simply head over to Settings -> General and scroll down to the very bottom. Now, just tap on “Shut Down” to bring up the power off slider.

10. Scan Documents in Notes
Ever wanted to convert your physical documents into a digital one, without having to spend a chunk of cash on a dedicated scanner? Well, from now on with iOS 11, you’ll be able to do just that. The stock Notes app on your iOS device will be able to scan and save your documents easily. Simply follow the steps below to get this done in a jiffy:
- Open the “Notes” app and tap on “Create Note” icon which is indicated by a pen and paper at the bottom-right of your screen. In the next menu, tap on the “+” icon located right above your keyboard.

- Now, tap on “Scan Documents” and point the camera towards the paper and click a decent picture of it. After this, you’ll be able to adjust the area of the scan according to your preference. Once done, tap on “Keep Scan” to save the scanned document.

The scanned document will look quite similar to the one shown below. As you can see, iOS 11 did a fairly good job in the scanning process. If you’re not satisfied with the results, you can choose to retake the scan and position your camera perfectly.

11. Annotate Screenshots
Almost every smartphone today can take screenshots, but marking them up is still a tedious process. Well, with iOS 11, users will be able to markup their screenshots immediately after they take it. All you need to do is, simply take a screenshot as usual and tap on the screenshot preview that appears for a few seconds at the bottom-left corner of the screen. Now, you’ll be able to markup your screenshots and tap on “Done” to save the edited screenshot.

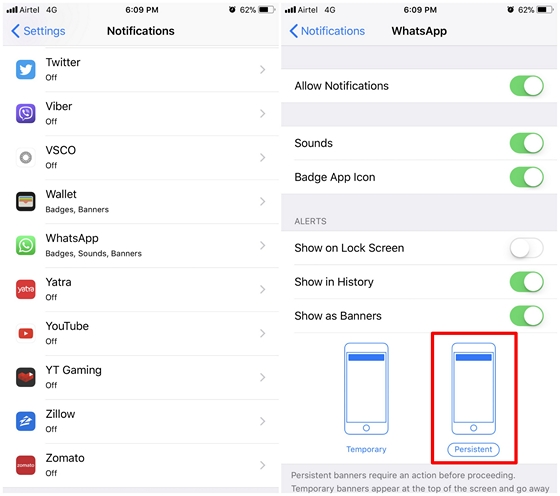
12. Persistent Notifications
Apple’s interactive banner-style notifications on iOS are quite impressive to say the least. They least just long enough to read the whole notification and automatically disappears. However, not everyone is fast enough in reading and therefore, the temporary banner might just not make the cut for them. Well, once you’ve updated to iOS 11, you’ll be able to switch between Temporary and Persistent banner notifications for each app individually.
In order to get this done, simply head over to Settings -> Notifications and choose the app you want to turn on persistent notification for. Now, select the “Persistent” banner icon as shown in the screenshot below. From now onwards, the banner-style notifications from this app will no longer be temporary.
13. Share Screenshots Quickly
People usually take screenshots on their smartphones to share it with others, but who wants to deal with the hassle of getting inside the Photos app just to share the particular screenshot? Well, with iOS 11, users will be able to share their screenshots immediately after they take it. This can be done by long-pressing on the screenshot preview that appears for a few seconds at the bottom-left corner of the screen. iOS will now display all the supported applications that it can share your screenshot to. The process of taking and sharing screenshots, just got a lot more easier and faster.

14. One-Handed Keyboard
If you’re using the Plus variant of an iPhone, and if you have really tiny hands, you’ll probably be using both of your hands all the time for typing. What if you want to text while you’re eating or drinking and one of your hands isn’t clean? Well, just make use of one-handed keyboard, a nifty feature that comes with the iOS 11 update.
In order to take advantage of this keyboard, simply long-press on the “emoji” icon located at the bottom of the keyboard. Now, you’ll notice the option to switch between right-handed and left-handed keyboard. Tap on your preferred style to start making use of one-handed keyboard right away.

15. Save Webpages As PDF
Ever wanted to save online webpages for offline reading and sharing at a later time? Apple lets you do just that with iOS 11. Once you update to the latest version of the operating system, you’ll be able to quickly create a PDF out of any webpage. In order to do this, tap on the “Share” icon located at the bottom of the Safari browser and choose the option “Create PDF”. Once done, you can just tap on “Done” to save the PDF file for later use.

Bonus: Siri Tricks
Apple’s personal voice assistant that’s baked into iOS just got a lot smarter with the latest version of the operating system. You can now ask Siri to translate English into various languages including Mandarin, French, German, Italian, and Spanish. However, the assistant still can’t translate it the other way around. Hopefully, that gets implemented by the Cupertino-based company in the near future.

Siri can also take advantage of the ride-hailing apps installed on your iOS device and book a cab for you within seconds. It can even specifically choose the type of cab that you’re looking for, and request that particular cab.

Other than that, with iOS 11, Apple has opened Siri to developers, so more third party apps like WhatsApp are also supported by Siri.
SEE MORE: 20 Cool iOS 11 Features You Should Know About
Enhance Your iOS Experience With These iOS 11 Tricks
There are a slew of new features and tricks baked right into the latest version of Apple’s mobile operating system. From minor improvements like the ability to record your screen, to totally redesigning the Control Center, iOS 11 has come a long way and its a major upgrade over its predecessor. So, make sure you’ve updated your iOS device to the latest version to take advantage of all these tricks and features. Well, which of these iOS 11 tricks are you keen on trying out, and why? Do let us know, by shooting your valuable opinions in the comments section down below.