
We have already written an in-depth guide on how to automate tasks on Windows 10, but it was done using Task Scheduler. Now, Microsoft has brought a new Power Automate Desktop app on Windows 10 that aims to connect various Windows components and elements to its automation stack. The Microsoft Power Automate Desktop app was earlier available only to Windows 10 Enterprise users under a paid plan. Now, Microsoft has announced that the automation tool is coming to all Windows 10 users for free. That’s amazing, right? So if you want to learn how to set up and use Microsoft Power Automate Desktop on Windows 10, follow this helpful guide.
Use Microsoft Power Automate Desktop on Windows 10 (2021)
Before we start with the process, bear in mind, the new Microsoft Power Automate Desktop is currently available to Windows 10 Insider builds only. Specifically, if you are on Windows 10 build 21337 (March 18) or above, the app should be pre-installed on your PC. Microsoft says that it will be available to all stable users in the coming weeks, and users would soon be able to install the app from the Microsoft Store. Now having said that, let’s jump in and automate some tasks.
1. To install Microsoft Power Automate Desktop on Windows 10, click here to go to the app’s Microsoft Store listing. If you’re unable to download the app from the Store, you can also get it from Microsoft’s official website. The EXE file for Microsoft Power Automate Desktop can is available to download via the link attached here.


2. Once you have installed the app, open it and sign in with your Microsoft account. Now, click on “New Flow” and give a ‘Flow name’ to your task.


3. There are around 370 pre-built actions available on the left pane. To give you some examples, you can run “Web automation” tasks such as opening Edge, going to a specific webpage, and more using Microsoft Power Automate Desktop.


4. Similarly, you have System actions like running any installed program, taking a screenshot, shutting down the computer, etc.


5. I will demo a simple task for this guide. I will automate the task to extract a PDF and copy its contents to a text file. To do this, search for “extract” in the Actions pane on the left and double-click on “Extract text from PDF” in Power Automate Desktop.


6. Here, click on the file icon and choose the PDF file that you want to extract. It will give you a variable named “ExtractedPDFText”. That is where the app will store the text extracted from the PDF. Finally, click on “Save” and move on to the next step.


7. Next, search for “write text” and drag the “Write text to file” action to the Main window on the right. Make sure to place it below the PDF extraction action. It means the write text operation will only run after PDF extraction is done.


8. Under the File path, click on the file icon and choose where you want to save the text extracted via Microsoft Power Automate Desktop. I am saving it on my Desktop in the “a.txt” file.


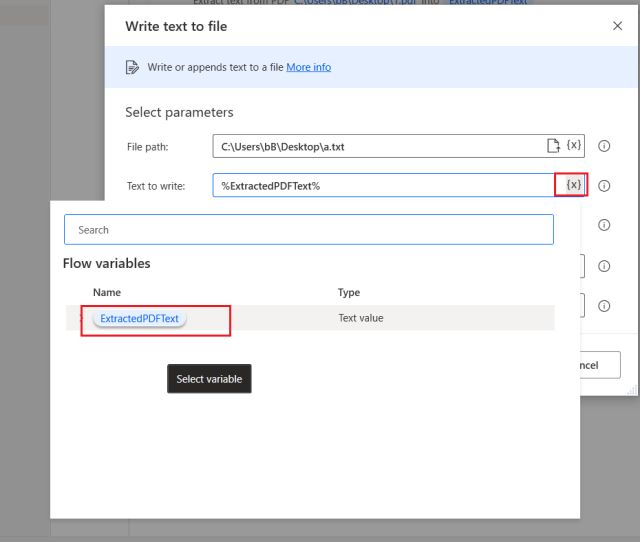
9. Next, under the “Text to Write” field, click on the “{X}” button and choose the “ExtractedPDFText” variable from the list. It’s the text value we get after PDF extraction. Now, click on “Save”.

10. If you have multiple PDF files to process, then you can choose “Append content” from the drop-down menu. Microsoft Power Automate Desktop will not override the earlier extracted text but instead, will add the newly extracted text after the existing content.


11. Now, your flow is ready. Click on the “Run” button and the flow will perform all the operations within a few seconds.


12. As you can see below, the extracted text from PDF is successfully copied to the text file.


13. If you want, you can choose to add a display message box that alerts you on the successful completion of the job. It makes the automation process look more fun.


14. Also, here is what the display message will look like.


Automate Any Operation on Windows 10 With Ease
So this was one example of how you can create a flow with Microsoft Power Automate Desktop and save time while doing routine tasks on your PC. While the tool targets Windows 10 enterprise users, it also offers several options to general users, and I believe people can take advantage of it.
So go ahead and try this helpful new automation tool on your Windows 10 PC. In case you want to learn how to schedule Batch files on Windows 10 or want to shut down your PC based on a specific schedule, then go through our dedicated tutorials. And if you have any questions, comment them down below, and we will try to help you out.

