
One of the many advantages of buying into the Apple ecosystem with a Mac, is the thriving App Store. No matter what you want to do on your Mac, chances are, you’ll find an app for it. However, there are certain applications that are only available for Windows, and while their alternatives do exist for the Mac, in certain situations, you might need (or want) to stick with the Windows’ programs that you have used before. So, if you have a Windows’ application that you need to run on macOS, read ahead to learn how you can get it running on your Mac.
Different ways to run Windows apps on Mac
1. Wineskin Winery
Wineskin is a tool used to make ports of Windows software for the macOS. What the application does, is that it creates a wrapper for the Windows’ application you want to run, so that you can execute it on the Mac. Wineskin is completely free, and will allow you to create wrappers for any application that you want to run on a Mac.
To get started with using Wineskin, you’ll have to download it first.
Once you have done that, you can simply follow the steps given below to get your Windows’ application running on your Mac:
Note: For illustration purposes, I’m using an application called HTMLasText, that converts HTML code into plain text files. The app is available for Windows, and if you want to follow along with this tutorial, you should download it.
- First, unzip the HTMLasText zip file that you downloaded, and then launch Wineskin Winery. When you launch Wineskin for the first time, the list of installed engines, and the “wrapper version” will be empty. So, we’ll have to install those first. I have already used Wineskin before, so the list is not empty in my case.


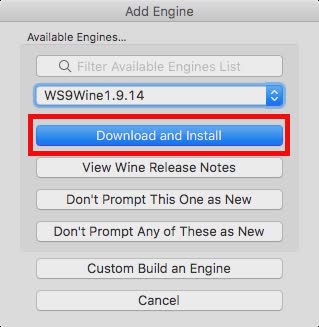
- Simply click on the plus icon, and then choose the latest engine that is available (In my case, this was WS9Wine1.9.14). Click on “Download and Install“.

- Click on “Create New Blank Wrapper“, enter a name for the wrapper. I’m using “HTMLWrapper” as the name. Then, click on “Ok”.


- Wineskin will start creating the blank wrapper. If you get prompted to install some additional packages, make sure you allow Wineskin to install them. After a while, Wineskin will tell you that the wrapper has been created.


- Click on “View Wrapper in Finder“.


- In the Finder window that opens up, right click on the wrapper you just made, and select “Show Package Contents“.


- Navigate to drive_c -> Program Files. Create a new folder by the name of the app you want to run (HTMLasText, in this case), and then copy the HTMLasText.exe file that you downloaded, and paste it inside this folder. Now, go back to the main wrapper window (the one where you selected “Show package contents” from), and double click on the wrapper. In the window that opens up, click on “Advanced”.


- This will open up another window. Click on “Browse”, and select the htmlastext.exe file that you copied into drive_c -> Program Files -> HTMLasText. Leave the rest of the options untouched.


- Click on “Test Run“, and after a while, the Windows’ application will start running on your Mac.


Note: In case the application you want to run has an installer, simply select the installer in the Browse menu, and, instead of clicking on “Test Run”, click on “Install Software”.
Well, that was all that you needed to do in order to get a Windows’ application working on your Mac. Do note that this method might not work for all applications, but it usually does. In my experience, trying to use this method to run heavy games usually does not work, but you might have better luck.
In case Wineskin doesn’t work out for you, you can try out the next method.
2. Codeweavers CrossOver
CrossOver, by Codeweavers is essentially built around the Wineskin Winery wrapper itself. However, unlike Wineskin, the CrossOver app is commercial, and is available for purchase (for $15.950), however the app also offers a 14 day trial, that you can download from the Codeweavers website.
CrossOver officially supports a large number of Windows’ applications, and if you have any trouble with using the officially supported apps, you can call tech support and they will definitely try and fix it for you. To get started with using CrossOver to run Windows’ applications on the Mac, simply follow the steps below:
- Once you have installed CrossOver, simply launch it, and click on “Install a Windows Application“.


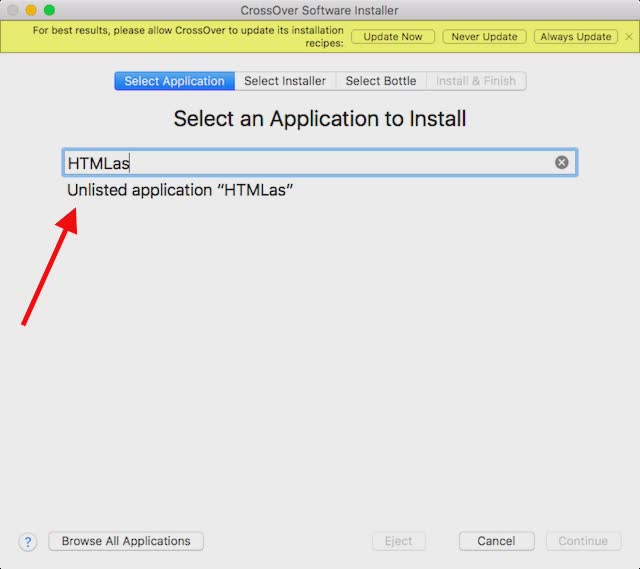
- In the window that opens up, start typing the name of the application you want to install. The drop down box will dynamically update to display the officially supported applications that match the name you have entered. If you can’t find the name of the application you want to run (as is the case with HTMLasText), simply select “Unlisted“.

- Click on Continue.


- You will be asked to select the installer file or folder. Click on “Choose Installer Folder“, and select the folder that contains the HTMLAsText executable, and click on “Install files from this directory“.


- Click Continue, and then click on Install.


- You’ll have to wait, while CrossOver installs the application, and then it will automatically launch the application (or the installer) for you.

3. Using a Virtual Machine
If neither of the methods mentioned above work for the app that you want to use, you can deploy a Virtual Machine, with Windows installed on it. This will effectively let you use a Windows PC inside the macOS environment itself, and you can install any Windows’ application in the virtual machine.
If you want to deploy a virtual machine on your Mac, you can read our detailed article about running Windows on a Mac.
4. Dual Boot Windows using Boot Camp Assistant
Chances are, that a Windows VM would have allowed you to run pretty much any Windows’ software that you might have wanted to. However, if the application you want to run requires the full horsepower of your Mac (a high-end game, for example), then allocating all those resources to a virtual machine might spiral into a recipe for disaster. If you want the full horsepower of your Mac hardware to be available to the Windows’ application that you want to run, then your only option is to use Boot Camp Assistant.
Boot Camp Assistant is a utility that Apple includes with the Mac, which allows users to dual boot their Mac with Windows. So, you will basically have both the operating systems installed on your Mac hard drive, or SSD, and you can choose the one you want to boot into, every time you power up your Mac.
SEE ALSO: How to Create Custom Keyboard Shortcuts on Mac
Use These Methods to Run Windows Programs on Mac
So, the next time you need to run a Windows’ only application on your Mac, you can follow any one of these methods to do so. Each of these methods have their own pros and cons, and you can choose the one that suits your needs best. As always, we would like to know your thoughts and opinions about the methods we have mentioned in this article, and if you know about any other method to run Windows programs on Mac, do let us know about it in the comments section below.

