


Facebook certainly does not have a good track record when it comes to protecting the privacy of its users. It has been victim to numerous privacy scandals, including the infamous Cambridge Analytica incident from 2018 and the 2021 Facebook data breach that compromised the data of over 533 million Facebook users. If Facebook’s latest security lapse has sent you into a panic, and you are looking to permanently delete your account, you’ve come to the right place. Here’s how you can delete your Facebook account on the web, Android, and iOS. We will also show you how to get rid of all your Facebook data, so buckle up and get ready to leave behind your Facebook days.
Steps to Delete Facebook Account (2022)
Steps to Undertake Before Account Deletion
Back up and Download Data
The first step before you delete your account is to create a backup of all your Facebook data and download it to your computer or mobile device. It will let you hold on to precious status updates, photos, videos, messages, friends list, and everything else you did on Facebook. So think of it as a memory bank for your social media life.
1. To download your Facebook data, you need to navigate to Settings -> Your Facebook Information and choose the ‘Download Your Information’ option.


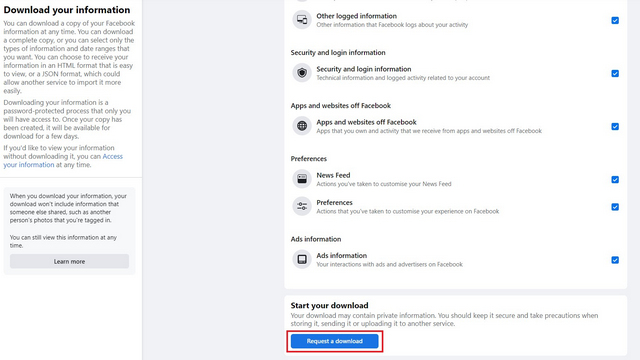
2. On the next page, you can pick the data you want to download, the format (HTML or JSON), and the image quality on this page. You can choose to include or exclude your activity across Facebook, personal information, friends and followers, logged information, security and login information, apps and websites off Facebook, preferences, and ads information. Choose all the relevant categories and click on the “Request a download” button to generate the backup.
Transfer a Copy of Your Information
In June 2020, Facebook introduced a new tool that lets users transfer a copy of their photos and videos to Google Photos. Since then, the company has added support for multiple services, namely Google Docs, Dropbox, Google Calendar, Photobucket, Datybook, WordPress Jetpack, Blogger, Backblaze B2, and Koofr. Here’s how you can use the feature to transfer a copy of your information to other services:
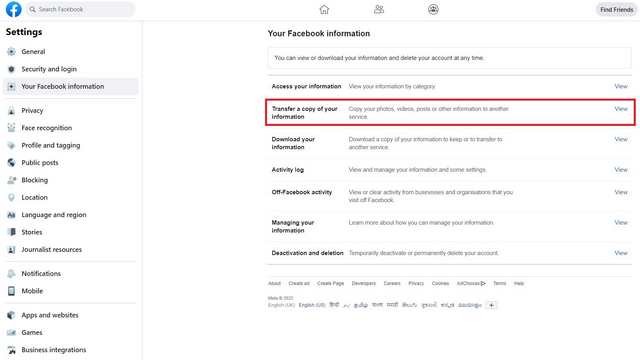
1. Open Facebook, navigate to Settings -> Your Facebook Information, and choose the “Transfer a copy of your information” option.
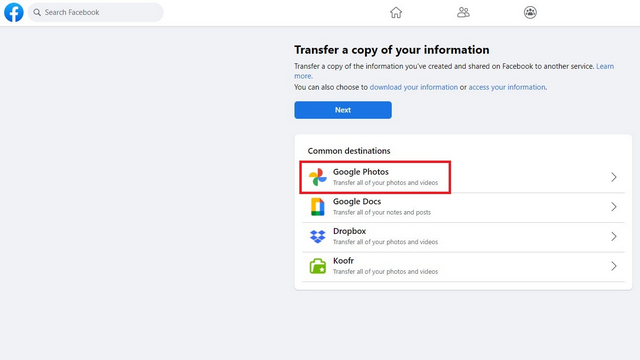
2. On this page, Facebook lists common destinations people choose for transferring their Facebook data. Pick from the list or click “Next” to manually choose the service.
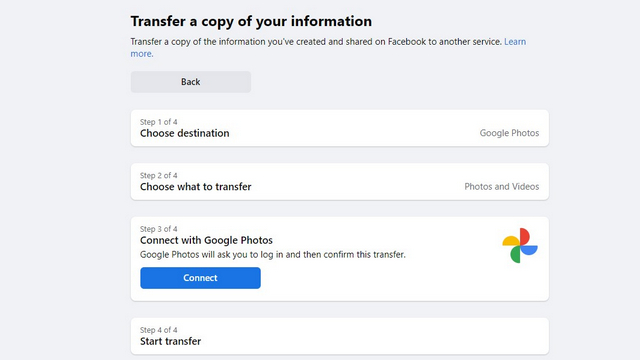
3. To start the transfer, you should connect the destination service to your Facebook account. We have a separate guide with instructions to transfer photos and videos from Facebook to Google Photos.
Disconnect Third-Party Apps
The next most important step is to disconnect third-party apps for which you used Facebook to sign up. It plays right into the Facebook–Cambridge Analytica data scandal from 2018. Reports suggest that third-party apps may also be compromised, so it’s safe to disconnect them from Facebook and update their login credentials.
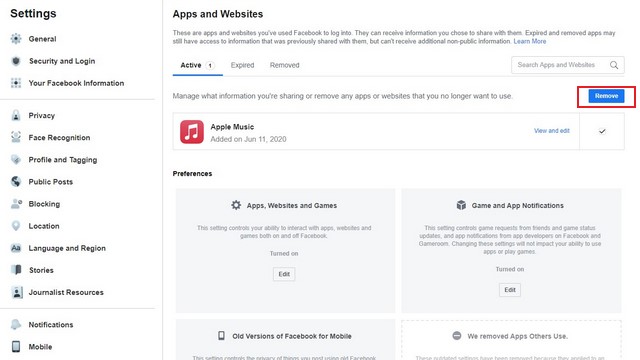
1. To disconnect third-party apps, you need to navigate to ‘Settings -> Apps & websites’ to see the list of apps and websites where you log in with Facebook. Choose the apps you want to disconnect and click the ‘Remove’ button.
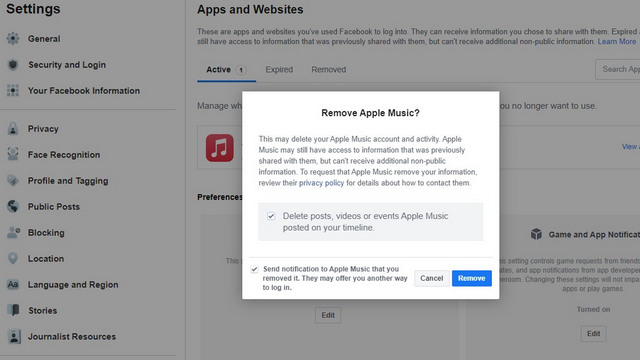
2. When the confirmation prompt appears, click on ‘Remove’ again. At this point, you should know that your data in those apps might get reset, so you might want to sign up with an email address for those apps and link your data. You can also choose to send notifications to those apps for setting up an alternate login method.
Delete Facebook Account using the Website
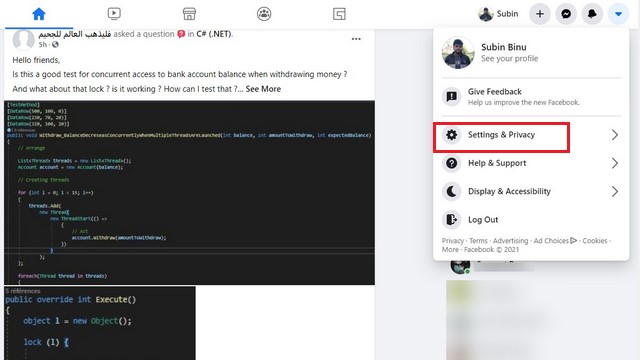
1. Navigate to Facebook, click the drop-down arrow at the top right corner and select ‘Settings & Privacy -> Settings’ from the list of available options.
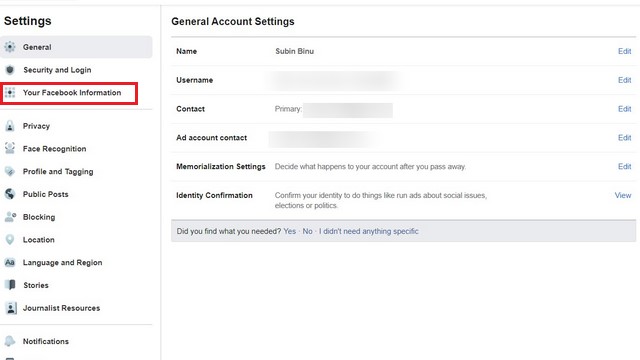
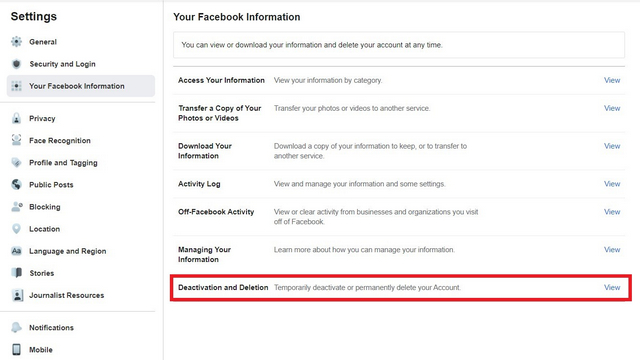
2. Under Settings, select ‘Your Facebook Information’ from the left sidebar menu.
3. You will now see the ‘Deactivation and Deletion’ option. Click on the ‘View’ button next to it to proceed further.
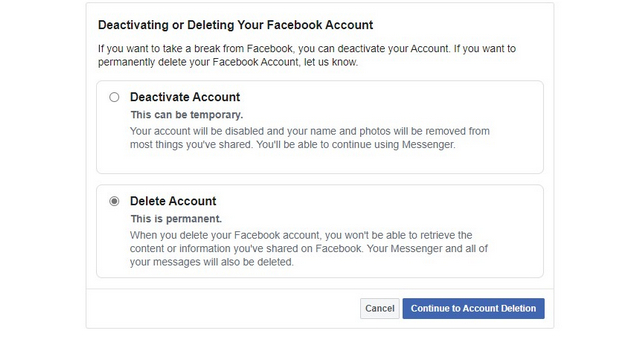
4. You can now choose to temporarily deactivate or permanently delete your Facebook account. Choose ‘Delete Account‘ and click on ‘Continue to Account Deletion’.
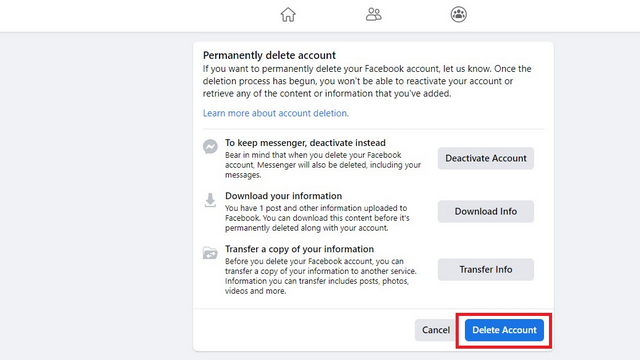
5. Before deleting your account, Facebook will remind you that you can download your information, transfer a copy of your information, and will lose access to Messenger. Click on ‘Delete Account’ to confirm.
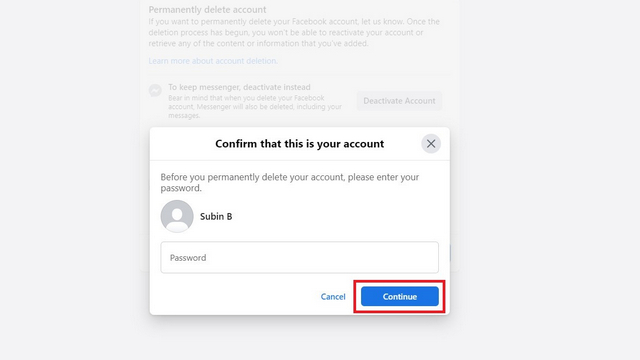
6. Facebook will ask for your password and remind you that you are going to delete your account permanently. You won’t be able to recover it after the deletion process has begun. Enter the password and click on ‘Continue’ to complete the process. Congrats, you have deleted your Facebook account!
7. Finally, we would recommend you clear the browser cache and history to automatically log out of all web apps linked to your Facebook account.
Delete Facebook Account on Android
The process to delete your Facebook account on mobile in 2022 is the same as that on the web, but you need to navigate through a couple of new menus. Follow the steps below to delete your account through the Facebook app on Android:
Note: We tested the account deletion process in the Facebook app, version 356.0.0.28.112, on the Pixel 4a running Android 13 developer preview 1.
1. In the Facebook app, switch to the hamburger menu at the right and scroll down until you find ‘Settings’ under the ‘Settings & Privacy’ section.

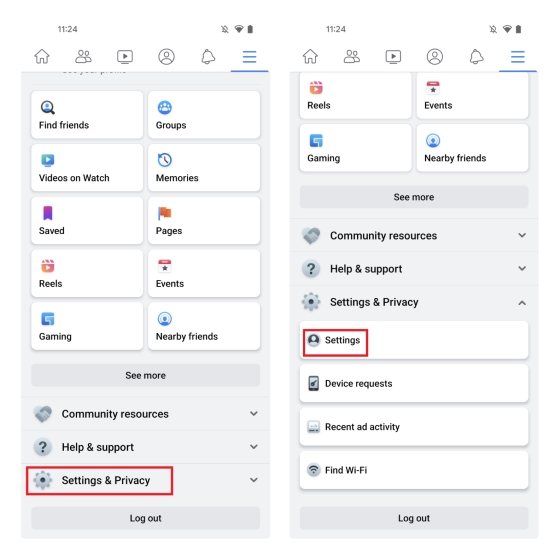
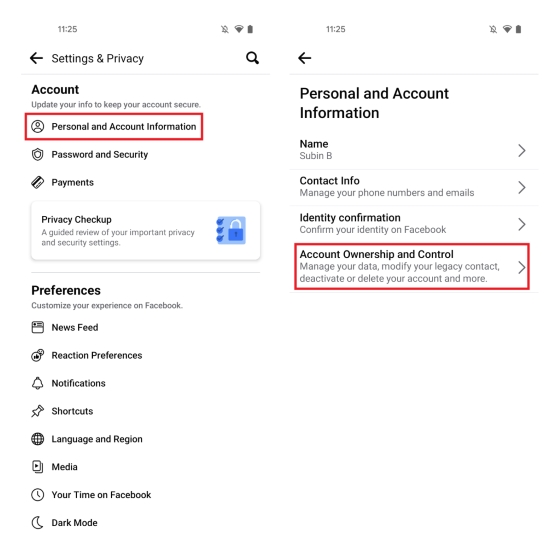
2. Tap on ‘Personal and Account Information’ under account settings and choose ‘Account Ownership and Control’ to manage your Facebook account.
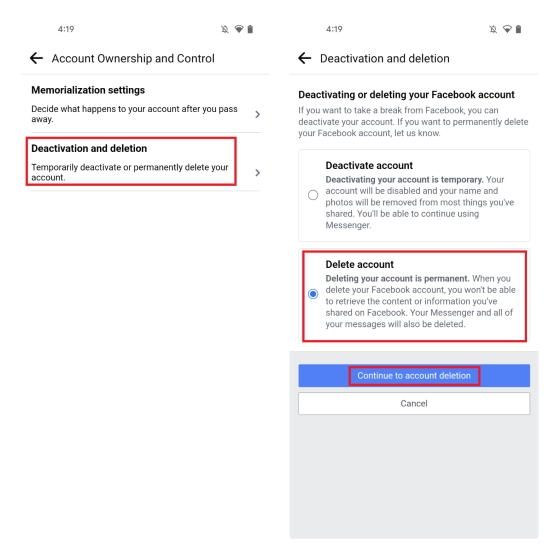
3. Here, tap on ‘Deactivation and deletion’ and choose ‘Delete account’. After choosing the toggle, tap on ‘Continue to account deletion’.
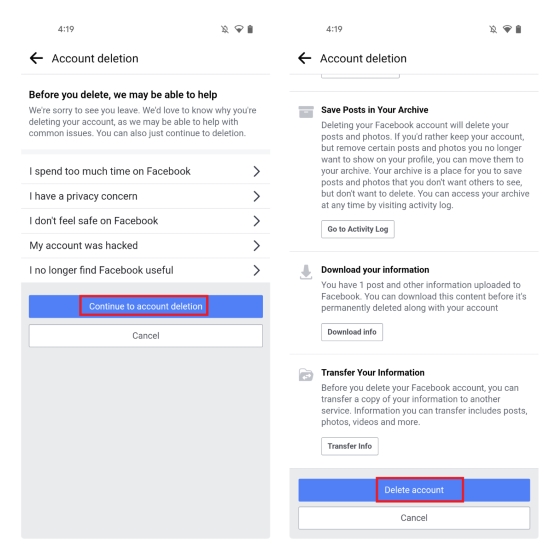
4. You can choose to pick the reason or directly tap ‘Continue to account deletion’ to proceed further. From the next page, tap the ‘Delete account’ button to quit the Meta-owned social media platform for good.
Delete Facebook Account on iPhone
Apart from a few visual differences in button placements, the account deletion process is the same as Facebook for Android. However, you can follow the steps below to avoid confusion and delete your Facebook account on iPhone:
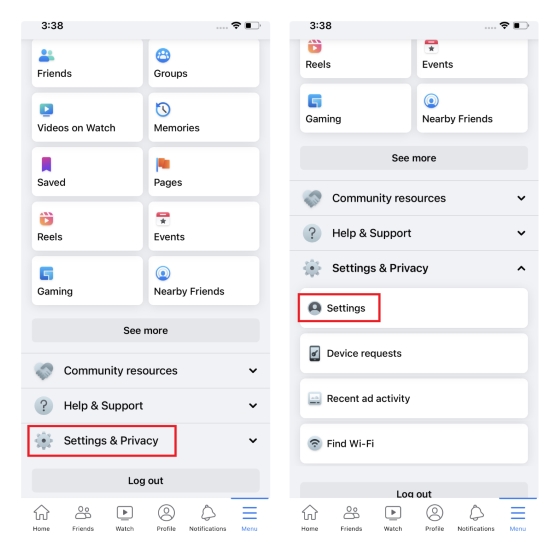
1. Open the Facebook app and press the Menu tab from the app’s bottom navigation bar. Up next, tap on ‘Settings & Privacy’ and choose ‘Settings’.
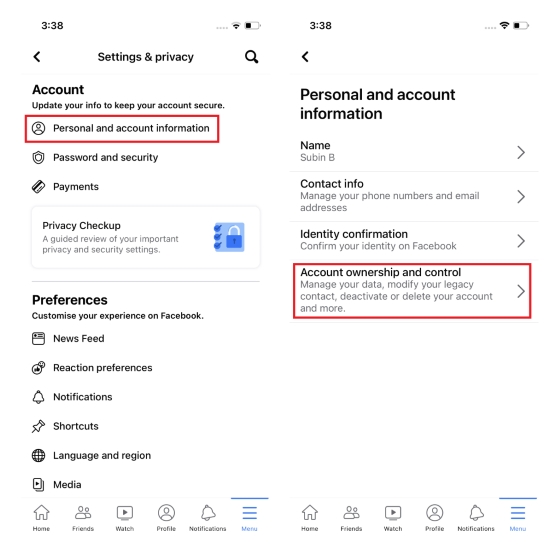
2. From the Settings & privacy page, press ‘Personal and account information’ and choose ‘Account ownership and control’ from the next page.
3. Now, tap on the ‘Deactivation and Deletion’ option.

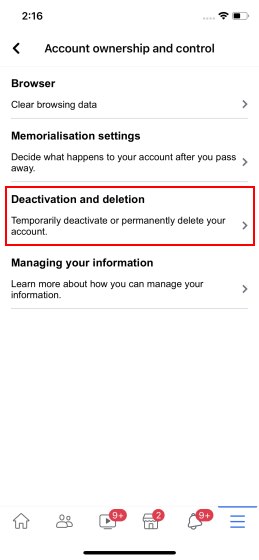
4. Select the ‘Delete Account’ option and tap on ‘Continue to account deletion’ to proceed further. Now, pick a reason to delete your Facebook account or tap on ‘Continue to account deletion’ again to free yourself from Facebook. If you did not back up your data yet, the app prompts you to do so before moving forward.


And voila, you have now learned how to delete your Facebook account via the website, and the company’s Android and iOS apps.
Frequently Asked Questions
Q: When you delete your Facebook account, is it really deleted?
Facebook says it will delete all of your information when you delete your account, and the process could take up to 90 days. However, the company acknowledges that copies of your information may remain after the 90 days in backup storage to recover in case of a disaster, software error, or other data loss incidents. The company may also keep your information for legal issues, terms violations, or harm prevention efforts.
Q: Why does it take 30 days to delete Facebook?
Facebook offers a 30-day recovery window to get your account back in case you change your mind and want your Facebook account back. You can’t reactivate your Facebook account after 30 days.
Q: How can I delete my Facebook account without password?
You can’t delete your Facebook account without a password. If you forgot your password, you can reset it and use the new password to delete your account.
Delete Facebook Account in Easy Steps
The above steps will initiate the account deletion process, but your profile will not be removed from the platform instantly. You can cancel your request to delete the Facebook account within 30 days. Further, Facebook claims that it takes up to 90 days for all the information in your profile to be deleted from the company’s servers. It, however, will not include data such as messages you’ve sent to someone on Facebook Messenger and other residual data for your interactions with others. So here’s to a happier life without Facebook and its privacy nightmares! Also, don’t worry, you will still be able to search Facebook without an account.


My Facebook I’d is disabled
Thank you for this information ???
I be meaning to delete my account from long time but didn’t knew
You guys are great ?