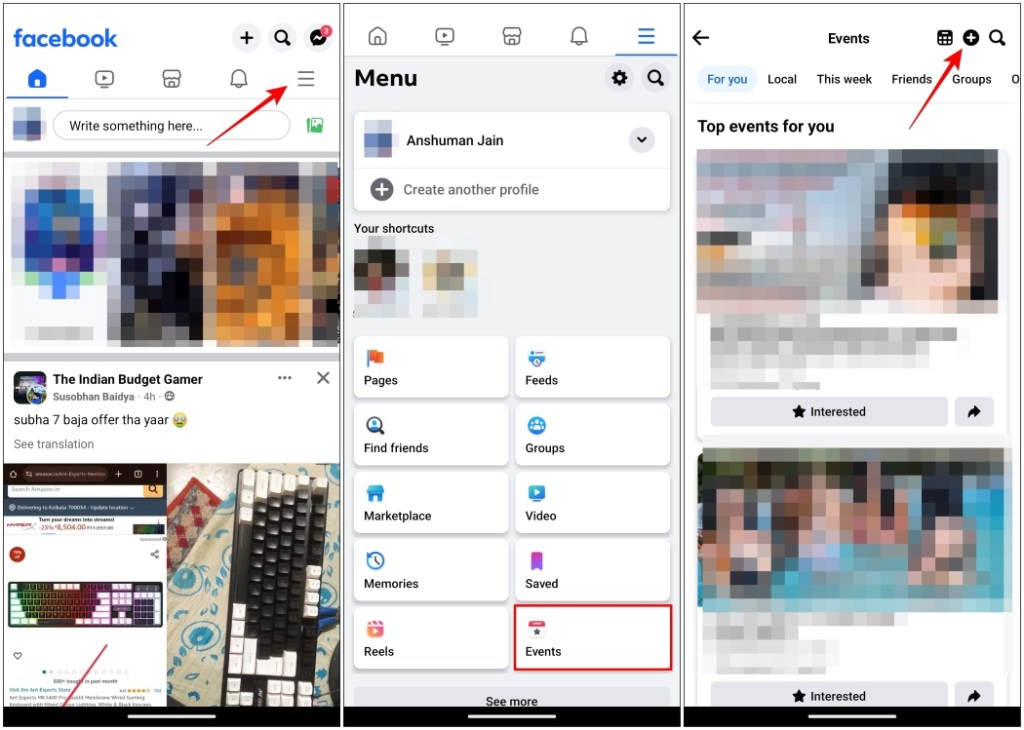
- You can create events on Facebook by navigating to the hamburger menu > Events > Add icon and adding the necessary details for your event.
- You can choose if your event is to be held in person, or virtually and select from different privacy options.
- In case there is a change of plans, you can cancel an event from Your Events and add a post stating the reasons for cancellation.
Whether you are organizing a birthday, a get-together, or just hosting a party for the weekend, Facebook events can be a great way to send out invites and let others know about the details. You can send invitations to selected friends or anyone interested. So if you also want your next movie night to be a success, then here is a quick guide to help you create an Event on Facebook.
Types of Events on Facebook
Events on Facebook contain details of the program you are organizing. Users can show their interest, get all the updates related to it, and confirm whether they are attending or not. There are four different types of privacy settings to choose from in the event creation process. Let’s discuss them briefly before moving on to the steps to create one.
Private: A private event on Facebook is only visible to people who are invited by the organizer. Only invited users who RSVP’ed to the event can view the attendee list and access other details. As a host, you can choose whether you want the guests to invite their friends or not.
Public: Public events are visible to everyone even if they are not friends with the organizer. Anyone can see the details of these events, RSVP to them, and check who is interested and coming to the said event.
Friends: The Friends privacy option will make the event visible to everyone in your friends list. It is similar to the Public option but events will limited to your Facebook friends.
Group: As the name suggests, it will give the event information to the members of a group that you are a part of.
Create an Event on Facebook
- To create an event, open the Facebook app.
- Tap on the hamburger menu at the top or bottom right corner depending on your OS.
- Here, tap on Events.
- Now, tap on the add icon at the top right corner.

- On the next page, enter the event name, date, and time.
- Tap on the subsequent text field and choose if the event is “in person” or “virtual“.
If the event is in person – enter the location of the venue and if it is virtual – attach a link to the event site.
- In the next box, choose any one of the four privacy options that we explained above. Tap on Done once selected.
- Lastly, write a description for the event you’re about to create. You can also check out additional options like adding co-hosts or turning on chat with guests before creating your event.
- Now, tap on Create Event at the bottom to complete the process.
Invite Guests to an Event on Facebook
Now that you have created an event, it is time we send invitations to the guests. Here is how you can do it.
- Open Facebook and tap on the menu icon at the top or the bottom right corner.
- Go to Events and under Your Events, tap on the event that you created.
- Here, tap on Manage and choose Invite.
- It will bring up a list of your Facebook friends. Tap the Invite button next to the name of the person you want to invite to your event.
Doing so will send them an invite notification and they can open it to view the details of the program.
Cancel an Event on Facebook
In case you have a sudden change of plans and the event has been cancelled then follow these steps to delete the event page.
- Open Facebook and tap on the menu icon at the top or the bottom right corner.
- Visit the Events menu.
- Under Your Events, select the event that you want to cancel.
- Then tap on Manage on the event page.
- From the overflow menu, select Edit.
- Tap on the trash icon at the bottom right corner.
- Inside the Cancel event menu, you can add a post to inform the attendees why the event has been canceled.
- Next, tap on Cancel Event.
This will cancel the event and a post will be sent out to the invited users informing them why it was cancelled.
That’s how you can create an event on Facebook. Events is quite a useful feature and you can use it to find ongoing events and parties. We hope you found this guide to be helpful.
Besides that, if you are using Facebook on an iPhone and getting a chirping sound while scrolling through your feed then read our article to disable the sound. Do share with us what you thought about this guide in the comments below.