
An Administrator account in Windows offers you plenty of benefits that Standard user accounts do not. That includes the ability to change security settings, install software for all users, access all the files on the device, make changes to other user accounts, and lots more. While new user accounts created in Windows 11 are Standard by default, you can change them to Administrator at any time.
Change Administrator in Windows 11 (2021)
We will show you how to change the administrator on your Windows 11 computer in this article. With our guide, you can assign admin privileges to any user on a Windows 11 PC so they can also carry out the same changes that you can. We will also tell you about all important things to remember before granting administrative privileges to a standard user account. So let’s get started.
Changing Account Type in Windows 11: Things to Remember
- As mentioned above, when you create a new account in Windows 11, it defaults to the “Standard” type, which comes with limited privileges. A Standard account user can run existing applications (provided they were installed for all users), perform basic tasks, and modify system settings only related to their account.
- On the other hand, admins have far-reaching powers that let them make virtually any system-wide change affecting all user accounts. An account with administrative privileges can carry out many changes, ranging from software installation to hardware addition, from accessing protected system files to changing security settings, etc.
- Another important thing to note here is that only users with administrative rights on Windows 11 can change the account type of other users. So whether you want to elevate a Standard user to Admin or demote an Administrator account to a Standard user, you need to log in from an Administrator account to be able to do that.
- Finally, the original user account in Windows 11 always has administrative rights by default. To revoke those rights, you first need to create another admin account on your computer. Then, you can log in from the new admin account to change the original user account from Administrator to Standard.
Now that you know the basics about the two types of user accounts on Windows 11, let’s check out how you can change an account from Standard to Administrator.
Note: The following methods work for both local user accounts as well as Microsoft accounts.
Method 1: Change Account Type via Settings
The easiest way to grant or revoke administrator permission for an account is through Windows 11 Settings. Here’s how:
- Open your PC Settings using the Windows 11 keyboard shortcut Windows key + I. On the Settings panel, click on “Accounts” on the left sidebar and select “Family & other users” on the right pane.


- On the next page, click on the target account you want to change from Standard to Administrator. Now, click on “Change account type” next to “Account options”.


- You will now see a pop-up window where you can change the account type for that user. On the pop-up, click on the drop-down menu and select “Administrator“. Finally, click the OK button to implement the change.


You have successfully changed a Standard demo user account to Administrator on your Windows 11 PC.
Method 2: Change Administrator Account via Control Panel
You can also change a Standard user to Administrator from the Control Panel on your Windows 11 computer. This is how you do it:
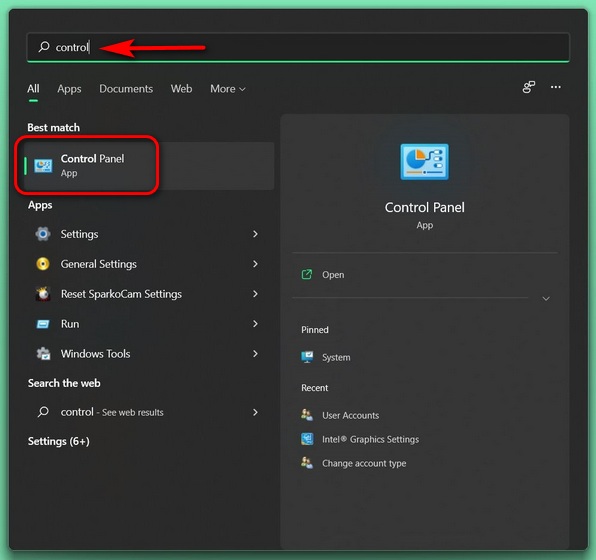
- Open Control Panel on your Windows 11 PC. To do that, search for “control” (without quotes) in the Windows search bar and select “Control Panel” from the results.

- On the Control Panel, click on “User Accounts” irrespective of whether you are using the “Icons” view (small or large) or the “Category” view.


Note: Those using the “Category” view on the Control Panel should now click on “User Accounts” one more time on the next page and move to the next step. But, if you are using the “Icons” view (small or large), move directly to the next step.
- Click on “Manage another account“.


- On the next page, select the target account.

- Now, click on “Change the account type“.

- On the next page, change the account type from Standard to Administrator. Finally, click on the “Change Account Type” button at the bottom.

- You will now automatically return to the previous screen, where you will be able to verify that the user account now has administrator privileges.

Method 3: Change Account Type Using User Accounts Panel
The third method to change administrator in Windows 11 is through the User Accounts Panel. Follow the guide below to learn how:
- Open the “Run” dialog box by using the keyboard shortcut Windows key + R. Now, enter “netplwiz” (without quotes) in the textbox and hit Enter.


- In the User Accounts window, select the account you want to grant Administrator rights to, and click on “Properties“. This will open the Properties window for that account.


Note: You can also double-click on the target user account to open the Properties window.
- On the Properties window, navigate to the “Group Membership” tab. Here, select “Administrator” and click on “Apply” at the bottom to save changes.


Your chosen user account will now have administrative rights on your PC. Moving away from GUI options, let’s check out how you can use the Command prompt and Windows Powershell to change Administrator in Windows 11.
Method 4: Change Administrator Account Using Command Prompt
The Command Prompt is yet another way you can change administrator on a Windows 11 computer. Here’s how you go about it:
- First off, open a Command Prompt window in Admin mode. To do that, search for “cmd” (without quotes) in the Windows search bar and select “Run as Administrator“.

- Now copy+paste the following command into the Command Prompt window:
net localgroup Administrators "Demo User" /addand hit Enter. Replace “Demo User” with the actual account name that you want to grant admin privilege to. You will get a message saying “The command completed successfully”.


- To remove Admin rights from an account, execute the following command:
net localgroup Administrators "Demo User" /delete. Again, replace Demo User with the actual account name of the target user.

Method 5: Change Account Type Using PowerShell
Another way to change a Standard user account to Administrator in Windows 11 is by using Windows PowerShell. Here’s how you do it:
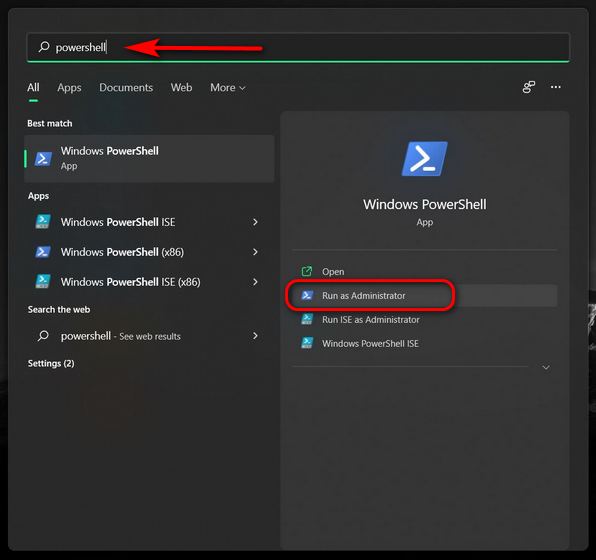
- Open Windows PowerShell in Admin mode. To do that, search for “powershell” in the Windows Search bar and select “Run as administrator“.
- Now copy + paste the following command and press Enter:
Add-LocalGroupMember -Group “Administrators” -Member “Demo User”.


Note: Unlike the Command Prompt, you won’t get any feedback about the successful execution of the command. As long as you don’t get an error message, it means your attempt to change user account privileges has been successful.
- You can revert the change with the following command:
Remove-LocalGroupMember -Group “Administrators” -Member “Demo User”

Note: In both cases, replace the Demo User with the name of the actual user account that you are looking to promote to Administrator. Retain the double quotes in each case.
Change User Account Type From Standard to Admin in Windows 11
A Standard account is all you need when handing over your PC to a child or friend. That ensures they won’t have the ability to snoop through your files or change settings that could wreak havoc on your device. However, if you are convinced that you need to elevate someone’s user account to administrator, you now know how to do that. On the subject of user accounts in Windows 11, you can also check out some of our other related tutorials, including how to remove your Microsoft account from your Windows 11 PC and how to change your computer’s name in Windows 11.

