The macOS System Preference is where all the OS level settings live. From changing the wallpaper to setting up parental controls to managing your input and output audio device, all the settings are hosted here. While most settings are set and forget type, there are several preferences that we might need to access regularly. For such cases, opening the right preference pane with a click will surely improve your workflow. In this article, we are going to show you how to access important system preference panes directly from macOS Dock.
Add Important System Preference Panes to Mac Dock
Each setting page inside the System Preference on macOS is called a preference pane. These preference panes are controlled by files hidden inside the Library folder. We will make use of these files to launch the preferences panel. Here are the steps:
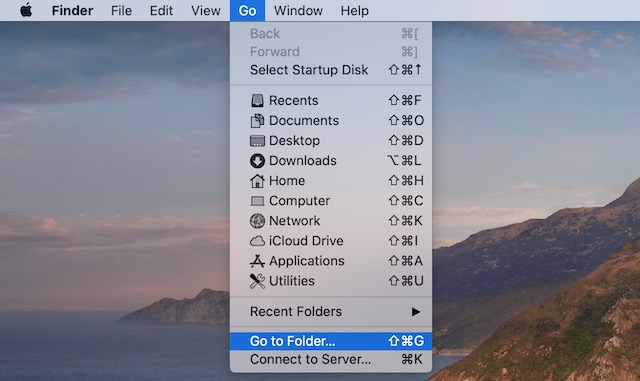
1. Activate Finder and then open the “Go to Folder” Menu (CMD+Shift+G).

2. In the text field, paste the following code and click on “Go”.
/System/Library/PreferencePanes
3. This will open the Finder window with the preference panes folder in the Library. You will see the list of all preferences here.
4. Drag and drop the preference that you want to access quickly between the Dock divider line and Trash. For example, let’s assume I regularly change my Desktop wallpaper. I will drag the “DesktopScreenEffectsPref.PrefPane”.
5. Once you drag a preference, it will exactly like its icon in the System Preferences panel. Now, a single click on the Dock icon will launch the corresponding system preference.
6. If you are confused about what preference files open what system preference setting (although the name makes them more than self-explanatory), double click on the file to open it and confirm that it’s the right preference file.
Access Important Preference Panes Directly from macOS Dock
As you can see, it’s an easy process. It only requires a few steps to configure. If you access a setting inside system preferences regularly, this simple shortcut will help you save a lot of time. If you had any problems following the tutorial, ask your questions below, and we will help you out.