
Android 14 has now rolled out in the form of a developer preview to Pixel users worldwide. While the release comes with only a few user-facing changes, we understand if you still want to install the latest Android version. You will be pleased to know you won’t need to jump through hoops to install Android 14. To make things even easier, we have compiled a step-by-step guide on how to install the Android 14 developer preview on your Pixel devices. So without further ado, let’s dive in.
While the process to install the latest Android 14 developer preview is easy, it does have certain requirements you must meet. To browse through all of them and more, use the table below.
Android 14 Compatible Pixel Devices
The first Android 14 developer preview is only available for Google Pixel devices right now. As such, you will need to make sure you have a supported phone to test the new update. Currently, Android 14 is only available for the following devices:
- Pixel 7 and 7 Pro
- Pixel 6 and 6 Pro
- Pixel 6a
- Pixel 5 and 5a
- Pixel 4a (5G)
As you can notice, the standard Pixel 4a isn’t eligible and won’t receive the Android 14 update. Moreover, the Pixel 4 series has reached its end-of-life stage and won’t receive an update this year.
Pre-Requisites to Install Android 14 Developer Preview
Besides having a compatible device, there are other specific requirements you must fulfill before you begin the process. Make sure to check these off your list before beginning.
1. USB Drivers
The process to flash the latest Android build is easy. However, it does require a connection to your PC. To ensure a steady connection, you must have the proper USB drivers to install the build.
To make things easier for all of us, Google has already listed all the latest USB drivers. You can learn how to install them without problems. For those who cannot find their device drivers, go ahead and get the Google USB driver and install it. If you’re a macOS user, however, you can skip this step.
2. USB Debugging
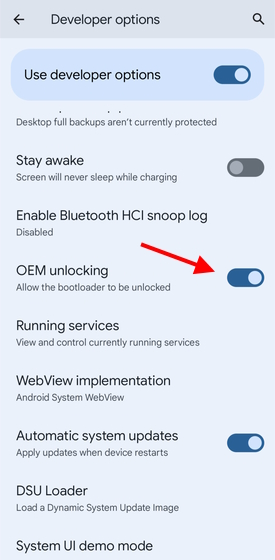
The connection from your device to the laptop requires more than just the USB drivers, though. In order to make sure Android 14 installs on your Pixel device without fail, you will need to enable USB debugging and unlock its bootloader. To do that, check out our guide on how to install ADB and follow the debugging steps under “Setting up your Android device.” You will find the option to unlock your bootloader right next to the USB Debugging toggle.

3. Google Chrome
Since we are not going the complicated ADB way, we will use Google’s Android Flash Tool to perform the Android 14 installation. While this is the easiest method, it also works best when paired with the company’s official Google Chrome browser (Free). Download and install the browser to avoid any complications with pop-ups and errors.
4. A Stable Internet Connection
You might have noticed I did not mention that we need to download the latest Android 14 build. This is because the Google Android flash tool will do the downloading and installation part for us. However, the build itself is upwards of 2.5GB and requires a steady Internet connection to download. Make sure you’re on a reliable connection before we begin.
How to Install Android 14 Developer Preview
Now that we are fully prepared, let’s learn how to install the latest Android 14 developer preview on our Pixel device. Make sure you have already connected the phone to your laptop using a USB-C cable. Then, follow the steps below to proceed:
1. Head over to the Google Android Flashing Tool (visit) to begin the process.
2. Click the “Allow ADB Access” prompt that comes up as soon as you open the website.


3. From the pop-up menu, click the downward arrow to select your device.


4. If this is your first time connecting your Pixel phone to the laptop, you will need to approve the connection from your mobile. Simply tap “Allow,” and for good measure, check the “Always Allow” option for next time.


5. Once you approve the connection, your compatible Pixel device will immediately appear in the menu. Click on “Add Device,” and you will be able to select it.


6. A browser pop-up will now appear asking you to select the device on which you wish to install Android 14. Select your Pixel device and click the “Connect” button.


Note: You might be asked by the browser to re-select your device at any point in the process. Follow the above step to do so. However, if you don’t see your phone again, disconnect it from the laptop and connect it again to make it re-appear. As mentioned above, make sure you have the proper USB drivers.
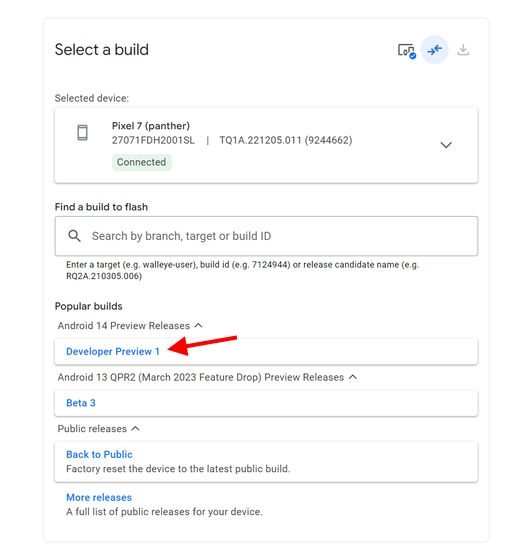
7. You will now see the list of builds available for your Pixel phone. We will choose Developer Preview 1 under Android 14. Simply click to select it.

8. The Android 14 build is now ready to be installed on your device. Without changing anything, click on the “Install Build” button to begin.


9. Before the final process begins, you will be met with a warning to let you know what you are installing. Read through the pop-up that appears and click “Confirm” to proceed.


10. Accept the license terms that appear by clicking the “I Accept” button.


11. The installation process will now begin in earnest without you needing to do anything. It is important that you do not unplug the device nor you touch its screen for now.
12. Now comes the time to unlock the bootloader so the Android Flash Tool can install the build. Click the “Start” button.


13. The process to download Android 14 will now begin. As you can see, the flash tool does all that automatically.


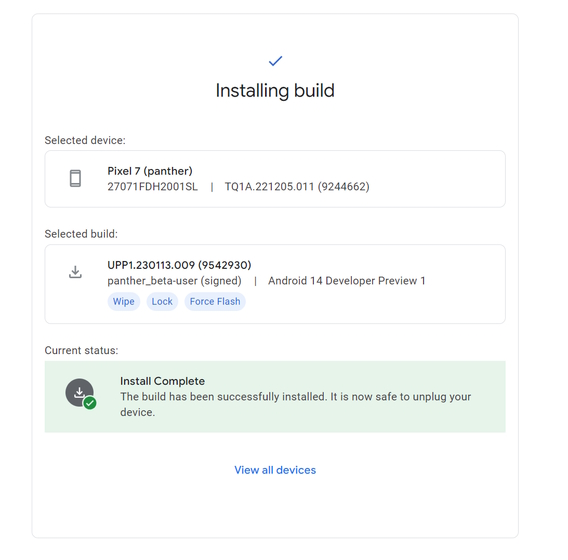
14. Once downloaded, Android 14 DP1 will now flash the build onto your device. You might see your Pixel device going through different screens and options. As mentioned before, do not touch anything for now.
15. The final option will ask you to lock the bootloader to finalize the flashing process. Click the “Done” button to do so.


16. And that’s it! Android 14 has been installed on your device, and you will see the same on your screen! You can now unplug the phone from your laptop and begin setting it up.

How to Flash Android 14 DP Builds Manually
If you are encountering errors in the above process or want to stick to the ADB method, you can do so. However, for users new to all this, we strictly advise against that and recommend you stick to the process above. For those who want to proceed, keep reading.
While we won’t be detailing the complete process here, we will give you a headstart on it. Start by downloading and extracting the Google SDK Platform Tools onto your computer. You will need these to interface with the mobile device. Speaking of your phone, make sure you have the proper USB drivers as we have detailed above. Finally, you will need the Android 14 preview build to flash and install the update on your phone. You will need to download this manually here and you can do so by heading on over to the official Android 14 download page.
As mentioned above, be wary of how you go about this process as a misstep might mean you bricking your device. If the Android Flash Tool refuses to work or you know what you’re doing, proceed with a manual install. You have been warned.
We hope the above guide makes it easy for you to install the latest Android 14 update on your device. While the latest build doesn’t really have a lot of user-facing changes, it’s still fun to use, and new features like cloned apps and more have already been spotted. If you do run into any issues, make sure to drop your questions in the comments below.

