


Whether you are new to the PC Master Race, or just want to extract more gaming performance from your NVIDIA GPU, we will show you some of the best NVIDIA Control Panel settings to play around with, so you can get better FPS in your games. You might not necessarily see huge performance gains from these tweaks, especially if you have a modern GPU. Still, these changes in NVIDIA Control Panel settings will configure your system to the most optimum state, making your games look the best and run well on the most optimized settings.
With that said, let’s look at the NVIDIA Control Panel settings you should change right away. These settings give the same results, whether you have a laptop or a desktop.
Before we begin, make sure to update your GPU drivers using our dedicated guide. With the latest GPU drivers, you will be receiving major updates that will improve the gaming performance for latest titles, as well as include new optimizations and hotfixes.
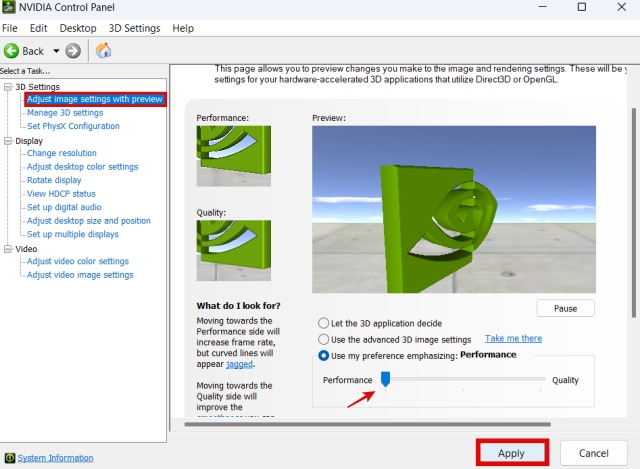
1. Adjust Image Settings with Preview
Adjusting image settings with preview will change how the GPU will render 3D images and objects in games you play on your PC. Setting it to Performance can help with FPS, especially on older PCs. Here’s how you do that:
- Right-click on your desktop, and then click on NVIDIA Control Panel. You might have to click on ‘Show more options‘ if you are using Windows 11.
- In the Nvidia Control Panel, click on Adjust image settings with preview under 3D settings.
- In the right pane, select the “Use my Preference emphasizing“ option and move the slider to “Performance”. If you have a modern GPU, you should select ‘Quality‘ or ‘Balanced‘ instead.
- Finally, click the Apply button to save the changes.
2. Set Preferred Graphics Processor
You should note that selecting the NVIDIA GPU under Global Settings, all the games or apps on your PC will use the dedicated GPU, which consumes more power.
- Go to the Manage 3D settings tab.
- Then, click on the “Under Preferred Graphics Processor” drop down menu.
- Here, select high performance NVIDIA processor as your preferred GPU.
- Once done, click on Apply.
Note: If you have a gaming laptop, go to program settings instead and set the dedicated GPU for specific games.

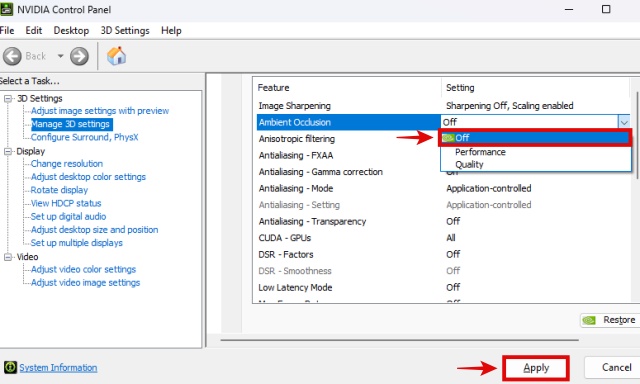
3. Ambient Occlusion
- In the Global or Program settings (depending on whether you want to change the setting for all games or a specific one), scroll down till you find Ambient Occlusion.
- Click on the drop-down menu, and set to ‘Performance‘, or Off if you have a low-end PC. For a modern PC, you can set it to ‘Quality’ instead.
- Click on ‘Apply‘ when done.
The following settings tweaks (up to the 9th point) will be in the same section, and you can find them by simply scrolling down. So, make sure to set them either for Program Settings (for specific games and applications), or Global Settings to apply the settings widely to everything that runs on your GPU.
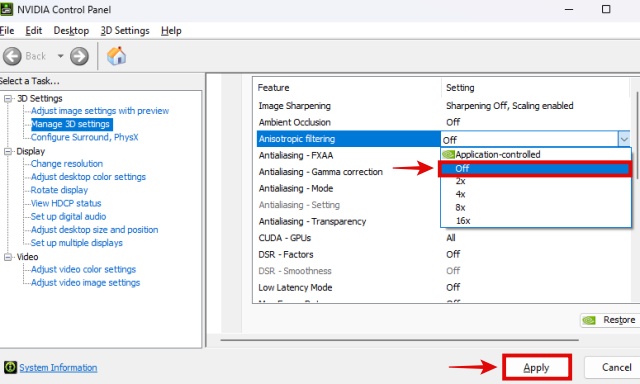
4. Anisotropic Filtering
This settings provides a major visual benefit, as it makes objects in a game look sharper from a distance by improving the appearance of textures viewed at steep angles. Still, disabling it can improve FPS slightly, but it shouldn’t be disabled for modern graphics cards.
- Find the ‘Anisotropic Filtering‘ setting.
- Click on the drop-down menu, and choose the ‘Off’ option.
- It is best to set it to ‘Application-controlled‘ or the 16x setting if you have a modern GPU.
- Click on ‘OK‘ and then ‘Apply‘ to save the changes.
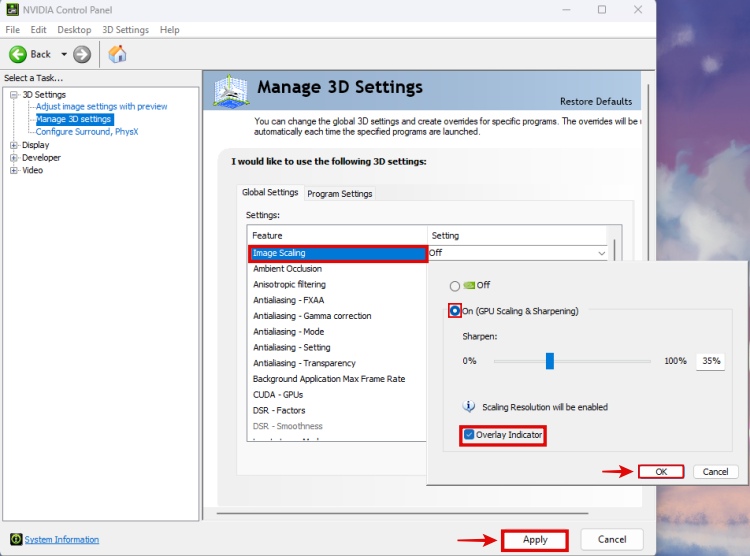
5. Image Scaling
Image scaling, also known as NIS or NVIDIA Image Scaling, can improve the image quality of your games. You can set a custom sharpening setting which works for you in the NVIDIA Control Panel.
- To enable it, find the ‘Image Scaling‘ setting.
- Turn it on, and then use the Sharpen slider to set it at your preference. A mild sharpening effect at around 15-30% works best in my opinion.
- Also, tick the Overlay Indicator check box, as it will reflect if NIS is on or off.
- Then, click on OK to apply changes.
5. Antialiasing Mode
Antialiasing (AA) is a technique that smooths out the edges seen in the images while playing a game. In most cases, letting the game do its own AA is best, but let’s look at how to disable it for better FPS on lower-end PCs.
- Locate Antialiasing – Mode in the settings.
- Set it to “Off“ for low-end PCs, or use the Application-controlled option for a modern high-end PCs.
- Once done, click on Apply.

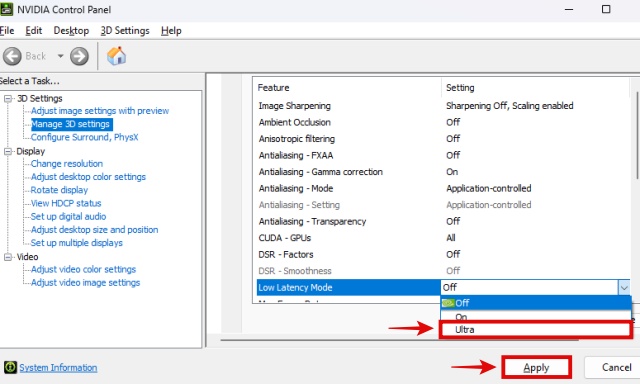
6. Low Latency Mode
Enabling ‘Low Latency Mode’ nets you faster input response time in games. By the way, if your game supports NVIDIA Reflex, this will be overridden.
- In the NVIDIA Control Panel settings, find Low Latency Mode.
- Click on the drop-down menu and select Ultra, or On.
- When done, click on Apply to save the changes.
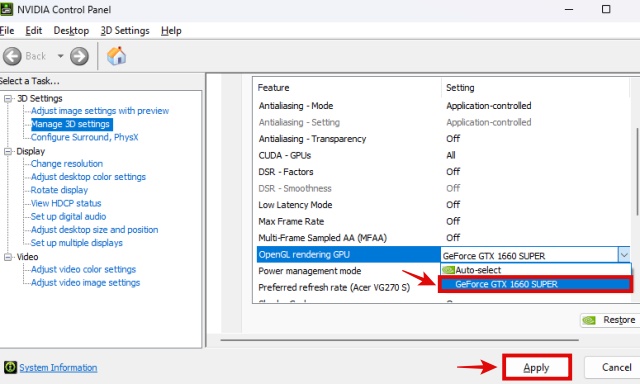
7. Open GL Rendering GPU
Usually, Open GL Rendering GPU is set to the auto-detect setting. Still, you can select the GPU manually with this. If you have multiple GPUs as a workstation user, setting a specific NVIDIA GPU for OpenGL rendering can be done here.
- Find Open GL Rendering GPU in the Nvidia Control Panel settings.
- Click the drop-down menu, and then select the GPU of choice.
- When done, click on Apply.
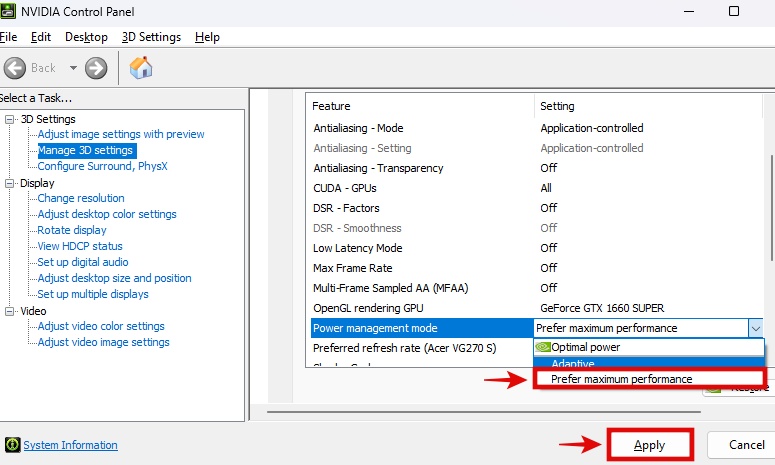
8. Power Management Mode
Usually, this is set to the ‘Adaptive’ setting, which is actually recommended for most people as the GPU will have lower temperatures and adapt to whatever you’re doing. Although, changing it could provide some performance benefits. To be sure if your GPU temperatures are in check, do check out this guide.
- Find the ‘Power Management Mode‘
- Click on the drop-down menu and select the ‘Prefer Maximum Performance‘ option.
- When done, click on Apply.
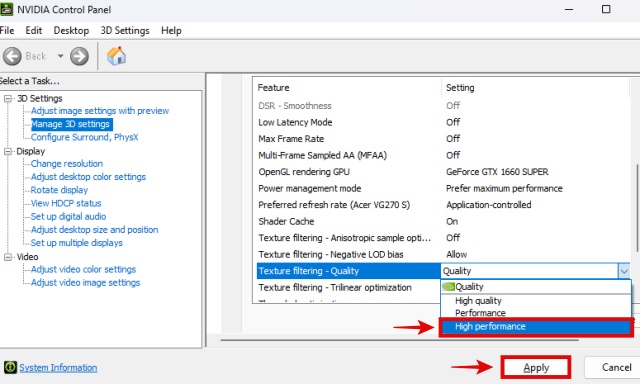
9. Texture Filtering – Quality
Texture Filtering reduces blurriness, gives better quality, and reduces visual artifacts. Let’s look at how to adjust this setting in the NVIDIA Control Panel:
- Find Texture Filtering – Quality in the settings. Click on the drop-down menu.
- If you want to maximize your performance on a low-end PC, then set it to High Performance. But if it’s a modern PC, then set it to High Quality for better visuals.
- Click on ‘Apply’ to save your changes.
10. Assign PhysX Engine to GPU
Furthermore, it is recommended to set PhysX settings to the GPU for the best experience. In NVIDIA’s FAQ page, they specifically say that “PhysX runs faster and will deliver more realism by running on the GPU,” so let’s see how we can change this.
- Go to the ‘Configure Surround, PhysX‘ tab to find this setting.
- Locate PhysX settings on the right-hand side. Here, click on the drop-down menu for selecting the processor.
- Select the NVIDIA GPU here which is installed on your system.
- When done, click on Apply to save the setting.

11. Change Resolution & Refresh Rate to Highest Available
- Under the Display section, click on ‘Change Resolution‘.
- Then, select the Display that you want to change the resolution and refresh rate for, by clicking on its respective Monitor icon. Only one will show up, unless you have multiple monitors.
- Under the Resolution section, select the highest resolution available.
- Also, set the monitor’s refresh rate by clicking on the drop-down menu under the Refresh Rate section, and selecting the highest available.
- Click on ‘Apply‘ in the Nvidia Control Panel settings.
If you know about your monitor’s refresh rate, but it doesn’t show up here, follow our guide on changing the refresh rate in Windows.
12. Adjust Desktop Color Settings
- Select the Primary Monitor from above, by clicking on the display which you use to play games.
- Under ‘Apply the following enhancements‘, find the ‘Digital Vibrancy‘ slider.
- Start adjusting the slider. At 75%, I find the colors to be more vibrant, but not too saturated so as to make the colors ‘blow up’, as in becoming too saturated. Depending on how things look on your monitor, you can set this setting higher or lower, based on your preference.
- Click ‘Apply‘ to save the changes.
13. Enable GSync For Smoother Gaming
If your monitor supports NVIDIA GSync, or even AMD Freesync, you should turn this setting on. NVIDIA had an update in the past which enabled many Freesync monitors to support GSync technology on its NVIDIA GPUs. Enabling GSync will make things look a lot smoother while gaming, as your monitor will dynamically adjust its refresh rate with the real-time FPS of the game. This reduces tearing. Check out detailed GSync vs Freesync comparison to know more.
That said, here is how you can enable GSync in NVIDIA Control Panel settings:
- Click on the Setup G-SYNC option.
- Click on the tick-box next to ‘Enable G-SYNC, G-SYNC Compatible‘
- Then, select a specific display, if needed.
- Click on the tick-box next to ‘Enable settings for the selected display model‘ as well.
- Lastly, click on Apply. Your monitor will flash, and then GSync will be enabled.
Frequently Asked Questions
Ensure that the highest performance power plan is selected under Battery settings of Windows.
For the best quality, you should configure different 3D settings such as for Anisotropic Filtering, Antialiasing (AA) mode, and Image Scaling to the ‘Quality’ settings.
Set your quality preference to ‘Performance’ instead, under ‘Adjust Settings with Image Preview’. Then set different 3D Settings under ‘Manage 3D Settings’ to the ‘Performance’ setting. Also, lower the graphical quality in your games to increase FPS.


 Beebom Staff
 Beebom Staff
 Beebom Staff
 Satyam Kumar
 Satyam Kumar
 Beebom Staff
 Beebom Staff

Fun fact guys none of those settings actually do anything on any “modern games” .. Nvidia control panel settings stop being relevant around 2010
Define “modern GPU”,
rtx’s, sped.