


Whenever the need to share files between Apple devices including iPhone, iPad, and Mac arises, I always count on AirDrop to get the job done without any fuss. Apart from making the entire sharing process seamless, it also ensures there is no loss of quality. Barring a few rare occasions, AirDrop works quite reliably in transferring files faster and with the desired security. That said, a small number of iPhone and Mac users have reported that AirDrop is ill-functioning ever since they upgraded to iOS 17 and macOS 14. If you are also one of them, look no further than these 12 best tips to fix AirDrop not working issues in iOS 17 and macOS Sonoma.
We have a more recent article that will be of more help to you. Check it out here.
1. Make Sure your Devices are Awake
If you’re facing AirDrop issues on iOS 17, iPadOS 17, or macOS Sonoma, make certain that your devices are powered on and the display is awake. We are saying this because if the devices are in sleep mode or the display is locked, people might not see your devices in their AirDrop devices list. As a result, you won’t receive any files. Also, if your AirDrop is stuck waiting, ask the other person to double-check that his device is unlocked with the display up.
2. Keep the devices in close proximity
It’s worth knowing that on modern devices, Bluetooth works within a range of 33 feet (10 meters). So, if AirDrop isn’t working or iOS 17 or macOS Sonoma, bring the devices closer and make sure they are within the acceptable range. If they are placed quite far, you won’t be able to discover the other device or AirDrop files between them.
3. Turn Off/On Bluetooth/Wi-Fi
As Bluetooth and Wi-Fi have a key role to play in helping AirDrop work consistently, make sure these important cogs are working well. One of the easiest ways you can fix the inconsistency of Bluetooth and Wi-Fi is by turning them off/on.


Bring Up the control center on your iPhone or iPad and tap on the Bluetooth and Wi-Fi icons to turn them off. Now, wait for some time and then turn them on. Also, try turning off/on Airplane Mode to reset connections.
On your Mac, open the Control Center from the top-right corner and click on Wi-Fi and Bluetooth icons in the Menu bar. Turn them off and wait for a few seconds. Then, turn ON both Wi-Fi and Bluetooth.
Now, try AirDropping any file or image to check if the problem is gone.
4. Disable Personal Hotspot to Free Up the Bluetooth and Wi-Fi Connections
Another thing you should do without any failure is to make sure the personal hotspot is disabled on both devices. As it prevents Wi-Fi and Bluetooth from working normally, ensure that it is turned off.
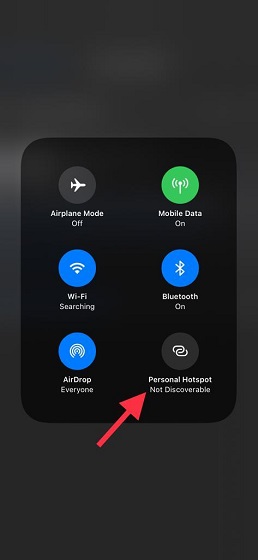
On your iPhone or iPad: Swipe up from the bottom or swipe down from the top right corner of the screen to bring the control center. Now, long-press the four-icon platter. Then, make sure the button for Personal Hotspot is turned off.
5. Disable Do Not Disturb Mode
Be sure Do Not Disturb mode is not trying to block the path of AirDrop. Believe it or not, DND has the tendency of preventing AirDrop from working normally. So, turn off Do Not Disturb on both the devices and try to transfer files again.

On your iPhone and iPad with Face ID: Swipe down from the top right corner of the screen. Then, tap on the crescent moon icon to disable Do Not Disturb mode on your device.
On your iPhone and iPad with Touch ID: Swipe up from the bottom to access Control Center and then hit the crescent moon icon to turn off DND.
On Mac: When DND is enabled, a titled partial moon icon shows up in the menu. You can use this shortcut to quickly disable Do Not Disturb.
6. Force Quit the App and Try to Share Files Again
Many a time, I’m able to fix AirDrop issues on iOS or macOS by just force-quitting the app and starting the sharing process again. So, try out this simple yet effective trick to see if it solves the problem.
On your iPhone/iPad with Face ID: Swipe up from the home bar and then hold in the middle of the screen. After that, swipe up the app card to quit the app (which files you are trying to share).
On your iPhone/iPad with Touch ID: Double press the Home button to bring up the app switcher and then swipe up on the app card to quit the app.
On your Mac: Click on the Apple menu at the top left corner of the screen and choose Force Quit. Now, select the app which files you are trying to share. And then, hit Force Quit.
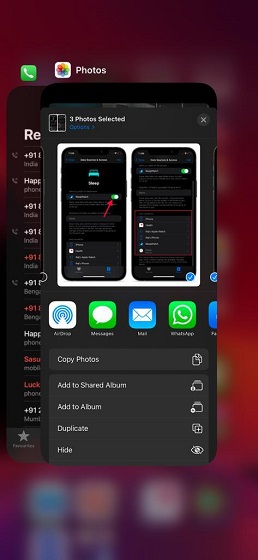
Now, head into the app and select the files you want to share, and then hit the Share button. After that, select the contact/person with whom you want to share the files. If the files are sent/received swiftly, you are good to go.
7. Switch to Everyone to Prevent Any Chance of Contact Mismatch
Both macOS and iOS allow sharing files between contacts only to prevent any foul play. While it’s a well-thought-out feature, at times it tends to create contacts mismatch. Therefore, ensure that your devices are discoverable by everyone.
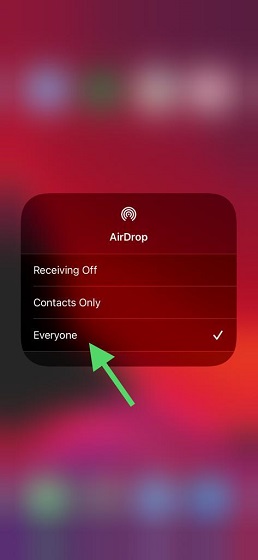
On your iPhone/iPad: Swipe down from the top right corner of the screen or swipe up from the bottom of the screen to access the control center. Then, touch and hold the four-icon platter at the top left corner to expand it. After that, tap on the AirDrop icon and choose Everyone.
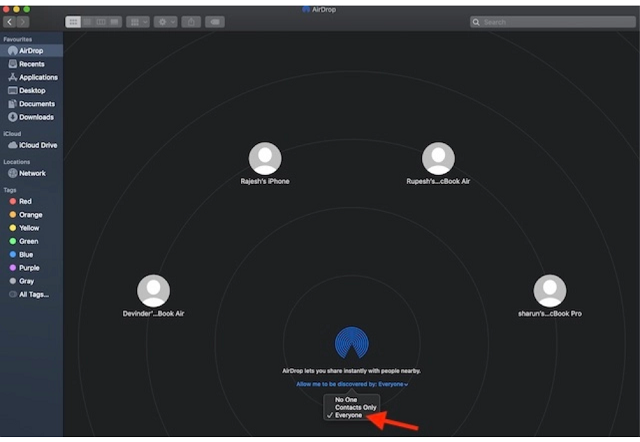
On Your Mac: Choose AirDrop in the sidebar of a Finder window. After that, click on the drop-down arrow located right next to “Allow me to be discovered by and then select Everyone.

8. Reset Network Settings
If AirDrop is still not working on your iPhone or iPad, try resetting the network settings. If the problem is due to network-related issues, you can fix it by putting the network settings to factory default.
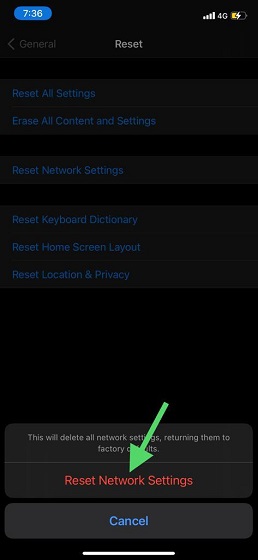
Go to Settings app on your iOS/iPadOS device -> General -> Reset -> Reset Network Settings. Then, enter your device passcode and tap on Reset Network Settings again to confirm the action.
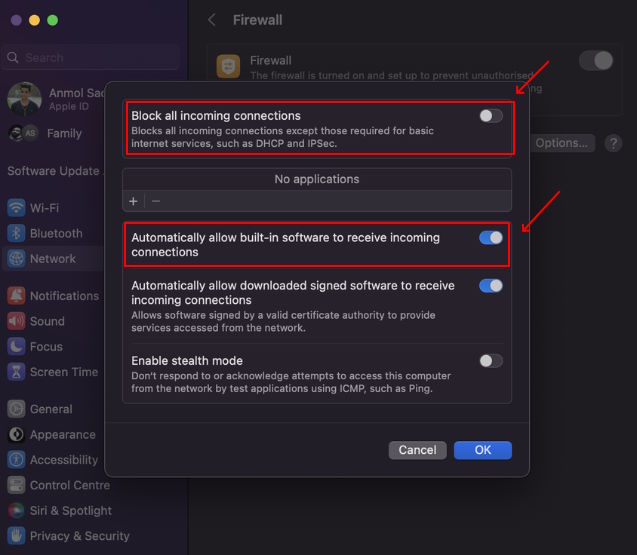
9. Disable “Block All Incoming Communications”
“Firewall” comes with a security feature that enables you to block all incoming communications except those needed for basic internet services such as Bonjour and IPSec. If you have turned it on, chances are pretty high that it’s playing the spoilsport by preventing AirDrop from working normally. Well, the good thing is you can turn off this security feature without having to disable the Firewall on your Mac.
To do disable this security feature, go to Apple menu at the top left corner of the screen and choose System Settings. Next, click on Networks and choose the Firewall tab. After that, click Options and deselect “Block all incoming connections.” Also, enable “Automatically allow built-in software to receive incoming connections.”

10. Reset All Bluetooth Connections
For smooth functioning, macOS stores all the known Bluetooth connections in a separate file. And when you eliminate the stored connections, Mac is forced to gather new Bluetooth connections.
Whenever I face stubborn Bluetooth issues on Mac, I reset all Bluetooth connections. More often than not, it helps me solve Bluetooth-related problems. The reason why I’m suggesting you try this solution is that Bluetooth plays a key role in helping AirDrop work efficiently. If it is not working, AirDrop gets affected.
To get going, click on the Bluetooth icon in the status bar and then turn off Bluetooth Off. Next, open the Finder window and choose the Go menu. Next up, select Go to Folder and then paste the mentioned path and hit Enter.
/Library/Preferences/


Now, find the “com.apple.Bluetooth.plist” and delete it. After that, turn on Bluetooth and then try to share files using AirDrop.
11. Use Terminal Command to Kill Bluetooth
Terminal commands are super handy for not just unlocking a ton of hidden features but also troubleshooting complex issues. And guess what, there is a pretty reliable command for Bluetooth-related issues as well.
So, just in case AirDrop is unable to work on your Mac running macOS Monterey or later, you can use Terminal Command to kill Bluetooth, which will force Bluetooth connections to start afresh. In most cases, it resolves transfer and visibility issues of AirDrop.
To do so, open the Terminal window and paste the following command.
sudo pkill bluetoothd
Now, enter your admin password and hit Enter. Next, allow the service to restart which will result in the removal of all the Bluetooth connections that are open.
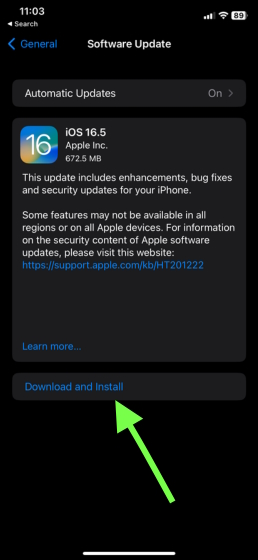
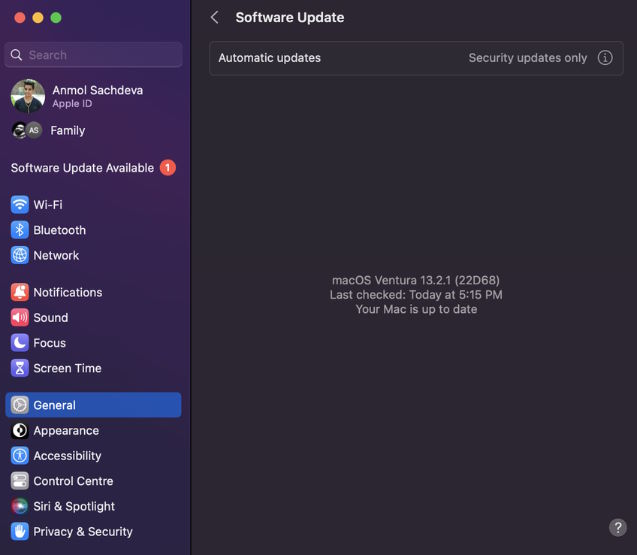
12. Update Software on Your iPhone/iPad, and Mac
Software update often proves to be the right answer to random issues or the annoying bugs that most of us find hard to explain. As Apple keeps refining software with plenty of under the hood performance enhancements and bug fixes (it’s altogether another matter that bugs keep cropping up despite all the tireless efforts put in by the Cupertino), it’s better to upgrade the device to the latest software version rather than stay back to the outdated software.
On iOS/iPadOS: Head into the Settings -> General. Now, tap on Software Update and then go through the usual process to download and install the latest version.
On macOS: Open Apple Menu -> General -> System Preferences > Software Update. Now, download and install the latest version of macOS.
After the software update, check if you have got the better of AirDrop issues.
Frequently Asked Questions
If your AirDrop isn’t working from iPhone to Mac, try the following:
1. Make sure your Mac is powered ON with the screen up.
2. Enable AirDrop for Everyone on your Mac.
3. Check Mac’s Firewall settings and deselect “Block All Incoming Connections”.
Software glitches, devices tuned OFF or screen locked, older software versions, Wi-Fi issues, and Bluetooth not working are some of the common reasons why your AirDrop is stuck waiting.


Resetting the network settings clears all of your saved passwords for every network you’ve connected to. I refuse to do that do to my job. I’ve always been told to do that by Apples support team and the problem has always been fixed on its own or by another method. It’s the tech support first or second go to thing and they usually say they they can’t help you if you don’t do it. Apple needs to allow us to back up our passwords.