


Like it or hate it, iTunes is one of the most popular media players and digital stores in the world. As a media player, iTunes does its job well. But that doesn’t mean it can’t be improved. There are several things that you can do to improve it. Here are some of the coolest tips and tricks to enhance iTunes.
Navigate Faster and Easier with iTunes Keyboard Shortcuts
Graphical User Interface (GUI) with its point and click interface is user-friendly and probably one of the most significant breakthroughs in computer technology. But it can’t beat the speed of getting around using the keyboard. That’s why many applications still preserve their keyboard shortcuts, and iTunes is no different.
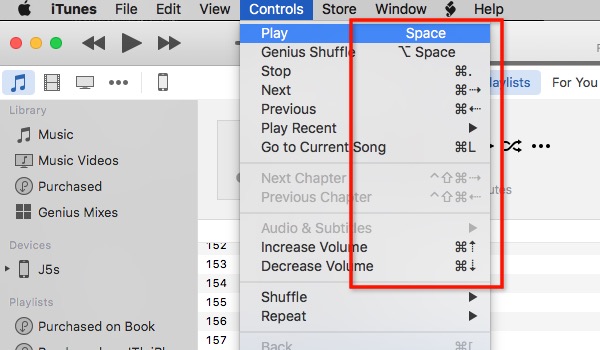
There are several basic iTunes shortcut key combinations that you would want to memorize. They are:
- Playback
- Play/Pause – Space
- Stop – Command + Period (.)
- Next/Previous – Command + Right/Left Arrow
- Volume Up/Down – Command + Up/Down Arrow
- Show Equalizer – Command + Option + E
- Switch to Mini Player – Command + Shift + M
- Navigation
- Go to Music – Command + 1
- Go to Movies – Command + 2
- Go to TV Shows – Command + 3
- Go to Apps – Command + 7
- Others
- Get Info (of selected item) – Command + I
- Show in Finder (of selected item) – Command + Shift + R
- Add to Library – Command + O
If you want to dive deeper into shortcuts, you can install Cheat Sheet (free). This little app will appear when you hold the Command button and show you all the available shortcut key combinations.
Improve Sound Quality in iTunes
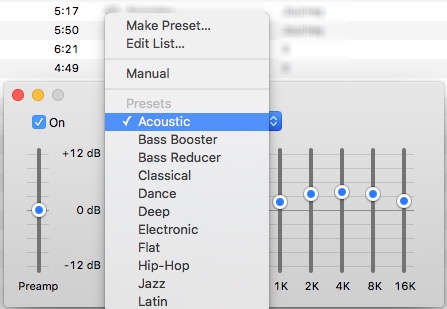
While the iTunes sound is only as good as your speaker/headset/earphone, it doesn’t mean that we can’t improve the quality internally. The most obvious method that we can do is to use iTunes built-in equalizer. Open it by going to Window – Equalizer menu or use Command + Option + E.
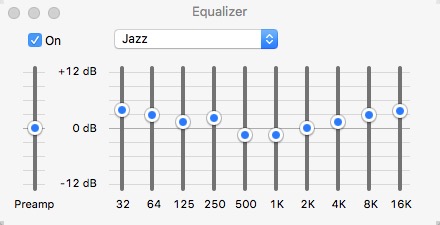
Check the On box to activate it, and choose one of the pre-setting sounds. If you want to be more adventurous, you can set each frequency channel manually.
But if you wish to improve the overall sound quality of your Mac, you can use an application called Boom 2 (US$ 14.99). The app will analyze your system and set the best sound setting for it, but there are other pre-set sound options. You can add sound effects, and you can also control the system volume. They have a 7-day free trial if you want to dip your toes into the water first.
Automatically Add Songs from External Source
Not all the songs you have in your iTunes library come from the iTunes store. Some of them you rip from your CD collections, some are the legacy of the ancient time before iTunes store. And there are also “other” sources.
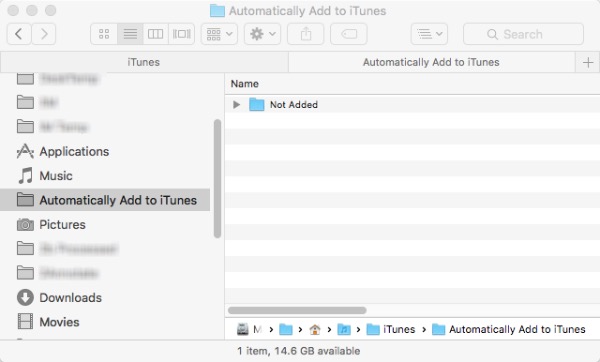
To add those items to your iTunes library, you can use File – Add to Library menu (Command + O). But the easiest way is to use Automatically Add to iTunes folder.
If you browse to the iTunes folder (HD_name > Users > Your_Name > Music > iTunes) you can find a folder name Automatically Add to iTunes. Any compatible media file that you put in the folder will automatically be added to iTunes library.
You can add the folder to Finder left sidebar by dragging and dropping. Having the folder shortcut ready in the sidebar will help you adding a boatload of media to the library. Just drag and drop them to the sidebar shortcut.
You can take the automation one step further by setting up Hazel rules to scan folders for media files and move them to the “Automatically Add…” folder, and all the process will work on its own. We have discussed Hazel before, so please refer to the article for more information.
Automatically Search and Add Lyrics
For some of us, song lyrics play an integral part of the music experience. Unfortunately, manually adding lyrics to the songs is not the favorite way to spend your spare time. Especially if you have thousands of songs in your library.
Let me illustrate the process: you search for the lyrics, copy the text, open iTunes, find the song, open the song info, choose the Lyrics tab, paste the text, and click OK to finish. That’s for one song. Try to repeat those steps thousands of times.
And it doesn’t stop there. To view the lyric, you have to go through a similar process, minus the copy and paste.
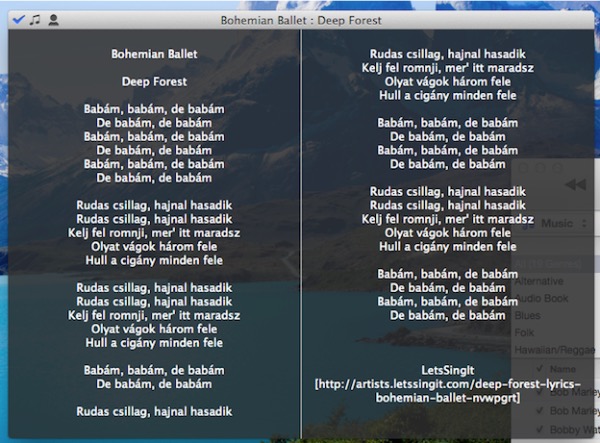
The easier way is to use Singer Song Reader (free). This little app will automatically search, add, and display lyrics to the currently played song in iTunes. If the song has already got lyrics, the app will only display it. All you have to do is open the app and let it run while you play your iTunes library. The app will handle the rest. Internet connection is required. You can also add lyrics in bulk for selected songs if you want to.
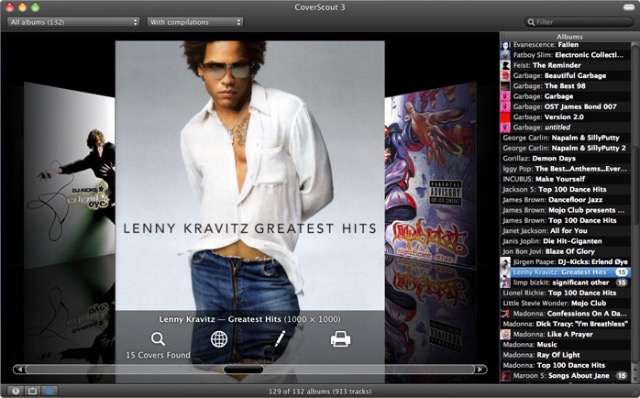
Add Missing Cover Album Art
Another annoying problem of adding songs from external sources is the fact that not every song/album has cover album art. Again, adding them manually is possible but not recommended. The process is similar to adding song lyrics, but you pick the Artwork tab instead of Lyrics.
The app that can help you in this department is Cover Scout (about US$ 39). The app will scan your iTunes library for songs with missing cover album art, and it will search the internet for related album art images based on the song data, and you can choose the perfect ones to add to the songs or let the app do it automatically.
For older OS X, there’s the free alternative called Album Artwork Assistant. In my experiment, it still works with the latest version of OS X. But the app hasn’t been updated for a long time. Unfortunately, I can’t find the developer site. But you still can download the app from several software download sites. Just do a quick Google search and you will find the app.
Star Ratings and Smart Playlists
Not many people give star ratings to the songs. Because in a quick glance, the rating serves no other purpose than showing how much we like a song. Some people might give ratings to few of the songs in their library. But if you have thousands of songs, nobody can find time to rate them all. The pain of the process defeats the gain on all front.
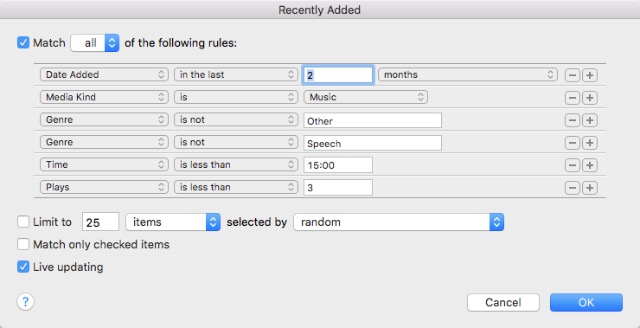
Actually, star rating system can be useful for creating and maintaining Smart Playlist. It’s a playlist that will automatically adjust its content based on rules that you set. For example you want to create a playlist that contains only Jazz songs that you like, you will set the filter to Genre: Jazz and Rating: five stars.
You can create Smart Playlist by going to File – New – Smart Playlist menu (Command + Option + N). Then start adding rules to customize your list. The example below shows a smart playlist that I created to contain only new songs that I added in the last two months and have been played less than three times. Whenever I want to check out new songs that I have, I open this playlist.
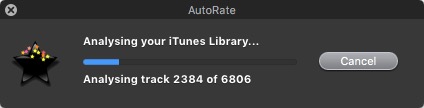
And how do you add star ratings automatically? You can use an oldies but goodies small app called AutoRate (free). When the app run, it will analyze your library, compare all the songs, and automatically give star ratings to songs based on the number of play each song has and the skip rate. So, the more often you play a song, the higher the star it will get.
This method is not perfect; it assumes that you will play the songs that you like more frequently than the songs that you don’t like and will skip the ones that you don’t like more. It doesn’t count the possibilities that sometimes people just play any song and leave iTunes to continuous playing just for the sake of having music in the background, even when they sleep. But this method might be the closest to perfection considering you don’t have to do anything but let the app runs in the background.
Similar to Album Art Assistant, the developer page for the app is already nowhere to be found, but you still can find and download the app from various download sites by doing a quick search. The app is still working fine with the latest version of OS X El Capitan.
Remote Control iTunes Using iPhone or iPad
You had your friends coming over, and everybody was having a great conversation. Suddenly one friend said that the song played in the background was his/her favorite and ask you to turn the volume up. You reach your phone and set the volume louder remotely. How cool is that?
Apple created a simple iOS app called Remote (free) that can do exactly that. It turns your iOS devices into a remote control for iTunes or Apple TV. The only requirement for the app to work is that all devices should be connected to the same WiFi network.
Or, if you use Boom 2 to enhance your Mac sound, you can also use iOS app called Boom 2 Remote (free) to do more or less the same thing. But in addition to iTunes play, this app also control global equalizers and sound effects; and applicable to other media players such as VLC, Quicktime, and Spotify.

SEE ALSO: Top 6 Apps to Unlock Your Mac with iPhone
These seven tips and tricks barely scratch the surface, but I think they are cool enough to start tinkering with iTunes. Do you have other iTunes tips and tricks that you can share? Please use the comment below.


 Akshay Gangwar

 Abubakar Mohammed

 Kanika Gogia

 Anmol Sachdeva
 Abubakar Mohammed
 Abubakar Mohammed
 Arjun Sha
 Abubakar Mohammed
