


Android 7.0 aka Nougat has been out for quite some time, now, and it is looking like a good update so far. However, if you’re not using a Nexus device such as the Nexus 5X, or the Google Pixel, and Pixel XL, you probably didn’t get the update. If you like using the latest and greatest that Google has to offer, then don’t fret. We will tell you how you can install Android Nougat on almost any Android smartphone.
Note:
Installing Android Nougat requires an unlocked bootloader or root access, and a custom recovery (TWRP, or CWM). Make sure you have unlocked your device’s bootloader before attempting to install Android Nougat. Many manufacturers offer the steps to unlock bootloaders officially, so you should check that out. If not, you will always find the steps for your device on XDA. Also, flashing custom ROMs can result in data loss, as well as bricking your device if you take a wrong step, so make sure you understand the risks, and keep a backup of your data. We will not be responsible if you end up bricking your device, or anything.
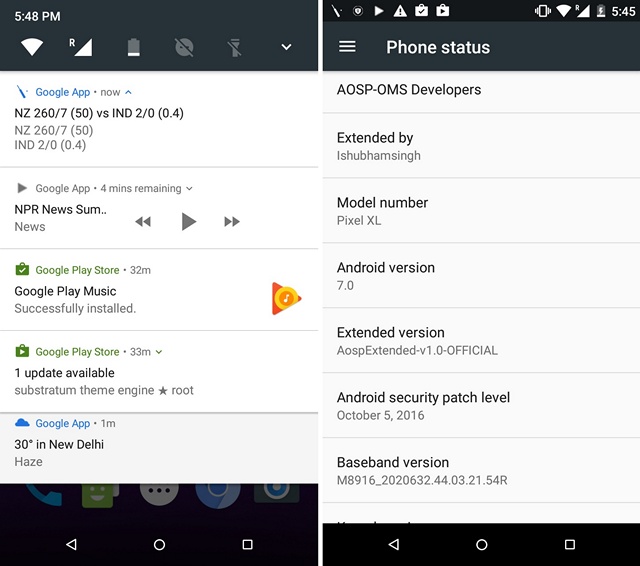
We have installed Android Nougat 7.0 on our Moto G3. You can look for your device specific ROM on XDA Developers, and follow the guide.
Getting the Custom ROM
Custom ROMs are nothing but custom builds of Android’s Source Code that Google makes publicly available. Custom ROMs are built specific to each device, and should only be used with the devices they are meant for. XDA Developers is the best place to look for custom ROMs for your Android device.
XDA Developers maintains a page with all the Android Nougat ROMs for various popular devices. You can check it out here. You can also check out the Unofficial Cyanogenmod page to see if they have a ROM for your device. If your device does have an Android Nougat custom ROM, download it but do make sure to check if there are any major bugs.
We are using a custom ROM called AOSPExtended, that has been built for the Moto G3, by ishubhamsingh.
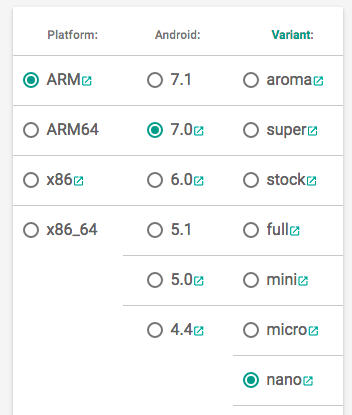
While downloading a ROM from XDA Developers, always make sure you download the appropriate GApps package, as well. In this case we will be downloading the GApps Nano package for Android 7.0, on the ARM architecture. Most Android devices feature an ARM chipset but you should check out, just to be sure.
Once you have downloaded both the ROM, and the GApps package for your device, you will have to transfer them to your phone, so you can “flash” them. You can use ADB for this, or you can simply connect your Android smartphone to your PC, and copy the files. You can even mount your smartphone through the custom recovery you’ve installed and then copy the files.
Flashing the ROM
Once you have copied all the files onto your device, you can proceed to flashing both the ROM, and GApps. Turn your device off, and then boot into recovery mode. This is usually done by pressing and holding the power and volume up buttons together. Once you get to the custom recovery (we have TWRP on our Moto G3), you can follow the steps below:
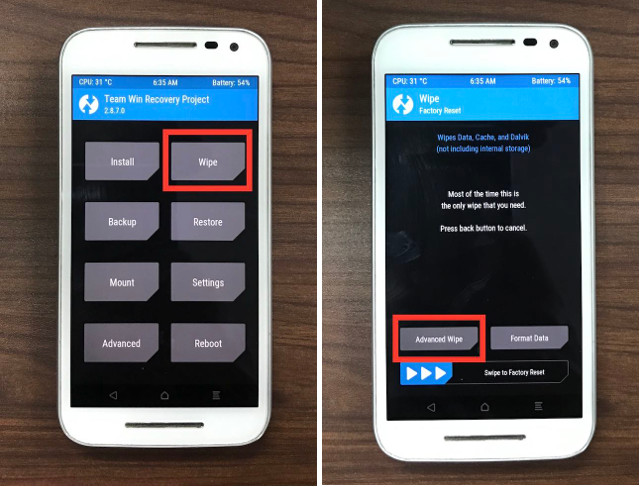
1. First, tap on “Wipe”, and then on “Advanced Wipe”.
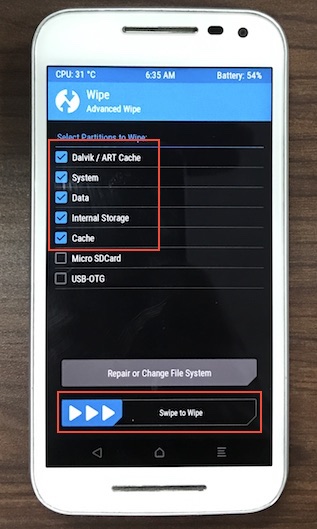
2. Select the partitions shown in the screenshot below, and then swipe to wipe.
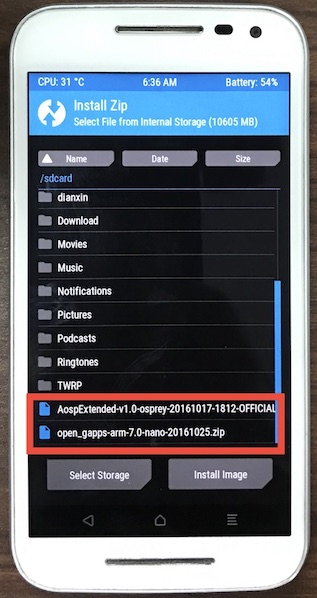
3. Once done, go to the TWRP homescreen, and tap on Install. Scroll down on the list, and tap on the ROM zip you downloaded from XDA.
4. Swipe to confirm the flash.

5. Now, select the GApps zip, and flash it in the same way.
6. You can now reboot your device. If your device takes long to boot up, don’t worry, it might do this on the first boot up after a ROM flash.
Once the device starts up, you’ll have to set it up, in the same way that you set up a new device. Once you have set up, you are all set to use Android Nougat on your Android smartphone.
Note: Custom ROMs might have some bugs (or a lot of them), make sure you read the “Known Issues” in the ROM’s thread properly and then make a decision regarding whether you can use it on your device or not. Also, if you are using an older recovery version, the options might be only slightly different, so you should be fine.
After you have installed the custom ROM, you can also get root access by flashing the superuser zip file. You can find the superuser zip file specific to your device from XDA. We’ll recommend you to root your device, as it brings access to a number of cool root-specific apps and some really great mods.
SEE ALSO: Android 7.1 Changes: What The New Update Brings?
Ready to install Android 7.1 on your device?
Custom ROMs are your best bet at getting Android Nougat working on your Android device, even if the manufacturer of your device is not ready to support it. Android Nougat brings with a host of features that will definitely help you use your device better. As always, if you face any issues or have any questions regarding the whole process of installing Android Nougat custom ROMs on your Android device, feel free to drop us a line in the comments section below. We’ll be happy to help.
Featured Image Courtesy: Flickr


 Arjun Sha
 Arjun Sha
 Arjun Sha
 Arjun Sha
 Sagnik Das Gupta
 Arjun Sha
 Anshuman Jain
 Arjun Sha
Anshuman Jain
Arjun Sha
Anshuman Jain

Hi,
I have a mobile swipe elite sense
Can i install the software in this device?
Hi i need help. I have Vivax Fly 4 ( android 7.0) and i can`t find custom rom.
hai…i installed as the above method….but play store doesnot respond it shows the error “your device not registerd with google” i cant signin into the google…
I can’t download lineage 14.1 OS or AOSPExtended or even Gapps. they are very slow to download even on fast internet and resulting in interrupted downloads in the process. What to do please help me.
“How to Install Android Nougat on Almost Any Android Device…”
Silly me, I thought this might help me to get a working version of Android onto a couple of tablets that have stopped working properly.
DUH, didn’t realize that “device” now means “phone”…